
CISS (continuous ink supply system) with their own hands.
I am sure that every person who uses an inkjet printer when the ink runs out of it thinks to himself: "Well! Again! Now change the cartridge again! I cleaned up the nozzles again! .. I'm tired already! .. "
Now the system of NPCs is widely used, or in the full version - the system of continuous supply of ink , when ink to printheads is not supplied from cartridges, but from rather capacious jars.
How is this system good?
There are several answers. We list:
- You will never have to change cartridges again !!!
- The volume of jars with ink is much larger than the volume of cartridges, so the system without refueling is enough for a very long period of time.
- For refilling, you just need to unscrew the cork with a tube from an empty jar and rearrange it with a new one - full.
- One branded cartridge costs almost an order of magnitude higher than a much larger jar of the same ink.
"But the most interesting plus is that such a system can be assembled at home, and this work will take about a couple of hours, of course, if you have the right tool, head on your shoulders, brain in your head, a couple of direct hands, and the main desire!
Actually, in this article I will tell you a story about how to assemble CISS independently.
So, to begin with, what we need:
From what should be
Scissors
Scotch
Glue "super-moment"
Flat screwdriver
Latex gloves
Newspapers
Syringes (you can one, but it is desirable by the number of colors in your printer)
Old used cartridges for your printer
From what you need to buy
Thin elastic, preferably transparent tubules (I took 3 mm outer diameter).
Bottles with paint (must be sold in computer stores).
Personally, I bought pipes in the market in the stall of radio components ... I took with reserve - five tubes of one and a half meter each. It cost me 50 rubles.
With paint I was lucky, because right next to the house in the supermarket opened a department that sells ink for printers. This is the most unprofitable part of the idea, because four bottles (for four colors) cost me 1,150 rubles. But I'm not particularly tense, because as one branded cartridge for my printer costs more!
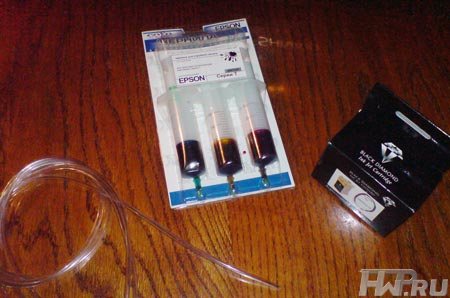
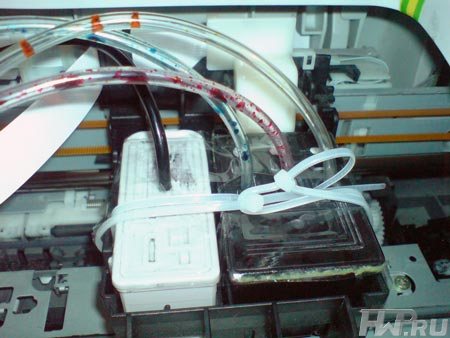
In the figure above: on the left of the tube, on the right color cartridge, on the center are old syringes for refilling the printer ...
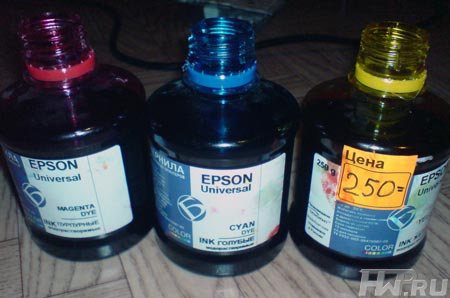
That's what jars of paint look like.
The process of manufacturing CISS
So, when everything is found and bought, the fun begins - the assembly process. In my example, I will experiment with a color cartridge for the EPSON Stylus C60 printer. So, the first thing to do is to wash the tubes under warm water with soap both outside and inside. Then they should be put on the battery so that they are completely dry and that the condensate evaporates from the inside.
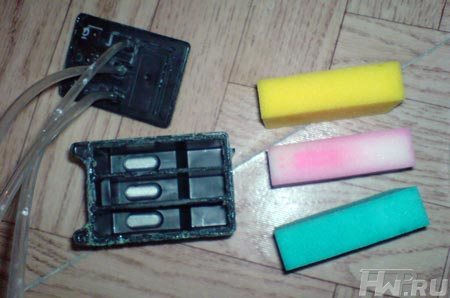
Next, if your cartridge is relatively new, i.e. If it still does not have dried ink, then IN NO EVENT SHALL IT DISCUSS !!!!!! Well, if he is already five years old, then we still do not understand it !! We put on rubber gloves, go to the bathroom and start using the syringe to run the water through the cartridge. To do this, pour the water into the syringe, insert the needle into the hole on the lid of the cartridge (any of the two hidden under the label) and inject it there. If the cartridge is branded, then you'll have to open a valve located in the window (not to confuse the accent !!!) with something like a very small screwdriver. And so several times until the color of the leaky liquid becomes pale. Well, of course, if you just pret-see what's inside the cartridge, please, but keep in mind that it will be very difficult to collect it back. If you have already dismantled it, then clean it completely, taking out the foam pads and rinsing them.
Attention!
Before disassembling, you must put on rubber gloves and put newspaper on the table, we do not want after work on the surface of the table, we had an unprecedented picture of Picasso! .. Although, to someone like! ..  Disassembling means removing the top cover of the cartridge. Remove it should be very careful not to damage the mounts. After disassembly and rinsing, all parts of the cartridge must be completely dried.
So, after drying, the next stage begins - sticking! Yes, now you have to poke the tubes into the fillings of the cartridge cover. A refill hole on EPSON cartridges is a hole in the middle of the cover. If the tube is too large, then we take some kind of a cross-shaped screwdriver and groove the hole thicker. Picking up until the tube does not start with difficulty, but climb into the hole.
We do this operation for each color. Now we insert the tubes. In principle, it does not matter how deep you push it, but I thrust it into 5mm somewhere. When inserted, very high-quality paste, to achieve tightness in these places.
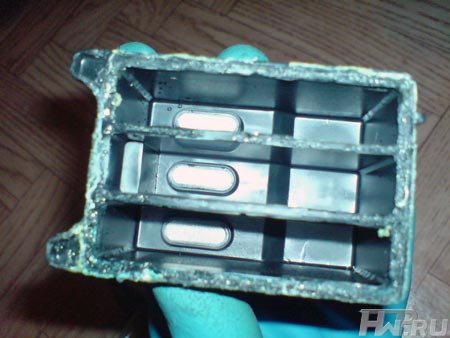
Now, if you disassemble the cartridge, take foam rubber, insert it in place and also very qualitatively stick the lid with the tubes to the cartridge ( CAUTION !!! If the cartridge is colored, then it must be glued so that each ink compartment is sealed, i.e. Put glue on top and on the partitions of the compartments.I did not immediately do this, and then I had to sort everything out!).

There should not be a single place from which air could be sucked, otherwise the system will not work! BUT, do not glue until the factory air ducts (these are such small holes, closer to the top of the cartridge cover). Wait until everything is completely dry. Now choose the desired length of tubes (I have about 60-70 cm) and cut off excess from the free ends. Now, we have a ready-to-start working part of the CISS.
We take the design, go to the printer, remove the clamp from the carriage and put the cartridge in its place, pasting it with adhesive tape, and better securing the clamp. It must stand to the death, i.e. Do not move at all.
Here begins the most dirty work. It is necessary to supply ink to the cartridge and at least partially fill the hose. To do this, take a syringe, suck ink into it and start pouring into the tube, after raising its end above the printer. ATTENTION! Do not mix colors !!! Otherwise, you have to do it all over again!
So, as soon as the ink began to fall into the cartridge on the tube, we close with a gag orifice, where the paint was just poured. As a plug, ordinary chewed chewing gum can come off. Just do not overdo it! Remember that then it will have to be removed from there and inside the tube there should not be a single piece of the plug. We do this for all the other tubes. As a result, I got three ink-filled tubes with chewing gums on the end. Now we take more chewing gum, or better some small rubber bands and close them with the holes of the air ducts, which I asked not to seal above. For reliability and tightness, we water the newly closed places with the same glue "moment".
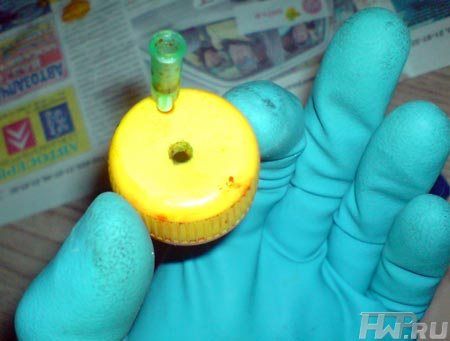
Now, well, now it remains to make two holes in the cover of each jar of ink (one for the tube, the second for the air) and, after removing the cud, insert the tubes into place, pushing them almost to the bottom of the jar. I advise you to make a hole for air as follows: take a needle from a syringe, pierce through the cork, and on top of this greenery plastic thing on the needle you shove a little foam, or just a small piece of napkin, as an air filter.
All! Work on the part of the assembly is completed. Now it's just vital to reset the chips of the cartridge. To do this, download the utility SSC Utility, which you can find at http://www.ssclg.com/epson.shtml. Next, install it, it should collapse into the tray. Then right click on the program icon in the tray and select "Reset counters -> reset all counters". All actions must be performed while the printer is on. After the window with the inscription "Made!" Appears, press "OK", turn off the printer for a couple of seconds and turn it on again. Must be reset.
Now it remains only to pump out the system by cleaning nozzles and print, print, print! .. By the way, now you can not skimp on cleaning! The ink is enough!
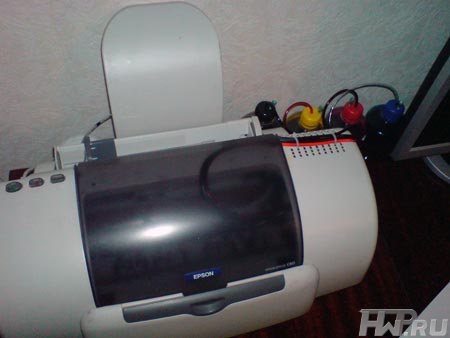
This is how my printer looks in the final version with a fully installed and tuned device:
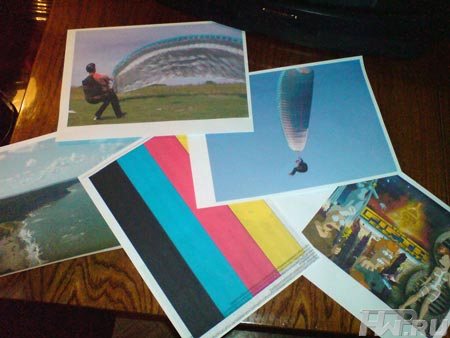
And here are the photos, pictures and test pages that were printed after the setup (there is a barely noticeable banding in the blue color, but it is easily eliminated when cleaning the heads):
PS I'm compelled, too, to write a little addition to the story ... I did my system without instructions and based only on the picture I saw on the web. So I made a lot of mistakes, which, I hope, thanks to this article, you will not allow. But, for reliability, I will once again clarify the mistakes I made :
1. I dismantled the color cartridge !!! It should not be worth it, because it was not possible to collect it back to me, good, there was another worker in the pantry !!
2. Most of the operations I did without gloves. As a result, I walked with colorful hands for about two weeks ...
Instead of chewing gum at first, I used, oddly enough, but my own language, for which I paid for the fact that I had a little blue ink. Do not do this, the ink is very tasteless!
3. When everything has already collected and expelled the air from the system with the help of head cleaning, I overdid it a little. The printer generally stopped working and became a plaintive warning window asking me to change its details !!! O_O After a short search on the network, I found that it was time to change the printer diaper (the block of gaskets where the ink spent during the cleaning operation is taken away). It is necessary, it turns out to be cleaned so diligently that this block was overfilled and the ink almost spilled over the edges !!! In general, I looked at this diaper and realized that it would not work like that, so I made a system of tapping ink not into a gasket, but into a separate jar ... But this is a separate story ... In short, do not clean the printer too much !!!
PPS It goes without saying that if you take on the creation of a similar device, you should be aware that after such experiments your printer may not survive, and you must prepare for this before starting work and convince yourself that the author of this article, those. I do not bear any responsibility for what you have done! But, let's hope that this does not happen, and your printer will get another life - a new, better life! =)
Good luck to you, in the manufacture of such a device, and simply, good luck!

Comments
When commenting on, remember that the content and tone of your message can hurt the feelings of real people, show respect and tolerance to your interlocutors even if you do not share their opinion, your behavior in the conditions of freedom of expression and anonymity provided by the Internet, changes Not only virtual, but also the real world. All comments are hidden from the index, spam is controlled.