
I present to your attention a detailed step-by-step guide on self-assembly of a self-made solar battery. This article is a free translation of Michael Davis about the construction of an inexpensive solar battery.
A couple of years ago I bought a remote site in Arizona. I'm an astronomer, and I needed a place away from major cities for astronomical observations. I found such a place. The problem is that because of the remoteness on the site there is no electricity supply. Well, actually for me it's not a problem. There is no electricity - there is no night illumination of the sky. Nevertheless, it is good to have at least some kind of power supply, because Life in the twenty-first century strongly depends on it.
I built a wind generator for electricity at home. It works well when the wind blows. Unfortunately, I need more energy. And this energy should be more stable. And then there is the feeling that I always have a wind blowing on the site, but not when I need energy. In Arizona, more than 300 sunny days per year, so the solar battery seems to be an obvious addition to the wind turbine. Unfortunately, solar panels are not expensive, so I decided to do it myself. I used the most common tools and inexpensive and common materials to make a solar battery with my own hands competing with commercial power samples, but leaving them no chance at a price.
So, what is a solar panel , the panel (SB)? Essentially, it is a container containing an array of solar cells. Solar cells, these are the things that actually do all the work of converting solar energy into electricity. Unfortunately, to get enough power for practical use, solar cells need a lot. Also, solar cells are VERY fragile. Therefore, they are united in the Security Council. The battery contains enough elements to get high power and protects the elements from damage. It does not sound too difficult. I'm sure I can do it myself.
I started my project, as usual, from searching the network for information on self-made satellites and was shocked at how little it was. The fact that few people made their own solar panels made me think that this should be very difficult. The idea was put on hold, but I never stopped thinking about it.
After a while, I came to the following conclusions:
- the main obstacle in the construction of the Security Council is the acquisition of solar cells for a reasonable price
- New solar cells are very expensive and difficult to find in normal quantities for any money
- Defective and damaged solar cells are available on eBay and other places much cheaper
- solar cells of the "second class" may be used to make a solar battery
When it dawned on me that I could use defective items to make my SAT, I got to work. Started with buying items on eBay.
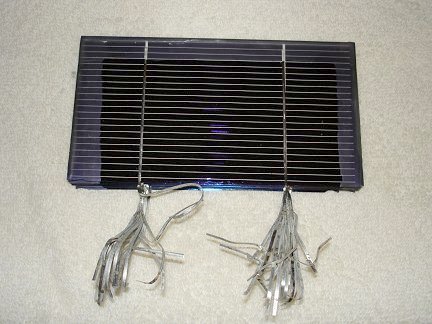
I bought several blocks of single-crystal solar cells measuring 3x6 inches. To make the SB, it is necessary to connect 36 such elements in series. Each element generates about 0.5V. 36 elements connected in series will give us about 18V, which will be sufficient to charge the batteries at 12V. (Yes, such a high voltage is really necessary for efficient charging of 12V batteries). Solar cells of this type are thin as paper, brittle and brittle like glass. They are very easy to damage.
The seller of these items dipped sets of 18 pcs. In the wax for stabilization and delivery without damage. Wax is a headache when it is removed. If you have the opportunity, look for items that are not covered with wax. But remember that they can get more damage during transportation. Notice that my elements already have soldered conductors. Look for items with soldered conductors. Even with such elements you need to be ready to work hard with a soldering iron. If you buy items without wires, prepare to work with a soldering iron for 2-3 times more. In short, it's better to overpay for the already soldered wires.
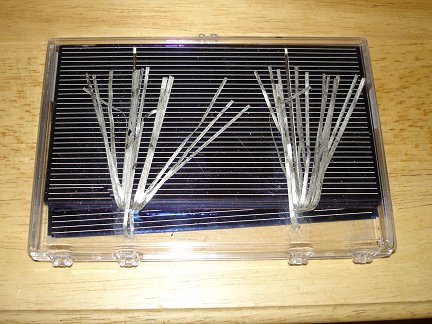
Also I bought a couple of sets of elements without waxing from another seller. These items came packed in a plastic box. They dangled in a box and pinched a little at the sides and corners. Minor chips do not matter much. They will not be able to reduce the cell's power enough to worry about it. The elements I bought should be enough to assemble two satellites. I know that maybe I'll break a couple when assembling, so I bought a little more.
Solar cells are sold in the widest range of shapes and sizes. You can use larger or smaller than my 3x6 inches. Just remember:
- Elements of the same type produce the same voltage regardless of their size. Therefore, to obtain a given voltage, the same number of elements will always be required.
- Large elements can generate a larger current, and smaller in size, respectively - a smaller current.
- The total power of your battery is defined as its voltage multiplied by the generated current.
Using large-sized elements will allow you to get more power at the same voltage, but the battery will get bigger and heavier. Using smaller elements will reduce and simplify the battery, but will not be able to provide the same power. It is also worth noting that the use of cells of different sizes in one battery is a bad idea. The reason is that the maximum current generated by your battery will be limited by the current of the smallest element, and the larger cells will not work at full power.
The solar cells on which I stopped the selection have a size of 3x6 inches and are capable of generating a current of about 3 amperes. I plan to connect in series 36 such elements to get a voltage slightly more than 18 volts. The result should be a battery capable of delivering power of about 60 watts in bright sunlight. It does not sound very impressive, but it's still better than nothing. At what, it's 60W every day, when the sun shines. This energy will go to charge the battery, which will be used to power fixtures and small equipment only a few hours after dark. Just when I go to sleep, my energy needs are reduced to zero. In short, 60 watts is enough, especially considering that I have a wind generator that also produces energy when the wind blows.
After you buy your solar cells, hide them in a safe place where they will not break, will not get children for games and will not be eaten by your dog until you are ready to install them in your SAT. Elements are very fragile. Rough handling will turn your expensive solar cells into small, shiny, shiny, and for nothing unusable fragments.
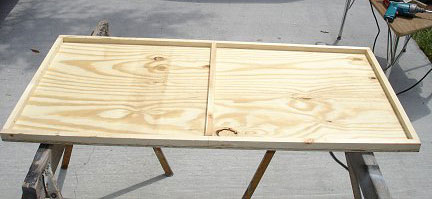
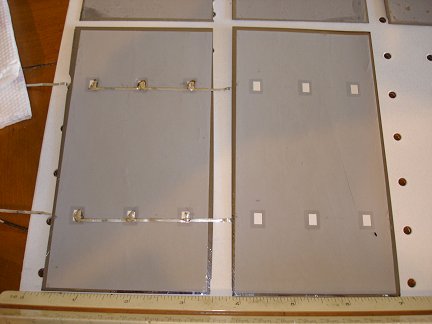
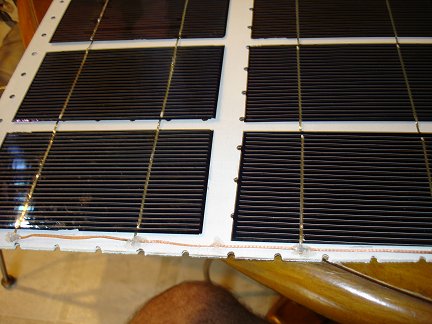
So, the solar battery is just a shallow box. I started with the construction of such a box. I made it shallow so that the sides do not obscure the solar elements when the sun is shining at an angle. It is made of 3/8 inch thick plywood with rails of 3/4 inch thick rails. The sides are glued and screwed into place. The battery will contain 36 items in the size 3х6 inches. I decided to divide them into two groups of 18 pcs. Just to make it easier to solder in the future. Hence the central lath in the middle of the box.
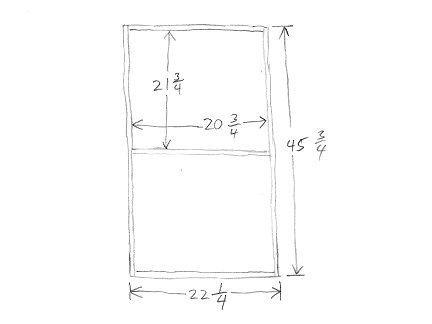
Here is a small sketch showing the size of my SAT. All sizes in inches (excuse me, fans of the metric system). Borders of 3/4 inch thick go around the entire sheet of plywood. The same rim goes in the center and divides the battery into two parts. In general, I decided to do so. But in principle, the size and overall design are not critical. You can freely vary everything in your sketch. Sizes here I drive to those people who are constantly whining that I included them in my sketches. I always encourage people to experiment and invent something of their own, rather than blindly follow the instructions written by me (or someone else). Perhaps you will get better.
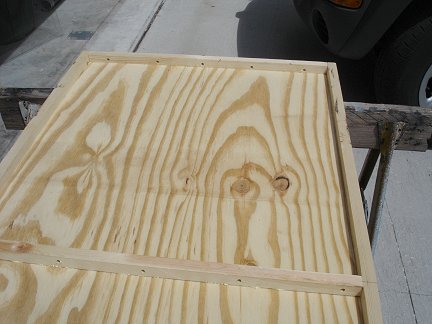
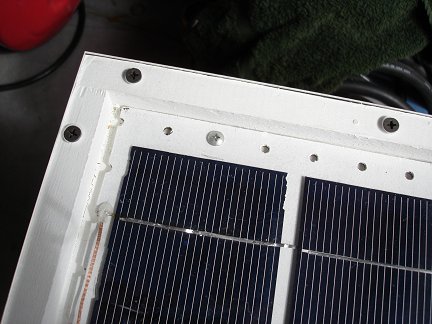
The view of one of the halves of my future battery. In this half, the first group of 18 elements will be placed. Note the small holes in the sides. This will be the bottom part of the battery (in the photo the top is at the bottom). These are air vents designed to equalize the air pressure inside and outside the SAT and serve to remove moisture. These holes should be just at the bottom of the battery, otherwise rain and dew will get inside. The same ventilation openings must be made in the central dividing bar.
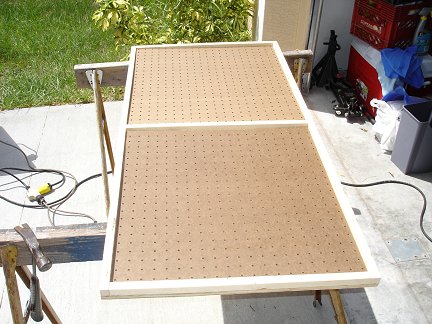
Next, I cut out two suitable pieces of fiberboard. They will serve as substrates for collecting solar cells. They should fit freely between the sides. It is not necessary to use perforated sheets of fiberboard, I just had such at hand. Any thin, hard and non-conductive material will go.

To protect the battery from weather troubles, the front side is closed with Plexiglas. These two pieces of plexiglas were cut out to cover the entire battery completely. I did not have one big enough piece. Glass can also be used, but the glass is beating. Hail, rocks and flying debris can break glass, and from plexiglass simply bounce. As you can see, the picture begins, how the solar battery will look as a result.
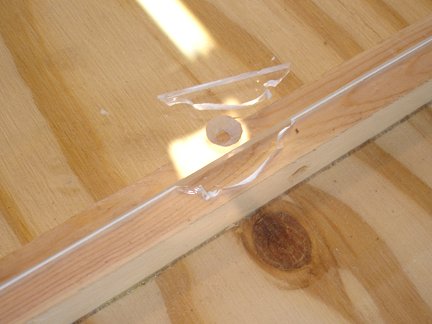
Oops! In the photo, two sheets of plexiglas joined on the central partition. I drilled holes around the edge to put plexiglass on the screws. Be careful when drilling holes near the edge of Plexiglas. You will crush heavily - it will break, which happened to me. In the end, I just stuck the broken piece off and drilled a new hole nearby.
After that, I painted all the wooden parts of the solar battery with several layers of paint to protect them from moisture and environmental influences. I painted the box inside and out. When choosing the type of paint and its color, a scientific approach was used. I shook all the paint from the leftovers in my garage and chose the jar in which the paint is enough to do all the work.

The substrates were also painted in several layers on both sides. Make sure that you have painted everything well, otherwise the tree can be shaken from moisture. And this can damage the solar cells that will be glued to the substrates.
Now that I have a basis for the SB, it's time to prepare the solar cells.
As I said before, removing wax from solar cells is a real headache. After a few trial and error, I still found a good way. But I still recommend buying items from someone who does not fill them with wax.
The first step is "bathing" in hot water to melt the wax and separate the elements from each other. Do not let the water boil, otherwise the bubbles of the steam will strongly beat the elements one by one. Boiling water can also be too hot, electrical contacts may be broken in the elements. I also recommend submerging items in cold water, and then slowly heating them to prevent uneven heating. Plastic forceps and a spatula will help separate the elements when the wax melts. Try not to pull strongly at the metal conductors - they can tear. I found this when I tried to share my elements. It's good that I bought them with a margin.
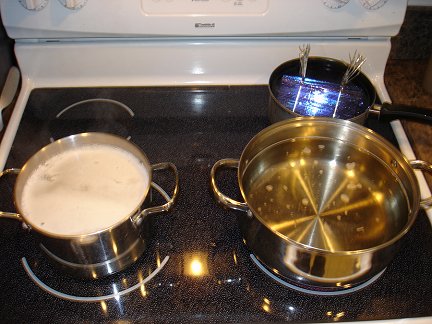
Here is the final version of the "installation" that I used. My friend asked me what I was cooking. Imagine her surprise when I answered: "Solar cells". The first "hot bath" for melting wax is in the background on the right. In the foreground on the left - hot soapy water, and on the right - pure hot water. Temperatures in all pans are below the boiling point of water. First, in a distant saucepan, melt the wax, transfer the elements one by one to soapy water to remove wax residues, and then rinse in clean water. We put the elements to dry on a towel. You can change soapy water and water for washing more often. Only do not discharge the used water into the sewer, as The wax will harden and clog the drain. This process removed almost all the wax from the solar cells. Only on some there were thin films, but this does not prevent soldering and work of the elements. Washing with a solvent may remove wax residues, but it can be dangerous and fetid.
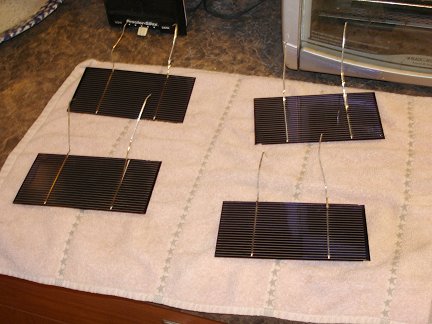
Several separated and purified solar cells are dried on a towel. After the separation and removal of protective wax because of their fragility, they have become surprisingly difficult to handle and store. I recommend leaving them in the wax until you are ready to install them in your SAT. This will allow you not to break them before you can use them. Therefore, build a battery base first. It's time for me to install them.
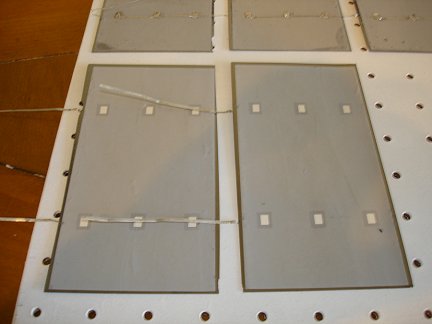
I started by drawing the mesh on each basis, to simplify the process of installing each element. Then I laid out the elements on this grid with the back side up, so they can be soldered together. All 18 elements for each half of the battery must be connected in series, after which both halves must also be connected in series to obtain the required voltage.
Soldering the elements among themselves is difficult at first, but I quickly got used to it. Start with only two elements. Place the connecting wires of one of them so that they cross the solder points on the back of the other. You also need to make sure that the distance between the elements corresponds to the markup.
I used a low-power soldering iron and a rod solder with a rosin core. Also, before soldering, I lubricated the soldering points on the elements with a special pencil. Do not press on the soldering iron! Elements are thin and fragile, push hard - break. I was sloppy a couple of times - I had to throw out a few elements.
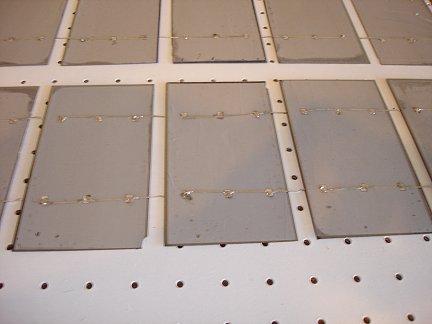
Repeat the soldering was necessary until it turned out a chain of 6 elements. I soldered the busbars from the broken elements to the back of the last element of the chain. I made three such chains, repeating the procedure twice more. There are 18 elements for the first half of the battery.
Three chains of elements must be connected in series. Therefore, the average chain is rotated 180 degrees relative to the other two. The orientation of the chains has turned out to be correct (the elements still lie back side up on the substrate). The next step is to glue the elements into place.
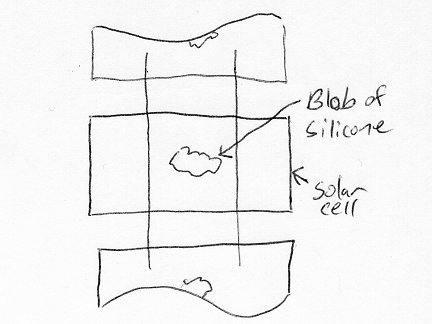
Bonding the elements will require some skill. Apply a small drop of silicone sealant in the center of each of the six elements of the same chain. After that, turn the chain face up and place the elements on the markings that were applied earlier. Gently press the elements, pressing in the center to glue them to the base. Complexities arise mainly when the flexible chain of elements is turned. The second pair of hands here does not hurt.
Do not apply too much glue and do not glue the elements anywhere except the center. Elements and the substrate on which they are mounted will expand, contract, bend and deform with varying temperature and humidity. If you glue an element over the entire area, it will eventually break down. Bonding only in the center allows the elements to freely deform separately from the base. Elements and the base can be deformed in different ways and the elements will not break.
Here's the fully assembled half of the battery. I used copper braid from the cable to connect the first and second chain of elements.
You can use special buses or even ordinary wires. Just at my fingertips was a copper braid from the cable. The same connection is made on the reverse side between the second and third chain of elements. I fixed the wire to the bottom of the sealant so that it does not "walk" or bend.

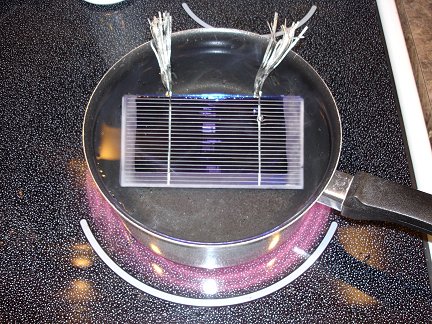
Test the first half of the solar battery in the sun. With a weak sun in the haze, this half generates 9.31V. Hooray! Working! Now I need to make another half of the same battery.
After both bases with elements are ready, I can install them into place in the prepared box and connect.
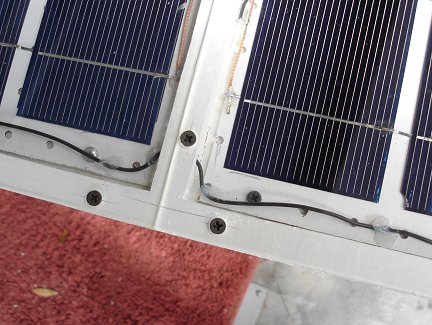
Each of the halves is placed in its place. I used 4 small screws to fix the base with the elements inside the battery.
The wire for connecting the halves of the battery I missed through one of the ventilation holes in the center ledge. Here, too, a couple of drops of sealant will help fix the wire in one place and prevent it from hanging inside the battery.
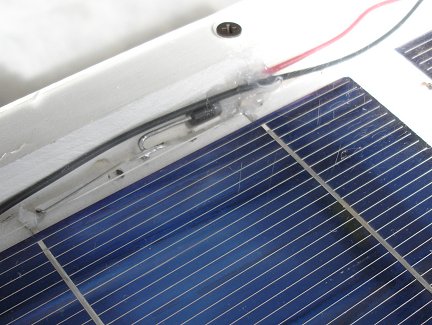
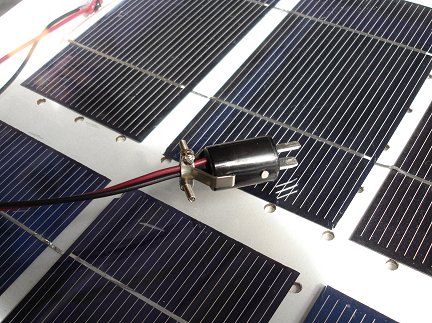
Each solar panel in the system must be equipped with a blocking diode connected in series with the battery. A diode is needed to prevent the discharge of batteries through the battery at night and in cloudy weather. I used a Schottky diode on 3.3A. The Schottky diodes have a much lower voltage drop than conventional diodes. Accordingly, there will be less power loss on the diode. I bought a set of 25 31DQ03 diodes on eBay for only a couple of bucks. I still have a lot of diodes for my future SAT.
First I planned to attach the diode on the outside of the battery. But after I looked at the technical characteristics of the diodes, I decided to put them inside the battery. For these diodes, the voltage drop decreases with increasing temperature. Inside my battery there is a high temperature, the diode will work more efficiently. We use some more silicone sealant to fix the diode.

I drilled a hole in the bottom of the battery closer to the top to pull the wires out. The wires are tied to a knot to prevent them from drawing out of the battery, and are secured with the same sealant.
It is important to allow the sealant to dry before we fix the plexiglass in place. I advise, relying on previous experience. Vapors from silicone can form a film on the inner surface of Plexiglas and elements, if you do not let the silicone dry out in the open air.
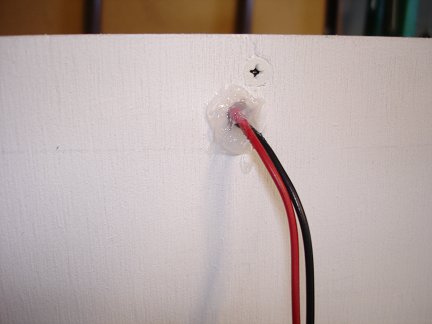
And a little more sealant to seal the outlet.
On the output wire I screwed the two-pin connector. The socket of this connector will be connected to the battery charge controller, which I use for my wind generator. Thus, the solar battery can work with it in parallel.
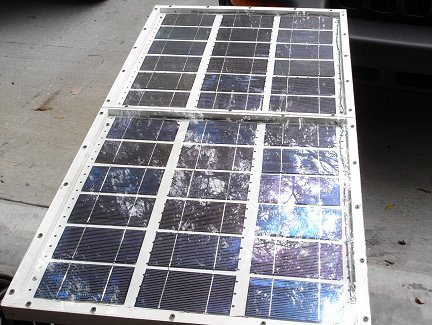
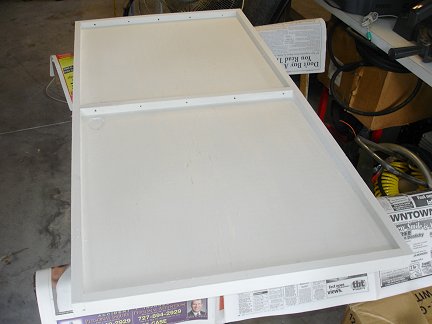
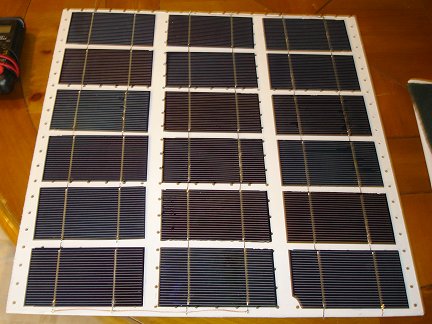
This is how the finished SB looks like with a screwed screen of Plexiglas. Plexiglass is not yet sealed. I did not first seal the joints. I did a little testing first. According to the test results, I needed access to the battery inside, there was a problem. I had contact on one of the elements. Maybe it was due to a temperature drop or due to inaccurate handling of the battery. Who knows? I disassembled the battery and replaced this damaged cell. Since then there have been no problems. In the future, perhaps, I seal the joints under plexiglass using a sealant or close them with an aluminum frame.
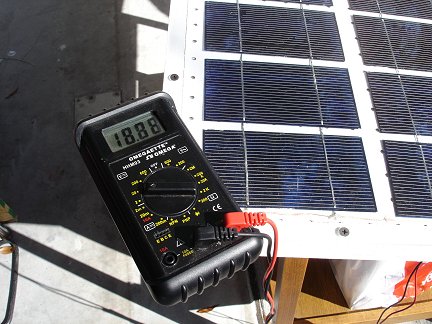
Here are the results of testing the voltage of the finished battery in a bright winter sun. The voltmeter shows 18.88V without load. This is exactly how I expected.
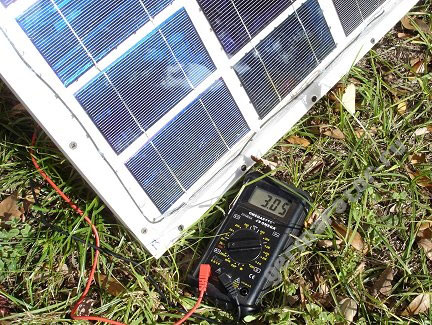
But the current test in the same conditions (a bright winter sun). Ammeter shows 3.05A - short-circuit current. This is just near the calculated current of the elements. The solar battery works great!
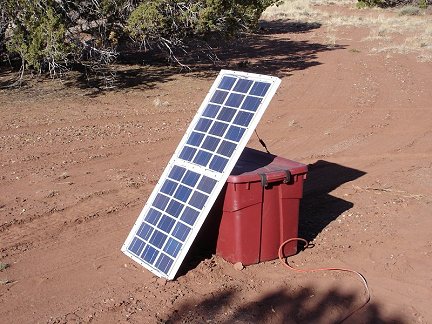
Solar battery in operation. I move it a couple of times a day to keep the orientation to the sun, but it's not that much of a challenge. Perhaps someday I will build an automatic system for tracking the sun.
 The proposed video collection will help you create your source of electrical and thermal energy by building yourself : |
So, how much did all this cost? I kept all the checks from all my purchases for this project. And of course there was a lot of things in my workshop. Any pieces of wood, wires and other useful things (someone will say garbage) are lying around my workshop. In short, a lot of things were already at hand. Therefore, your calculations may differ. Given that the cost of items purchased on eBay $ 74, the total cost of the solar panel cost $ 105.
Not so bad! This is only a small part of the cost of a serial SB of the same power. And it's very simple! I already have a plan to build a few more solar cells to increase power.

Comments
When commenting on, remember that the content and tone of your message can hurt the feelings of real people, show respect and tolerance to your interlocutors even if you do not share their opinion, your behavior in the conditions of freedom of expression and anonymity provided by the Internet, changes Not only virtual, but also the real world. All comments are hidden from the index, spam is controlled.