Manual for emergency opening of locks (Impression technique (indentation))

The technique of indentation - the possession of this method of hacking can speak about the professionalism of the burglar. Long and painstaking work associated with the gradual stitching of the super-file excess areas of key metal, part of which is responsible for secrets, this happens until the key will not become a copy of the native.
To the undoubted advantages, it should be attributed to the fact that you have a completely working duplicate, which you can easily open the lock next time. Lock picks of this effect do not give.
This text is a translation of English versions of the manual published in the network. (The author of the translation is Alexey Goncharenko, [email protected]).
Introduction
Knowledge and application of the indentation method is invaluable for emergency lock opening services. In contrast to the disassembly / burglary method, this method of indentation not only provides the opening of the lock, but also the production of the corresponding key. This means that the indentation method (key selection) is not only effective, but also very economical. These working materials on indentation technology are divided into three main groups:
- Locks with disc retainers (handrails)
- Locks with pin retainers
- Locks with cylinder and transverse bolt
All together forms the basis of the theory on technology, which is called IMPRESSIONAL TECHNIQUE (Dent technique).
Table of contents
- Introduction
- Basics of dent technique
- Markings / prints
- Preparing the key blank
- Rotation and pressing
- Types of keys
- Locks with cylinder - transverse bolt
- Concluding remarks
1 Basics of the technique of indentation
The theoretical side of technology.
First, the key blank is ready for use.
Processes:
- File surface processing
- File processing areas
- Edge file processing
- A - processing with a file of one edge (angle 45 °)
- B - processing with a double-edged file (with opposite angles of 45 °)
- C - Blackening / painting
Each of these methods is detailed in the chapter on the manufacture of a key blank.
The procedure for taking a print.
1. The key blank for the key blanking method is inserted into the channel of the lock cylinder. You should make sure that the disc is inserted into the cylinder as far as possible. Do not try too hard.
2.Press the key firmly with special tongs. Then it is necessary to firmly tighten the head of the key inserted into the cylinder with the tongs. For this, it is best to use special forceps. These tongs have soft sponges, so there can be no scratches on the disc. It should then be ensured that the jaws of the forceps are parallel to each other, since only in this case the greatest force is provided to hold the key blank.
3.Now, turn the key inserted into the cylinder to the right until it stops. At the same time, you should pay attention to the fact that too much force is not applied, as it is possible to break or bend the disc.
4.In conclusion, press the clamped pincer several times, press it upwards or, accordingly, downwards. Because only thanks to such movements on the disc there are noticeable prints.
5.After the next working cycle, turn the key inserted into the cylinder to the left as far as it will go. In doing so, you should also pay attention to the fact that too much effort is not applied, as it is possible to break or bend the disc.
6. Now you can take out the pig from the cylinder.
Your pig should be kept in the tongs during all work processes, that is, from preparing the blanks to the subsequent manufacture of the key. Only thus it is possible to provide feeling of a constancy of unification in a combination "a pig and tongs" and to avoid errors owing to uneven clamping of a pig.
The result of manipulation will lead to the fact that the pins of the cylinder left on the stick obvious marks of marks or prints.
Now the question arises, why do prints appear?
When the bar is inserted, the cylinder pins are pressed out to different heights. If the disc is rotated to the stop, it should be assumed that no cylinder is manufactured without production tolerances or can not be manufactured. One of these tolerances is the tolerance for drilling; That is, drilling for the pins with their centers are not strictly on the same line, but slightly offset from the middle line. It follows that the pins are locked at different times. Thanks to this, markings or prints appear either when turning to the right or to the left until it stops.
When the bar is rotated in the cylinder until it stops, the inner pins that are in the zone of the separation gap are locked in their position.
The contact between the pins of the core and the housing is created when the paper moves up and down. Markings and prints occur when moving up and down, rather than by rotating the blob, as is often assumed.
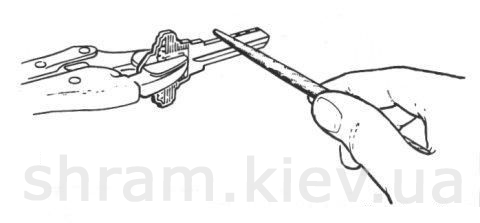
In places where markings and prints are visible, the file is later processed.
The above mentioned processes of obtaining marks and prints are repeated until the notches formed at the file processing at the appropriate places reach the corresponding depth at which the core pins can be withdrawn from the separation gap zone. In this case, the contact force between the pins of the body and the core will not be sufficient to leave distinct marks or prints on the key.
The main rule of impression technology is: No file processing in areas where clear markings or prints are not visible!
When performing the processing with a file, you should always remove only a little material, that is, jumps of no more than 0.5 mm. Naturally, while making the key is a bit slower, however, when working carefully, you can avoid having to start again if too much material is removed.
Markings / prints
Markings and fingerprints on the key blank are due to the fact that the key blade made of metal is pressed against the retaining devices in the cylinder (pins / discs), which are also made of metal.
Every time the metals come into contact with one another or rub and scratch their surfaces, marking or imprinting occurs.
For impression technology, this means that the data of the markings or prints must be clearly recognizable in order to process the file in the right place. At the beginning of the impression process, labeling is difficult to determine, but at the end of the process, they become larger, easier to identify and process.
Attention: If too much marking is obtained at the beginning of the impression process at a certain site or at a very specific depth, in most cases this indicates that the following factor occurs:
- In this section, it is really about the depth number 1. In this case, the impression process for a given pin in the cylinder is completed.
- When preparing the key blank, too much material was removed. This is a big defect for the impression technique, since even before the work starts, conditions for its termination are created.
Thus, an improperly prepared disc will be labeled every time in the corresponding place until it has nothing to hold on. This phenomenon is explained by the fact that the housing pin is already in the zone of the separation gap. If the motion is made to the left or to the right, then not the core pin, but the housing pin, is blocked. Therefore, new markings or prints are made every subsequent work process.
It is important to understand that the markings created by the impression technology can be very different from each other.
These differences depend on the following two factors:
- From the type of lock used with the cylinder, i.e. Pin or disc retainers (sovalds) and the like.
- From the point at which markings are created during the work process, that is, at the beginning, in the middle or at the end.
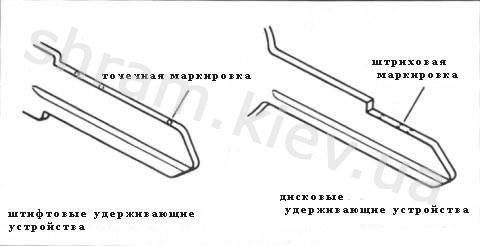
The type of marking is determined by the design of the retaining devices of the lock being opened. In principle, two different forms of marking are distinguished:
- Dashed marking produced by the discs of the lock with disc retaining devices (suvalds).
- Point marking made by the lock pins with pin retaining devices.

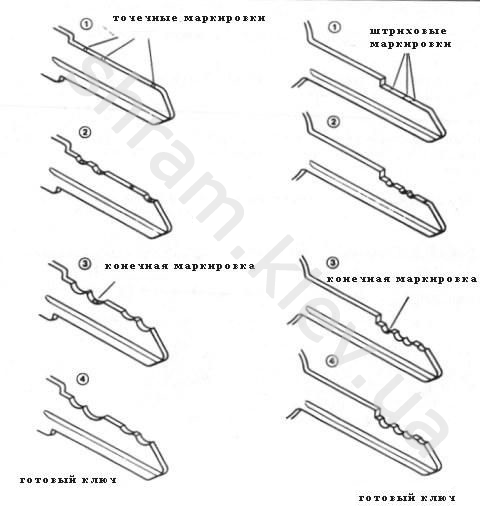
The closer you come to the final result of closures (cuts), the more distinct the markings become.

The size and depth of individual markings varies from the very beginning and to the end of the impression process.
The closer you come to the corresponding depth of the corresponding closures (cuts), the more distinctive are the markings, while they should already be considered as final or final markings.
After processing the blank with a file, the closing surface must be mirror smooth. Only in this case it will be possible to distinguish initially weak markings.
File processing areas

When processing with a file, the closing surface of the blank is prepared only in those places where, according to the measurement on the cylinder, there must be closures. Also these areas should be mirror smooth.
File processing after measuring distances
Preparing the key blank
There are four effective methods for preparing a pig:
- File surface processing
- File processing areas
- Edge file processing
- Blackening or painting of contact surfaces
File surface processing
With this method, the file is easily processed with a file of the blocking plane of the blank so that there is neither chromium nor paint on it so that after the first impression process (fingerprinting) it is possible to clearly distinguish the appearing markings and determine the distance between individual closures.
Then, further processes of imputation are carried out, as already described earlier.
Attention : When processing a blank with a file, remove less material than is required for the closure itself.
If you remove too much material, the consequence of this may be that the markings will not be accurate, and the workflow will become impossible.
Edge file processing
There are two ways to handle the edging file:
- Double-sided processing by the file of the blocking surface of the blank at an angle of 45% every time, and the edge is similar to the blade of a knife. This means that from the flat surface of the blanks, it is necessary to remove evenly under the corners of the chamfer.
- Single-sided processing of the blocking surface of the blank with a file at an angle of 45%. This means chamfering from the side of the blank.
During both preparation options, care should be taken to ensure that too much material is not taken off the file.
In locking cylinders with pins in the body, it is also important that the edge of the bar passes under the center of the axis of the cylinder pins. Many services working with keys, willingly apply these two options, since the sharp edge allows you to accurately determine the distance between closures and in addition to marking in more difficult cases with locks with retaining devices (sovalds) and transverse bolt.
You should try both options and choose the working variant that provides you with the best result.
Blackening and staining of the contact surface of a blank
When blackening or painting the contact surface of the disc, this is a method in which markings become noticeable in the opposite way. This means that after preliminary blackening or staining, the blanks are not given a dark marking on a light background, but instead a light marking on a dark background.
In this case, there are also several options for training.
1. Dirt blackening
In this working process, the appropriate blank is held over the ignited lighter and directly above the flame. At the same time, the blank is coated with soot and becomes black. The marking is due to the fact that the discs or pins of the cylinder remove the soot layer, and in these places you can then see the pure metal of the blank, which is a marked point.
2. Painting
Here, also, the corresponding blank during the first working cycle is covered with a coloring liquid. As a rule it is a paint from a felt-tip pen with a felt core or a marking varnish when processing metal products. Labeling occurs as described when using soot.
3.Ultraviolet kit
As with blackening with soot and when painting, the pig is covered with the coloring liquid during the first working cycle, however, in this case it is a fluorescent liquid.
After taking the markings or prints, keep the blank under the ultraviolet lamp. This special light provides a clear visibility of markings and prints, as the corresponding places become visible much darker than the other blocking area that glows under the UV lamp.
The methods described above are, of course, not the only methods for pretreating and preparing the key blanks. They are only the most common and effective methods, and everyone can decide for himself what he prefers. It is best if the user tests each method in different conditions and under different illumination.
Work processes.
Step 1
The dummy key is prepared for work using the method of impression technique, namely:
- File surface processing
- File processing areas
- Edge file processing
- Blackening / staining
Step 2
The key dowel is inserted as deep as possible into the cylinder shut-off channel.
Step 3
Turn the key with moderate force to the right until it stops. Press up and down
Step 4
Push the key several times strongly up and down. Then, with moderate pressure, turn the disc until it stops to the left. After this, the disc is pressed several times more strongly up and down.
Step 5
Remove the key wrench from the cylinder, and check the markings. At the location of the markings, the material is removed by the file, but only exactly where the markings are placed. Places without markings must not be processed even if the distances between closures are recorded.
The above stages of work 1 - 5 should be repeated for as long as a locking key is obtained.
Training, practical application and experience make from the user this method a specialist. Especially important is the practice to be able to distinguish the necessary markings from minor ones.
For most users, the application of this technology is on the verge of their visual abilities.
However, weak vision is not an obstacle, as it can be compensated by modern grinding of magnifying glasses or working loops, which, depending on the version, can be illuminated or without illumination.
It should again be recalled that rotational movements to the stop should be performed with moderate effort, if only because with great effort it is impossible to get recognizable markings. There is only a danger that the dummy key will be broken or bent.
Particular care is required if there are disc retainers and cylinders with transverse bolt. With these systems, if the force is too high, the cylinder may be damaged during rotation, since the washers or pins will be bent.
On the other hand, a small effort is not enough to block the pins. As a result, there are no markings on the disc or there are very indistinct fingerprints.
In order to successfully use impression technology, the user must train for a long time in getting the correct force during rotation.
Here are the books that allow you to get even more valuable knowledge in the castles. Key locks.
SA McLean, "The Impression System of Key Fitting", Dire Locksmith
Supply Co., 2201 Broadway, Denver, Colorado 808205, 1946 "Locksmithing and Keymaking Course Manual", Locksmithing Institute, Little Falls, New Jersey, 1968
"Padlock Handbook", Locksmith Ledger, 2720 Des Plaines Ave., DesPlaines, Ill., 60018, 1970
"How To Do It For Locksmiths," Locksmith Ledger, 1800 Oakton St., DesPlaines, Ill., 60018, 1971
"Know How for Locksmiths", Locksmith Ledger, 1970
"The Lock Pick Design Manual", Paladin Press, PO Box 1307, Boulder, Colorado 80302, circa 1975
TC Mickley, "Lock Servicing, Volume 4", Locksmith Ledger, 850 BusseHighway, Park Ridge, IL 60068, 1980
Eddie the Wire, "How to Make Your Own Professional Lock Tools, Volume2", Loompanics Unlimited, PO Box 1197, Port Townsend, WA 98368, 1981
Hank Spicer, Impressioning with Hankman, RSG Publishing Corp., Dallas, Texas, 1995
The remaining parts of the publication does not make sense, since it is already intended for professionals.
Materials are taken from books, magazines, other sources, bought in e-shops, received by exchange. Provided are "AS IS" ("AS IS"); Check the performance of each is not possible. The site www.shram.kiev.ua works, rather, as a paid search system for interesting materials.
There are no materials on sale that contain warnings about the prohibition of its distribution (paid or free of charge). If you notice a copyright infringement (the sale of the material, for free distribution and sale of which its author did not give permission) - report, the material will be removed.


Comments
When commenting on, remember that the content and tone of your message can hurt the feelings of real people, show respect and tolerance to your interlocutors even if you do not share their opinion, your behavior in the conditions of freedom of expression and anonymity provided by the Internet, changes Not only virtual, but also the real world. All comments are hidden from the index, spam is controlled.