
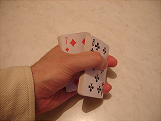
Volt (26 ways)
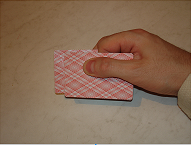
1. Up and down.
This volt is known as "domino", "latch", etc. I also call it "up-down", which corresponds to the movement of the top of the deck after the cards are removed.
The advantage is that this volt can be quickly executed, and the disadvantage is that it is complicated in execution and long training is necessary to achieve the required level of technique.
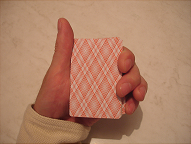
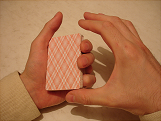
The volt is performed by one, the left hand.
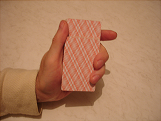
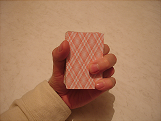
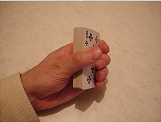
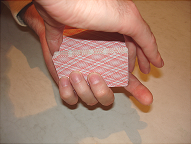
The initial position of the deck for starting the volt is as follows.
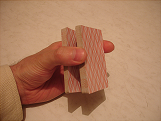
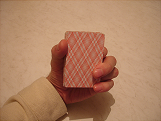
The deck lies in the left hand.
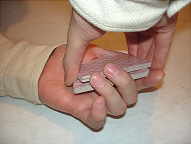
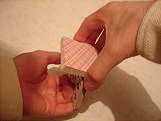
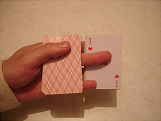
The viewer removes it, you pull the bottom of the deck with your right hand and put it on top of the top of the deck.
By this time on the top of the deck there must be the ring finger of the left hand, after which this finger is in the gap between the top and bottom of the deck.
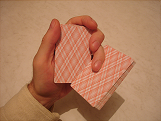
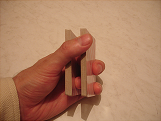
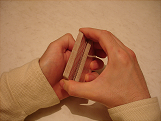
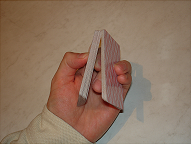
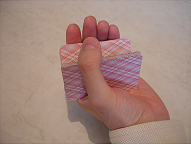
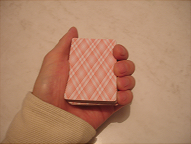
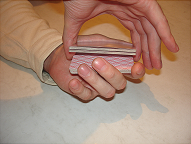
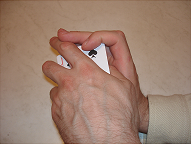
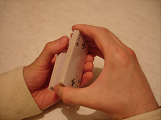
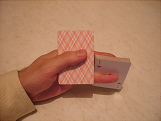
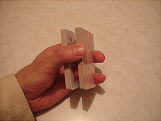
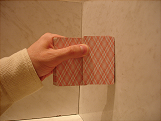
After that, straighten the index, middle, ring fingers and little finger in the joints of the left hand and the deck will open like a book, see the photo below.

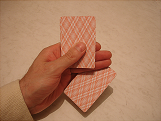
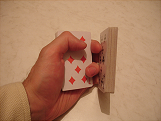
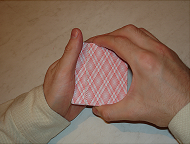
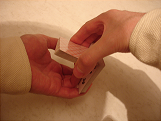
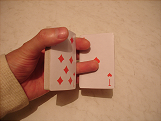
Then the left thumb of the left hand should press on the upper corner of the part of the deck that is on top, as a result of which, from the opposite side of the diagonal, the right lower corner of the same part rises, as shown in the photo, which is lower.

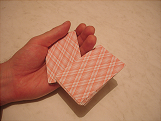
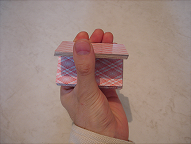
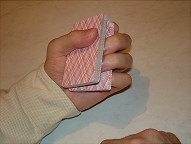
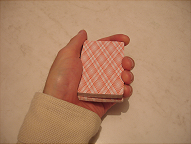
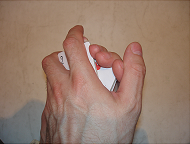
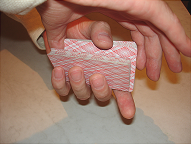
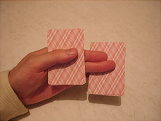
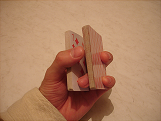
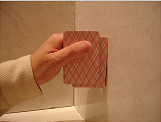
Then the index, middle, ring finger and little finger bend in the joints together with the part of the deck they hold and that should move towards the palm and dive under the top of the deck and lie down on the palm.

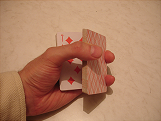
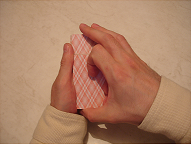
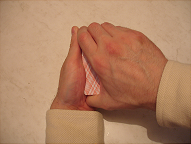
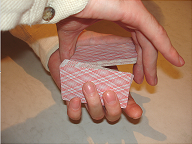
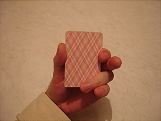
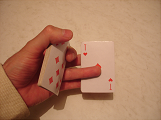
After that, push the part of the deck that is under this finger with the thumb of the left hand, and the index, middle, ring finger and little finger, respectively, at that moment should release part of the deck, which they should not hold anymore, and let it lie on one unnamed Finger, and allow part of the deck, which is under the thumb, to hit the part of the deck that is under it. After both parts of the deck are joined together, the ring finger of the left hand can leave its place under the deck of cards and take its usual place, as shown in the photo, which is lower.

The volt is done.
2. Turntable.
This volt is performed by one left hand and is very complicated in execution.
In order to fulfill it you need long training.
Its dignity is the speed of execution.
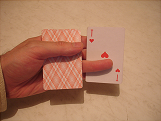
For the initial position, let's take a position where the removal of the deck is completed and the little finger of the left hand forms a gap between the two parts of the deck.
Above, the upper part is held by the index, middle and ring fingers.
From the bottom, the upper part is held by the little finger of the left hand.
The next moment, the ring finger and little finger on the top and bottom of the top of the deck raise it by the lower right corner, which is directed at the performer of the volt, as shown in the photo, which is lower.
The upper part rises perpendicular to the lower part and slides downward along it.
The palm of the left hand should be in a strictly horizontal position so that the upper part does not slip off the bottom and fall to the floor.
Then the thumb of the left hand ceases to help the movement of the upper part and only the ring finger and little finger continue to rotate it, as shown in the photo.
The top of the deck continues to slide along the bottom, and again assumes a horizontal position, such as it was before it began to slide, that is, with the shirt facing up and facing down. Then the fingers of the left hand rotate the upper part until it occupies the position shown in the photo, which is lower.
Then the base of the left thumb of the left hand will press on the upper left corner of the lower part so that this angle is lowered slightly downward, and the lower right corner of the bottom part of the deck due to this would be raised above the top.
Further, the thumb of the left hand pushes the lower part onto the upper part, as shown in the photo.
And at the same time, from the gap between the top and bottom of the deck, the left hand's ring finger should go to allow the lower part of the deck to fall onto the top of the deck and merge into a single deck.
The next moment all fingers are pressed to the palm of your hand and both parts form a single deck, as in the photo.

3. Wave.
The volt is performed with one left hand.
Take the deck in the left hand and ask the viewer to remove the deck.
After the sublimation, pull the lower part of the deck with your right hand, the top part of the deck will fall into the palm and take the place of the bottom part.
At the top of the deck in the left hand, place the index and ring fingers of the same hand.
Then complete the removal of the deck, put a part of the deck from the right hand over the top of the deck in the left hand.
The index and ring fingers will form a gap between the pieces of the deck.
After that, the left hand moves both parts of the deck from the horizontal position to the vertical position, as shown in the pictures, which is lower.
Next, rotate the bottom of the deck in the hand (if you look from the bottom of the deck) half a turn clockwise, and then in the same direction, the top of the deck.
To do this, the thumb of the left hand should press hard on the upper edge of the lower part to make it rotate to the right side down until the lower part of the deck takes up the inverted position.
Rotating, the upper part of the deck should slightly deviate to the side so that the lower part of the deck can freely rotate in the space of the palm, but the upper part of the deck should not deviate significantly from the vertical position of the cards.
See the photo above.
In this photo, both parts look at each other face-up.
The next moment, the top of the deck should also roll over like the lower part, in the same direction with the thumb of the left hand, which with force should make the top of the pack rotate in the palm of the left hand.
When the top of the deck turns over, both sides of the deck should be facing in the right side, and in the gap between them the index and ring fingers continue to remain.
The next moment, these fingers should leave the slot, as a result of which both parts will form a single deck.
4. Volt with the viewer's hands.
This technique is performed in the viewer's view, by the spectator himself.
For its execution, take the deck and carefully shuffle it.
And the last move in card shuffling is to remove the deck, and this movement should be a natural continuation of shuffling.
You need to arrange the cards in such a way that the order of the pieces of the deck is the reverse.
After shuffling the deck, the cards should be positioned as shown in the photo, which is lower.
The lower part of the deck is solid, and the upper part of the deck is, as it were, bifurcated.
The lower part of the deck must be firmly fixed in the left hand, the left hand must hold this part with force so that no card of this part is shifted at the moment when the spectator makes the removal of the deck.
The top of the deck, on the contrary, should move freely.
After the spectator removes the deck, you return the lower part to the top, and the upper part becomes the bottom.
There may be a situation that the viewer will still not remove the entire upper part, but only half of it, then take the entire upper part of the deck from the side of the deck.
In fact, the viewer returned the deck to its original state.
5. Turn the Volt.
This volt is performed with both hands.
The deck at the time of removal is in the left hand, the right hand pulls the bottom of the deck, the top part of the deck falls into the palm of the left hand and remains there.
After that, the little finger of the left hand should lie on top of this part of the deck, as shown in the first photo in the volta with the little finger, and the right hand should put the bottom of the pack on top of the top.
The little finger of the left hand then forms a gap between the parts, which looks towards the magician.
At the same time, the opposite edge of the deck, which is directed towards the spectators should be without a gap, it is necessary to look carefully for this.
Then the right hand with two fingers grabs the lower part of the deck, which is closer to the palm of the left hand.
The thumb of the right hand holds the lower part of the deck, and the right index finger holds this part also behind the right narrow edge.
After that, the right hand with the thumb and forefinger begins to unfold the lower part of the deck counter-clockwise, with the axis of rotation along the longitudinal center of the card, while trying to pull the lower longitudinal edge of the lower part of the deck upward.
In this case, this part of the deck slides on the front side of the top part of the deck, but the right hand does not rise up, but remains at the same level.
Once the lower longitudinal edge of the bottom of the deck is on the edge of the top of the deck, the index, middle, ring finger and little finger should bend in the joints and help the upper part to slip the lower edge of the lower part of the deck and fall into the palm of the left hand.
The right hand should at this time help the lower part to fall to the top and merge with it into a single deck.
6. Volt with a little finger.
The method often used is simple in execution.


Take the pack in the left hand for the long side, shirt up, as if you are going to take it.
In this position, the thumb of the left hand lies to the left of the pack, and the other fingers of the left hand lie to the right.
Put the upper joint of the little finger on the cards that should be on the top, at the moment they are at the bottom.
The remaining 3 fingers lie freely on top of the deck.
The top part of the deck is between the little finger underneath and the other fingers on top.
Cover the deck with your right hand.
After that, grab the bottom half of the pack along the middle finger from the top and the thumb from the bottom.
At the same time, the thumb of the left hand lies in a slightly bent position across the deck.
Then press the inner edge of the lower half at the point where the thumb of the left hand departs from the wrist.
Move the upper half of the deck out, while slightly loosening the fingers on the left hand.
At the same time, lift the outer edge of the lower half until the edges of both halves part.
Next, when you close your left hand, the cards will fold together and change places.
When playing for the first time this trick, you need to do this all very slowly, paying attention to the correct sequence of actions.
At first, nothing can work out, but eventually the hands will acquire the necessary dexterity and the two halves of the deck will change places very easily, as if passing through each other.
From the outside it looks just an easy grip and a show of hands.
If it is necessary to fold the halves of the deck face to face, you can first turn the top of the deck upward with the face, at the moment when the moved parts of the deck are reconnected.
This way of performing volts is the most correct and learning how to execute it, other methods are almost unnecessary.
While applying it to the audience, it is necessary to distract the attention of the audience on something else.
For example, the viewer chose a card, and you need to do a volt, if you do it immediately, then for sure the viewer will see your actions, so you need to pause and, looking at the viewer's face, ask: "Do you remember the map well?".
Then the viewer will be distracted for a second and look at you, and at this moment you perform the volt.
7. Volt with viewing the map.
This method is typical for tricks, when a magician needs to know the card, which after the execution of the volt will lie at the bottom of the deck.
For example, when the upper half of the deck describes a semicircle, its lower card is perfectly visible to the magician, and viewers at that time see only the shirt of the deck.
To execute this method, take the cards in the left hand, as in the first method.
Put your left hand finger on the cards you want to move up, at the moment they are at the bottom.
The remaining 3 fingers of the left hand are placed on top of the deck, and the finger's place is occupied by the ring finger.
Then straighten your fingers and thanks to this, the top of the deck describes the circle.
At the same time, press the upper-left corner of the lower part with your thumb, then the opposite end of the lower part will rise to the top, and this will allow you to press the upper part of the deck when the fingers are squeezed into the bottom of the deck.
Now you need the top part of the deck, the one depicted in the photo by the tambourine's wreath, from the position shown in the photo on the left to the position shown in the photo to the right.
To do this, tilt this part of the deck forward with the middle finger and part of the deck begins to describe the semicircle near the ring finger.
With this movement, it turns in such a way that the near end towards you becomes distant, and the far end becomes near.
The rapid movement of the hand from the left to the right side during the execution of the volt masks the movement of the cards.
8. Volts with a wide card.
As far as I know this technique, few people use it, if at all.
But you need to know it.
For this reception, a pre-prepared map is used, which is 1-2 millimeters wider on each side.
This card should lie with you in a secret place: in your pocket, in your sleeve or elsewhere.
To perform this method, take a deck of cards, shuffle it carefully.
After shuffling, you need to secretly get a wide card and discreetly put it down the deck, then you need to give the deck to the viewer.
After the viewer has removed the deck, place the lower part of the deck from above and the wide map is somewhere in the middle of the deck.
After this, it is necessary to divert the attention of viewers with some question and imperceptibly with the right hand to change parts of the deck in the opposite direction.
Do it quickly, it will not be difficult, because with your left hand you point and finger fingers you will find a wide map and make a slot.
After replacing parts of the deck, a wide card must be removed from the bottom of the deck in a secret pocket or somewhere in another secretive place.
9. The Volt Charlier.
Place your left hand with your palm up.
The deck, which is facing upwards, is held at the tips of the fingers of the left hand, while the thumb is placed on the long near edge of the deck, the remaining 4 fingers are located on the long opposite edge of the deck.
Loosen the pressure with your left thumb on the nearest long rib, after which the long near edge of the lower part of the deck falls into the left palm to the base of the thumb.

Bend the left index finger under the bottom of the deck and push it to the front side, after which the fringe side of the bottom of the deck will be pressed to the left thumb.
Due to the pressure of the left index finger, the lower part of the deck is strongly pressed against the left thumb, while releasing the long near edge of the upper part of the deck, as a result of which the upper part of the deck falls, coming with a long near-edge rib in the middle of the left palm.
As a result, both parts of the deck are folded - the front side of the bottom of the deck lies on the edge of the top of the deck.
10. Rotation.
This volt is performed with one left hand.
For his execution, take a deck of cards, shuffle it carefully, let the viewer take it off.
After removal, the upper part of the deck is in the palm of the left hand and lies horizontally, and the lower part of the deck is held by the thumb and forefinger of the right hand.
Place the little finger of the left hand on top of the deck in the left hand and place the top of the deck from the right hand.
Then remove the right hand to the side, and the left hand taking the second part of the deck, holds both its halves and should place the fingers, as shown in the photo, which is lower.

Then the left hand acts as follows.
The index, middle, ring finger and little finger, slightly open, make the slot a little wider, just so that the thumb of the right hand enters the wide gap formed.
Then the thumb of the left hand pushes the left edge of the part of the deck from above, causing it to rotate clockwise, and the index, middle, ring finger pushes the right side of this part down towards the left hand.
As a result, the part of the deck that lies on top must turn face up and shirt down and fall on the part of the deck that is on the bottom, so that the top of the deck remains the visible strip of the shirt part of the deck, which is below, about one centimeter wide.


The fingers of the left hand should leave the slot between the pieces of the deck and allow one part of the deck to fall on the other closely and merge into a single deck.
The boundary between the parts will be easily determined by the upper strip of the shirt about a centimeter wide.
After that, the thumb of the left hand goes under the bottom of the part of the deck that is closer to the palm, and causes the whole deck to rotate clockwise around the axis of rotation, which is located in the center of the longitudinal part of the cards.
The remaining fingers, which must press on the right edge of the deck, help it to rotate until the deck turns 180 degrees.
After this second rotation of the thumb, the index finger of the left hand, using a strip about a centimeter in width, begins to rotate the part of the deck that is on top, clockwise around the same axis of rotation that passes through the center of the longitudinal part of the cards until this Part does not rotate 180 degrees shirt-up.

As a result, the deck will accept the initial position of the cards.
The volt was performed by three rotations in 4 main operations: first, the top of the deck was turned up, then the edge of the shift was formed one centimeter wide, after that the whole deck was turned upside down and part of the deck that was turned upside down using the edge of the shift.
11. Rough.
From my point of view, this volt does not have any grace and looks very rude, that's why I called it "rude".

For his execution, take the cards in the left hand with the shirt facing up.
Put the middle and ring fingers of the left hand on the cards, which must be transferred to the top of the deck, and place the index finger and the little finger of the left hand under the deck.
Now the lower half of the pack seems to be squeezed by forceps between the middle and ring fingers on top and the index finger and the little finger from below.
After that, cover the deck with your right hand, as it was done in the first method.
Then take a deck between the index and ring fingers on top and the thumb from the bottom of the top half of the deck.
Just slightly lift the top half of the deck in order to make room for the lower half, at the same time slightly, loosening the fingers of the left hand.
In this case, the bottom half of the deck describes a quarter of a circle, and when the upper half does not already cover the lower half, then the reverse movement (slightly bending the fingers on the left hand and removing the right hand), both halves of the deck re-form together, but in a different order.
12. Decorative.
I did not see any other name for this volta, but I think its name should be "decorative".
Why?
Because it is performed in full view of all viewers and if you stubbornly look at the hands of a magician, then any virtuosic combinations will be noticeable.
This volt can be used when it is necessary to put cards on the table or it can be used with the rapid movement of the hand from the right side to the left side at the moment of volt performance.
Take the deck with any hand, as if you want to put it edge on the table.
Place the middle finger between the two halves of the deck, and place your index finger and little finger on it.
Then take the lower (upper) half of the deck behind its 2 upper corners with the thumb and forefinger.
Now, when you unbend the index, middle and ring fingers, the upper part of the deck will move.
When it does not close the lower part of the deck, then bend your fingers again.
In this case, the upper half of the deck will be lower.
13. Children's volt.
I called him that because of his simplicity of execution.
The very process of changing parts of the deck does not happen in sight, but somewhere so that it can not be seen, for example, at the table or behind your back, or in appearance, but only with a distracting maneuver.
Consider the execution of this reception at the table.
Take the deck of cards and shuffle it carefully, the shuffled deck must be in the left hand.
Give the player on the left to help her.
During removal, the deck looks like it is shown in the photo, which is lower.
The upper part is shifted back, and the lower one is pushed forward.

The spectator or the player shifts the top of the deck in the opposite direction from the deck, and you remove the bottom part and put it on top of the top, but so that one part of the deck is moved a few millimeters relative to the other parallel to the long edge of the cards.
See the photo.

This shift must be on the left side of the deck.
The shift should not be visible to anyone from above or from the side, the shift should be hidden in the palm of the left hand.
After that, lower your left hand for a second under the table and with your right hand change the parts of the packs among themselves, returning them to their original position, which they occupied before removing the deck.
If this is done in sight, then make a diversionary maneuver so that the audience does not look at your hands, for example, contact any viewer with any question, and also with your right hand swap parts of the decks among themselves.
You see that there is no need to have any special skill, it is necessary to hide hands under the table or a distracting maneuver.
14. Idiot Volt.
Volt, designed for fools, hence the name.
In fact, they can also be used successfully as well as other voltaic methods.
Take a deck of cards and ask the viewer to pull out any card, memorize it and return it back to the deck.
To do this, remove 2/3 of the deck and immediately put it back.
Then, once again, lift up part of the deck, but only about half.
Look like you are shooting a part of the deck, but do not actually pick up any cards, just pretend that you are holding something in your right hand.
After the viewer puts the card on top of the deck, which is held in his left hand, then pretend that you are putting up cards that seem to be holding in your right hand.
It's all.
15. The book.
Take a deck of cards, shuffle it carefully and let any viewer take it off.
Removal occurs in the left hand.
After the removal is done, the lower part of the deck moves to the right hand, and the upper part of the deck remains in the left hand.
After that, the right hand brings its part of the deck to the left hand and places this part next to the piece in the left hand.
Parts of the deck must be parallel to each other and perpendicular to the palm of the left hand.
Between the parts there must be a slot in which the little finger of the left hand should be.
See the photos below.


The middle and ring fingers of the left hand should be on the outside of the part of the deck that was raised by the right hand.
Then connect together the sides of the parts of the deck that look towards the viewers so that at this point the deck looks like a single whole so that the slot is not visible.
Next, the left hand should make the following movements in one second.
The part of the deck that has been raised by the right hand opens as a cover of the book with the help of extending the index, middle, ring finger and little finger and should take the position shown in the photo below.

The part of the deck that was in the left hand initially remains in the hand vertically, supported from above by the thumb of the left hand, and from below with the index finger and the little finger of the same hand.
Then the thumb of the left hand pushes down on the upper edge of the part of the deck that is located closer to the palm and causes this part to slide on the index finger and little finger to the right side towards the other part until it occupies the same horizontal position above this part.
In this case, the parts will look at each other face cards.

After that, both parts begin to move horizontally towards each other.
To make this movement possible, the index finger and little finger should bend in the joints inside the palm of your hand, and the thumb should continue to push part of the deck to the right, on top of which it is located.

Further, a part of the deck that is under the thumb continues to move to the right side horizontally, and the other part moving to the left side, moves from the horizontal position to the vertical one.
When both parts are perpendicular to each other, the index finger of the left hand should jump from the bottom of the part of the deck over it, as shown in the pictures, which is lower.


After that, one part falls on the other, forming a single deck.
16. A book with rotation.
The initial position of the hands for the execution of the volt: the deck after the shuffle is divided into two parts.
The part of the deck that was below is in the right hand, part of the deck that was at the top is in the palm of the left hand, as shown in the photo, which is lower.

The right hand should throw its part of the deck into the part of the deck in the left hand in order to finish the removal of the deck.
But before this is done, bend the two fingers - the index finger and the little finger of the left hand, scribbling them on the edge of the part of the deck that is in the same hand.

The next moment a part of the deck from the right hand covers a part of the deck in the left hand, resulting in a gap between the pieces of the deck.
Next, you need to make a slight shake of the left hand, as a result, the left hand will have to perform the volt.
The following happens.
The index, middle, ring fingers and little finger unbend in the joints and open the deck of cards, like a book.
Until now, the performance of this volt was similar to the execution of the volta book, but the order of execution is completely different.
In the photo, both of the above are at right angles to each other.
The left hand extends the finger even further and the deck of cards occupies a horizontal position, one part will lie face down, and the other will face up, as shown in the photo, which is lower.

The next movement requires a part of the deck, which is held by the thumb of the left hand, turn 180 degrees, that is, face up.
To do this, you need a part of the left hand palm that is close to the base of the thumb of the left hand, press the left edge of the part of the deck that is located in it, so that the left edge of this part moves down and slightly to the right side, towards the other part, and then The index finger of the left hand bend in the joint and, pressing on the upper longitudinal edge of the part of the pack that is in the palm, make this part finally roll over in the palm of the left hand face up.
The whole cycle of the reversal of the maps of this part should take place in half a second.

The next time the deck should close as a book.
To do this, the index, middle, ring finger and little finger bent in the joints should make part of the deck, which was clamped with the index finger and little finger, describe the arc and approach the thumb of the left hand.

The thumb of the left hand, presses the left edge of this part of the deck down, and the index finger and little finger press the rib on the right side and make this part of the deck rotate counterclockwise.
The rotation of this part ends when it overturns 180 degrees and falls on the other side face up.
In this case, the remaining fingers must give way to this already upper part of the deck.
Now it remains to correct the deck and turn it 180 degrees so that the entire deck faces the palm of your hand.
To do this, the entire deck should be free to lie in the palm of the left hand, and the index, middle, ring finger and little finger should bend in the joints in such a way that the entire deck takes upright position, and when the fingers return to the original position at which they were unbent, the deck Falls on the thumb of the left hand and looks face down into the palm of your hand.

17. Crocodile.
This volt is performed with one left hand.
The initial position of the deck is shown in the photo, which is lower.
The deck is finished.
Both parts of the deck stand in the palm of the left hand perpendicular to the horizontal plane and are located face-to-face in the same direction inside the palm.
The middle finger of the left hand and the little finger of the left hand hold the lower part of the deck from the front side, that is, from the bottom of the entire deck, and the ring finger of the left hand is on the shirt of the lower part of the deck in the gap between both parts of the deck.
Thus, the lower part of the deck is held by the middle finger and the little finger on one side and the ring finger on the other side.
The upper part of the deck is held by the thumb and forefinger of the left hand.
The thumb holds the upper part by the upper long edge, and the left hand index finger holds the lower long edge of the top of the deck as close to the upper narrow edge of the top of the deck in order to more easily follow the subsequent volts.
After that, the thumb and index fingers of the left hand begin to move the top part of the deck up diagonally across the lower part so that the lower part is transferred through the upper short edge of the upper part to the front side of the same part.
See the photo below.

At the same time, the middle, ring finger and little finger that hold the upper part should be straightened and make this part slide on the bottom until the lower part is on top of the top.

As soon as the top part of the deck changes with the bottom of the deck, the ring finger of the left hand should bend in the joints and force one part of the deck to come close to the other.
The index, middle fingers and little finger should quickly leave the slot in which they are located and allow the connection of one part to the other in a single deck.
The Volt is done.
18. The roof.
The name can be seen from the fact that during the execution of this technique a figure appears that resembles a roof.
This volt is similar to some other volts differs from them only in small details.
This volt is performed in its main part with one left hand.
Take the deck, shuffle it carefully and let it be removed to any viewer.
The deck must be in the left hand.
The lower half of the deck should lie on the upper half of the deck, forming a slot in which there should be a little finger.
After that, using the little finger, the thumb and fingers of the middle and nameless, open the deck as a book, as shown in the photo below.

In this case, the index finger goes under the bottom of the deck.
Then with the thumb of the left hand, support the top of the deck.


The thumb takes its place, simultaneously with the movement of the index finger of the left hand, that is, both of these fingers simultaneously took their places at the same time.
Then the little finger leaves the slot between the pieces of the deck and takes up a place on top of the top half of the deck.
The index finger is still below the bottom of the deck and is not visible.
Note that the top of the deck should be held by the tips of the large, middle, ring finger and little finger.
This is necessary in order to the next time the lower part of the deck, easily climbed up, not clinging to the top of the deck.

With a slight shake of the hand, without changing the horizontal position of the palm of the left hand, it is more convenient to arrange the lower part of the pack in the left hand.
The index finger of the left arm on the bottom begins to push up the lower part.
The right edge of the bottom of the deck should go up freely, slightly touching the top of the deck.

The index finger of the left hand continues to push up the lower part of the deck until it comes out from under the upper part and appears on top of it.
At this point, the thumb of the left hand releases the top of the deck, but continues to hold the bottom firmly.

The index finger of the left hand is maximally compressed in the joints in order to allow the upper part to fall into the palm as low as possible.
As a result, the upper part falls into the palm of the left hand on the index finger of the left hand.
Then, press the thumb of the left hand on the upper edge of the lower part, which moves upward, helping the upper part to finally fall into the palm of the left hand.
After this, remove from the bottom of the deck index finger and attach it to the rest of your fingers.
Then, straighten the deck of cards in your left hand with your right hand.
19. Lightning fast.
This volt is not technically similar to some other volts, but it differs from them in that it is done very quickly, and as a result it was called a lightning fast.
For its execution, take the deck in the left hand.
Allow the viewer to remove the deck.
After the removal of part of the deck should be separated by the little finger of the left hand.
With your right hand, grab half the deck between the middle finger from the top and the thumb from the bottom of the right hand.
Remove the little finger from the slot that separates the pieces of the deck.
Move the thumb on the left hand.
You do not need this finger now.
Direct the lower half of the deck to the left side, and the top half of the deck down and vice versa.
This is the theoretical part of this method.
But in reality, in practice, all actions do not have such clarity.
Over time, the movement from the right side to the left side should become smaller and become almost invisible.
This movement must be reduced to a minimum, and for this you need to keep your hands as close as possible to each other.
Carefully see that the edge of the right palm is easy, but firmly attached to the three fingers of the right hand.
The point of support of the movement of hands should be in the place of their contact.
With prolonged training, you will find that a small, barely noticeable rotation of two hands on an imaginary hinge is enough to accomplish this method.
20. Invisible volts.
Take the pack in the left hand as for surrender, offering the viewer to return the card chosen by him to the place where he wishes.
The photo shows the deck after the card has already been returned.
Notice how the thumb is located, it is extended one centimeter beyond the outer edge of the deck.
Place the right hand on top of the deck, as shown in the photo above.
Raise the right ring finger and little finger so that the audience can see or observe the protruding map.
Then press the protruding card into the deck using only the middle finger of the right hand that presses to the left, pointing the left corner of the card to the left thumb of the card so that the card slides diagonally into the deck and extends somewhere by 0.6 centimeters from the deck in The right inner corner.
Since only the right middle finger takes part in pushing the card into the deck, then any dexterity or trick seems completely impossible.
At the moment when the inner right corner of the selected card comes out of the deck, place the tip of the left little finger on this corner as shown in the photo.
It should be noted that while the left index and middle fingers remain in their original positions (squeezing the deck), the ring finger moves, and the little finger presses on the protruding corner of the selected card.
During the execution of this action, the right hand is located on top of the deck, with long fingers on the outer edge, with the thumb on the inner edge, as shown in the second photograph.
For clarity, the right hand was removed from the image from above in order to show the action of the little finger.
After that, press the tip of the left little finger down on the protruding corner of the selected card in such a way as to make a slot from the side of the deck, and at the same time slightly press the card into the remainder of the deck.
Hold the slit by pressing the first phalanx of the little finger on the side of the deck.
But in any case, do not insert the tip of the little finger into the slot.
This is a standard error inherent in novice magicians.
In the photo above, the hand position is shown after this action.
The right hand, which is still in this position above the deck, can now be removed.
The outer end of the deck, which is directed towards the viewers, is in order, as far as the audience can see it, and the selected card looks lost in the deck.
All the described sequence of actions, which is shown in four photographs, which is higher, should be performed in one second, but no more.
Move the left index finger just below, as shown in the photo.
In this position, the deck is properly captured in order to execute a volt that will swap parts of the deck in places and thus lead the selected card to the top of the deck.
Next, place the right hand on top of the deck, as shown in the photo.
Note that the left thumb is still protruding from the left side of the deck.
The photo shows the first action of the volta.
The left index finger, at the outer end of the deck, moves the lower part of the deck to the right side to the position shown in this photograph.
The inner left corner rests against the right thumb.
This movement of the lower part of the deck can not be observed this way, it is blocked by the right hand.
In the photo, which is higher, the right hand is raised in order to show the action.
In reality, the tips of the left fingers touch the palm of the right hand.
In the photo, the above shows the previous action as it looks from the bottom.
The lower part of the deck is turned to the right side, the tip of the right index finger rests against the small left thumb pad, the tips of the right, middle finger and little finger rest on the side of the left index finger.
This position of the bottom of the deck, as shown in the two previous photos, is a secret action that makes it possible to invisibly move two pieces of the deck.
This should be done as shown in the photo.
When studying this action, it must be remembered that the photograph, which shows above the action in the direction from under the hands, and the photo in front of it shows the action on the right side.
This is the beginning of the volta.
Remove the left ring finger and little finger from the bottom of the deck, as shown in the photo above.
The lower part of the deck is lifted by the left index finger for the outer end, and the middle finger by the right side.
The inner left corner no longer rests against the cushion of the right thumb.
Then press down on the front end of the bottom of the deck with your middle finger.
Move the bottom of the deck from the horizontal position to the position shown in the photo above.
Here the right hand is raised again in order to show you this action.
Continue pressing down with your left middle finger until the bottom of the deck is springing into a vertical position, as shown in the photo.
Note that the left ring finger (in the photo the left middle finger looks touching the cards, but it is not, it should be slightly higher above the cards) and the little finger does not touch the bottom pack, and the left index finger is straightened, the left thumb stops pressing On the left side of the top of the deck.
In the photo above, the right hand is raised again to show you this action.
In fact, the upper edge of the vertical part of the deck touches the palm of the right hand to more smoothly pass the maneuver.
The photo shows the next step in moving parts of the deck.
Turn over the top of the pack, which until now has remained horizontal in the vertical position as follows: press up on the front side of this part of the deck with the tip of the right index finger, which will cause this part to rotate between the right middle finger on the outer edge and the right thumb On the inner edge.
Since the upper part of the deck moves to a vertical position, the left thumb will move first in such a way that it is opposite the left side of the top of the deck somewhere in the middle.
This photo shows the previous action as it looks on the left side.
The part of the deck that was at the beginning from the top (on the front side, which can see the four of the spades) moved to the vertical position as a result of bending the right index finger inward along the middle joint so that it unfolded the part of the pack along the axis between the right index finger and thumb.
The right hand moves to the position of complete closure, with the middle and ring fingers that lightly touch the left index finger.
The left thumb moves to a new position, opposite the side of the deck part somewhere in the middle.
At this point, the two pieces of the deck are arranged side by side almost in a vertical position, and the movement is almost done, which is accompanied by the squeezing of the left fingers, the movement of which converts the two parts of the deck into one, so that the original part of the deck is now positioned from the bottom.
In the photo above, the left hand begins to turn inward, pointing the back of the hand upward, and the left thumb, which presses down on the left side of the part of the deck originally from above, helps to connect the two parts of the deck together.
The action shown in the photo should be hidden by the right hand, but in the photo the right hand is located a little further to show you the maneuver.
Depending on what requirements apply to the volt, the action can be either stopped or continued, as shown in the photo.
If the action continues, everything looks as if the deck simply turns face up, the deck moves to the position shown in the photo.
It is clear how to show this, and cards can be immediately opened in a fan under the pressure of the thumb or the deck can be taken in the right hand and placed on the table or in the hand of the viewer.
21. Unsuccessful.
The most impractical or if so you can say an unsuccessful way.
Wait until the spectator has removed the deck and put both halves on the table.
Next, take the lower half of the deck of the one that, after removal, should lie at the top.
Take this half of the deck with the middle, ring fingers and little finger from below, and the index finger on top.
Pretend to put it on top, with the end of the index finger, tilt the right edge of the upper half forward, and with the other fingers slip under it the bottom of the deck.
The result of these actions is that the cards will be in the position they were before the removal.
22. Transfer.
This card volt is also performed by two hands, like all the previous ones.
Take a deck of cards and ask the viewer to take it off.
After removal, the upper part of the deck remains in the left hand, and the lower part of the deck is pulled out from under the upper part and is in the right hand.
The top part of the deck lies freely in the left hand.
The next moment the left hand should bend the fingers from the index finger to the little finger and make this part change from the horizontal position to the vertical shirt in the palm, as shown in the photo, which is lower.
The right hand then lifts the other part and places it between the fingers of the left hand and the shirt to the left as follows: the index, middle fingers and little finger should be on the right side of the part of the deck from the right hand, that is under the bottom of the deck, and the middle finger of the left hand on Middle, between parts.
In this case, the middle finger with its outer side holds one part, and its inner side holds the other part.
See the photo.
Further, the right hand releases the installed part and now this part is held by only one left hand.
Then the right hand takes a part of the deck, which was before in the left hand, that is, the one nearest to the palm, grabbing it by the narrow sides with two fingers, the index and the large right hand, raises it slightly upwards.
The left hand flexes the fingers even more with the part that remained in the hand and the part of the right hand is put in place of the part that has moved to the side of the palm.
Thus, the parts are reversed and the volt is made.
23. Propeller.
This volt is performed with one left hand.
The initial position of the deck for starting the volt is when the deck is divided into two parts: the upper part in the left hand and the lower part in the right hand, as shown in the photo, which is lower.
But before the removal of the deck is completed, that is, the parts will join together, the ring finger of the left hand should lie on top of the part of the deck that lies in the left hand.
Then a part of the deck from the right hand is placed on top of the deck in the left hand and the ring finger is between the pieces, forming a slot.
After that, the volt is performed by shaking the hand.
First the fingers of the left hand unbend in the joints, and the deck of cards opens like a book, see the pictures below.
On the left side of the left hand, the left side of the left hand remains the part of the deck that, after removal, became the lower part, and on the right side of the index, middle fingers and little finger, the upper side of the pack lies on the right side, on the front side, which is the ring finger of the left hand.
After that, the fingers of the left hand, on which the upper part lies, is the index, middle fingers and little finger begin to rotate the upper part around the ring finger until this part takes up the position with the shirt up.
In the process of rotation of this part, the little finger of the left hand should leave its place from the side of the shirt and move to the front side of this part of the deck to allow this part to rotate freely.
At the same time, the index and middle fingers had to push this part to rotate around the ring finger.
This part during rotation and after rotation is held between the middle from the side of the shirt and the ring finger unnamed on the front side.
After the rotation has ended and this part has turned over from the front side to the side of the shirt, the index and middle fingers of the left hand, which were at that moment in the gap between the parts, must leave the slot and allow to merge one part of the deck with the other part of the deck.
To do this, these fingers must contract in the joints.
The thumb of the left hand should press its base on the part that it holds and push it to the other part.
Then the left hand with all fingers should fix both parts in a single deck, leveling it around the edges.
The Volt is done.
24. Springboard.
Obviously, the name of this reception was due to the similarity of movements of parts of the deck with the athlete, who jumps from the springboard.
For its execution, take a deck of cards and ask the viewer to take it off.
When the viewer removes the deck, then with the right hand pull out the bottom part, and the left hand at that moment should place the fingers in such a way that it would be convenient to make the card volt.
For this, the fingers of the left hand should take the following position.
The unnamed finger of the left hand is underneath the bottom of the upper part, the little finger of the same hand is on top of the top part from the side of the shirt at the bottom of the pack.
The remaining fingers of the left hand are in the open position, without interfering with the free movement of the remaining upper part of the deck.
Only 2 fingers carry the main load, keep this part, the other fingers should not interfere with them.
After the left hand has taken the original position for the volt, and the right hand places the removed bottom on top of the upper part, the little finger of the left hand is between these two parts.
The index finger and the ring finger drop from the top of the deck.
Further, the right hand again covers the entire deck of cards, but retains only the upper part of it, which lies over the little finger of the left hand.
Then the right hand moves to the left side of the deck, which is below the little finger, and the left hand at the same time slightly extends the palm with the index, ring, middle fingers and little finger, holding the upper part between the little finger and the middle finger.
The further movement of the left hand, which unbends the palm of the hand, causes the top of the deck to occupy a position that is perpendicular to the bottom of the deck, as shown in the photo, which is lower.
The left hand, when it spreads the palm with fingers, further jumps over the edge of the upper part and now the lower part is on the right side of the top and perpendicular to it.
After that, the palm of the left hand with the lower part closes and the lower part covers the upper part from the top.
The top part of the deck jumped down like a springboard.
Probably that's why this volt is called a springboard.
Then both parts merge and form a single deck.
25. Window leaf.
The volt is performed with one left hand.
Take the deck in the left hand and ask the viewer to remove the deck.
After picking up, pull the bottom of the deck with your right hand, and the top of the deck will fall into the palm of your hand and take the place of the lower part.
At the top of the deck in the left hand, place the index and ring fingers of the same hand.
Then complete the removal of the deck, put a part of the deck from the right hand over the top of the deck in the left hand.
The index and ring fingers will form a gap between the pieces of the deck.
Then the whole process of execution should take place in one second, but no more.
It is performed by shaking the left hand.
At the moment of shaking, the following should happen.
The index, middle, ring finger and little finger in the left hand unbend in the joints and the deck opens like a leaf, the top part of the pack lays on the fingers, and the lower part of the pack lies in the palm of your hand.
Then the index finger of the left arm bends in the joints and moves under the bottom of the lower part, as shown in the photo, which is higher.
Further, this index finger presses from underneath the bottom to the bottom so that this part stands up perpendicular to the palm and top of the deck.
And at this time the thumb of the left hand should move from the bottom to the top and be on the upper edge of the bottom, as shown in the photo, which is lower.
The next moment, the middle, ring finger and little finger bend in the joints and close the deck like a window leaf.
Now both parts look at each other face-to-face.
See the photo below.
After that, the thumb of the left hand starts to hold both upper edges of the top and bottom parts of the deck.
Then the thumb of the left hand presses forcefully on the upper edge of the top of the deck, forcing it to slide to the right side along the fingers of the left hand, which should all straighten and give the top of the deck to slide over them without obstacles.
The final result of this slide should be the fall of the top of the deck to the palm of the left hand, and after it the lower part of the deck should fall freely on the top.
That is, both parts of the deck must merge into a single deck.
The Volt is done.
26. The shelf.
The advantage of this volt is the ease of execution and the lack of extra time for long training.
This volt is performed with one left hand, under the table on the table top, chair edge or on your foot.
The initial position of the deck is shown in the first photo, and the second shows the removal time, when the deck is divided into two halves.
After the complete division of the pieces of the deck, the upper part of the deck is in the left hand, and the lower part of the deck in the right hand.
The little finger of the left hand should lie on the shirt of the part of the deck that is in this hand.
Then part of the right hand, put on top of the deck in the left hand.
The little finger will form a slot that separates both parts of the deck.
Further, lower the left hand under the table.
Move your left hand to the side of the support.
The support can be a lid, a table leg, a back of a neighboring chair or one's own leg.
With the thumb of the left hand, push a part of the deck that lies on top of the left hand.
This part of the deck should easily slide down the bottom of the deck until it stops, as shown in the photo below.
At the same time, the little finger of the left hand should leave the slot between the parts and move to the bottom of the entire deck and there, along with the index, middle and ring fingers, keep both parts of the deck on itself.
The next moment, the upper part moving to the right side, slides from the bottom to the palm of the left hand and lies next to the bottom, with the right side touching the stop.
Then the thumb of the left hand presses the lower part of the deck on its left side downwards, and the left-hand index finger presses in the same place of the same part from below the bottom of the right edge so that this lower part of the deck rises above the level of the top part of the deck, As if on the second floor, and immediately the left hand with the help of the base of the thumb begins to push the lower part, which is already above the top on top of this upper part, to the very stop.
As soon as this part reaches the support, it immediately merges with the other part into a single deck.

Comments
Commenting on, remember that the content and tone of your message can hurt the feelings of real people, show respect and tolerance to your interlocutors even if you do not share their opinion, your behavior in the conditions of freedom of expression and anonymity provided by the Internet, changes Not only virtual, but also the real world. All comments are hidden from the index, spam is controlled.