Step by step guide that describes the process of making the kite (kite - English snakes.). Website wildkite.net source of guidance.
| Orange as it is the "prototype" kind of kites - the main goal pursued by the right to receive the flying characteristics. Also, I think that the one-color kites are beautiful. | 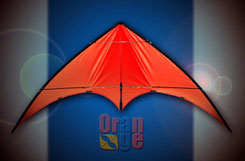 |
At the end you will find illustrated instructions drawings (plan) of the kite sail. Using the striper grid 10x10 cm. you can easily transfer the drawing to the paper. This instruction does not show all the nuances that may arise in the manufacturing process, so you must use your own head where you want;)
|
For the production of the kite you need some space. Your desk should be large enough for printing and cutting. |
|
Based on the wing kite plan, draw the kite outline on paper. Note that you have to add on the edges of the stock of about 12 mm to create a double fold. Asli wing kite is made up of several colors, you have to place a few patterns will and this care must be taken in development patterns. |
|
Impose template onto a colored matter. To avoid paper folding patterns fix it along the contour of the pins. |
|
Cut a piece of the future of the wing using a soldering gun. It zaplavit edges to prevent fraying later. |
|
Cut the second wing of the future kite, symmetrical to the first. |
|
Use double-sided tape, 6mm thick., To bond the two halves of the wings. Bonding to produce an overlap of 6-7 mm. |
|
Cut the 15mm wide reinforced tape. and a length of 800mm, to reinforce the spine seam. |
|
Reinforced tape should be about 25 mm in length. Later it will be sewn. |
|
Time for sewing the first seam. Use the three-point zigzag stitch for the spine seam. |
|
The next step must be sewn into the edge of the kite (back) nylon thread d 2-3mm. How do you see in the picture. |
|
Leave a loop 10cm. |
|
View from the bottom of the kite. You see stitched reinforced tape three stitches. |
|
To handle the leading edge of the kite, we need double-sided tape and thick waterproof fabric width of 5 -6sm. |
|
The procedure for processing the leading edge of the kite is specified below. |
|
Another photo illustrating how to steal an accompanying paper tape. |
|
Screw the back part of the added material (10cm), to strengthen the part of the tip. |
|
After the adhesive tape stuck to the matter, it is necessary to wrap up. |
|
At this stage, mark the stitches pencil, which will be marked on the matter. |
|
Bridle consists of two parts. The bottom part - 70mm wide piece of cloth. For the top, use the car seat belt material or some other durable fabric. |
|
Putting the pieces together to make it easier to handle them. |
|
The final forografiya. Remember to leave a hole (pocket) on the spine which is inserted into the guide! |
|
A) After folding his bridle and application-to-nose with tape, carefully note the stitch line. It will make sewing easier. Once again, remember the "pocket" for the guide. B) Sewing bridle to the nose, cut the edges along the edge of the soldering gun. |
|
A) Bottom view. Sew Velcro 7cm in the tail of the kite. It will vstyavlyatsya guide. B) Top view. Take a strip of 25mm solid matter (about 25cm long) and can cut the end of the boom. Then carefully sew the fabric to the sail straight stitch. This item mate sew Velcro. Get some sort of pocket. |
|
Here is the place for the connector. |
|
The next step is doing a hole for the T connector in the center. You can make a special tool for the job, in the same way that I use the photograph, but a hole made with a hot torch, will do just fine. |
|
Designated connectors Take 25mm thick material and cut two pieces by 7cm. Fold them in half lengthwise and cut the ends diagonally. Then sew them to the back of the sail and burn them in three holes for connectors, according to 2cm apart. |
|
Do the hole at the end of the wing. The hole should be about 5cm from the tip - to the place where there is a gap in the stitching. Install the retaining ring (Nylon thread, a plastic collar) |
|
Cut a hole in the front of the kite to the upper and lower guide connector. 5cm should be enough. Designated guides marked on the plan. |
|
Insert the T connector is the center guide in the oval hole made beforehand in the spine. |
|
Anatomy of a kite |
|
Places connection guide. |
|
It is necessary to fix the guide with plastic collars. |
|
Driving lanyard attachment. |
|
Alternative fixing scheme sling. |
|
The guide is inserted into the spine ballast d 5mm and weighs 8g. This helps the kite to make some tricks during the flight. Ballast moves inside the guide (the entire length) for that you should use at the ends of "shock" (silicone, foam, etc.). |
|
Connectors that you will need to kite. |
|
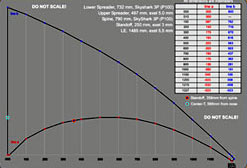
the sail plan. All measurements are in millimeters. For the correct manufacture of patterns put on paper 10X10cm grid. After that, follow the instructions. The plan is made in the PDF format. To view it, Adobe Reader is needed. |
|
Materials for the manufacture of: - Cloth sails lightweight polyester or nylon fabric sails ~ 1,5m2 2 x 150cm | |
)
)
)
)
)
)
)
)
)
)
)
)
)
)
)
)
)
)
)
)
)
)
)
)
)
)
)
)
)
)
)
)
)
)
)
)

Comments
Commenting, keep in mind that the content and the tone of your messages can hurt the feelings of real people, show respect and tolerance to his interlocutors, even if you do not share their opinion, your behavior in terms of freedom of speech and anonymity offered by the Internet, is changing not only virtual, but real world. All comments are hidden from the index, spam control.