
Self-made night vision device
| Self-made night vision device |
|
NIGHT VISION INSTRUMENT BASED ON LENS OF OLD PHOTO-APPARATUS OR LENS. OPERATING PRINCIPLE: Any body has the ability to radiate or reflect IR (infrared) rays. On this principle, and built "PNV" (night vision device) developed in 1984 by the German firm Elektrisch Manufactur. This device is based on the internal photoelectric effect. When the IR image is projected, the electrical conductivity of the irradiated sections of the photoconductor (2) (see Fig. 1) changes and a potential distribution corresponding to the brightness distribution of the image on the photoconductor (2) is created on the adjacent electroluminescent layer (4). To carry out this process, an alternating voltage of 250-500 volts must be applied to the extreme transparent electrodes with a frequency of 400-3000 Hz and a current strength of not more than 10 mA 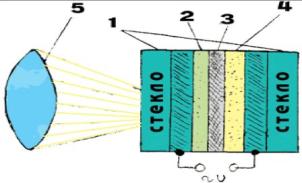 FIG. 1. glass plates. 2. photoconductor. 3. silver layer. 4. Electroluminor 5. lens or lens from the camera. MANUFACTURING NECK So, let's start manufacturing PNV. Chemical elements necessary for the manufacture of the device can be obtained in any chemical cabinet of the school or chemical laboratory of any enterprise. First, let's take two glass plates, tin chloride SnClz, silver, zinc sulphide ZnS (crystalline) and copper. The glasses are held for 4 hours in a mixture of H2SO4 and K2Cr2O7 (potassium dichromate). Dry it. Then take a porcelain cup, put SnCl2 in it and put it in a muffle (or electric) oven. Above it at a distance of 7-10cm fix the glass. Cover the cup with a metal plate and turn on the oven. As soon as it warms up to 400-480 degrees, remove the metal plate. As soon as the finest conductive coating is formed, turn off the oven and leave the glass in it until it cools down completely. Coat check the tester. Then, on one of these plates, apply a photoconductor. To do this, prepare equal amounts of a 3% solution of thio-carbomide Na4C (S) NH2 and a 6% solution of lead acetate. Pour both solutions into a glass jar. Using tweezers, add a glass plate to the solution and hold it vertically. But before this, apply a varnish free from the conductive coating to the side. Wearing rubber gloves, pour into a vessel with plates, to the top, a concentrated alkali solution (carefully!) And mix it very gently with a glass rod, without touching the plates. After 10 minutes, remove the plate (gently) and wash it under a stream of distilled water. Dry it. Turn the oven on and put the silver in a clean china cup. Repeat the process described above at 900 deg. The coating is applied to a plate with a photoconductor. Get a mirror film. For the manufacture of the phosphor, prepare pure ZnS crystals. If there are any impurities, the brightness of the luminescence drops sharply or disappears. Prepare the oven. Put a clean copper in the porcelain cup. Crystals of copper and ZnS should be as small as possible. Observe the proportion of ZnS - 100%, Cu (copper) - 10%. In the furnace, circulate the copper vapor and pass them through the gaps between the crystals. Do not grind the resulting crystals. Must be a colorless powder. Mix the lap sponge with the crystals. The amount of varnish is minimally possible. Pour the mixture on a plate with a layer of silver and wait for the full flow and the formation of a flat surface. Top the second plate of the conductive coating on the varnish and gently press it. After drying, seal the obtained NVV. Before all these operations, after applying a conductive coating, solder wires should be soldered to the edges of the plates. 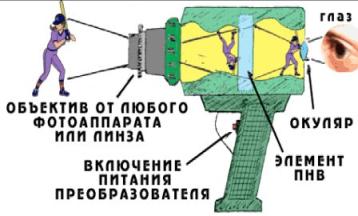 FIG. 2 ASSEMBLY Now it remains for you to assemble a high-voltage generator circuit and assemble it all into a single enclosure. It can be of any shape. But it is recommended that it be proposed by the developer (see Fig. 2). The lens can be from any camera, preferably short-focus, for example from "FED", "Smena-M". The eyepiece can be any biconvex lens. After final assembly, check all connections for proper connection and strength. Having switched on the NOV, the transformer must be quietly squeezed. If the image does not appear do not despair. Change the oscillator frequency or voltage level. Set the maximum sensitivity. 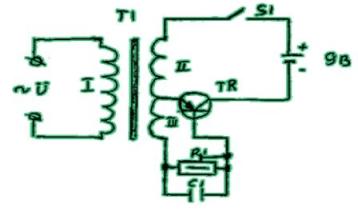 NIGHT VISION SCHEME SCHEME TR - P213, P 217 RI - from 75 to 150 Ohm; CI - 0.33 to 1 μF SI - any pushbutton switch. The frequency of the generator is measured: the capacitor CI - roughly; And the resistor - smoothly. TI - is wound on any transformer of suitable dimensions. The winding I contains 2000 - 2500 turns, the wires - 0.05 - 0.1 mm; Winding II contains 60 turns, Winding III - 26 turns, wires - 0.3 mm. |

Comments
Commenting on, remember that the content and tone of your message can hurt the feelings of real people, show respect and tolerance to your interlocutors even if you do not share their opinion, your behavior in the conditions of freedom of expression and anonymity provided by the Internet, changes Not only virtual, but also the real world. All comments are hidden from the index, spam is controlled.