
Self-made brick
| Self-made brick |
|
In rural construction today, details of reinforced concrete that essentially replaced undeservedly forgotten but used local materials from time immemorial have been used quite successfully. But from local materials in the village erected, and now erect solid, beautiful, warm, durable and absolutely environmentally friendly houses and other buildings. This section of the journal contains long-known and well-proven methods of manufacturing building materials in combination with new techniques, technologies and techniques. This combination allows to improve the quality of home-made building materials, as well as to mechanize their production, make them more affordable and cheaper. These recommendations are intended for people who have difficulties with building materials for their own needs when building a house, dacha, garage, as well as other farm-farm, individual, family or collective farm buildings, as well as for small business owners who are going to do construction work or production building materials. (Developments of VN Rudanovsky). 1. Direct non-burning compression Direct non-burning pressing of bricks, tiles and construction blocks is environmentally absolutely pure production. In this way, it is possible to obtain construction materials for various purposes: building block, brick, road stone (pavers), tiles, facing and paving slabs. The quality of the products depends only on the quality of the punch and matrix: the surface can be made glossy, strength - depending on the quantity and quality of the binder being introduced into the mixture, up to 600 kg / cm2. The receipt of materials with higher strength is not considered here because of their uneconomical nature and complexity of production technology. When building one-two-story buildings and structures, the strength of MZO brick is sufficient. The calculations show that the M20 brand should keep the masonry pole (theoretically) up to 80 m high, but taking into account the heterogeneity of the masonry strength, stability and safety factor, it is quite safe to build buildings up to two floors when laying walls with a thickness of 45 cm. When building, Three-storey buildings it is necessary to increase the thickness of the walls of the first floor to 66 cm. The condition of direct non-burning compression of building products is a minimum amount of moisture and a large preliminary reduction. Full natural drying ends in a week. With the minimum amount of moisture in the mixture, with the use of binder cement and preliminary reduction of up to 5 kg / cm2, the finished products have the ability to self-heat, resulting in drying is more intense, and after a day the product ripens for use in masonry. The consumption of cementitious materials (cement, lime) in the production of building materials by direct compression of a semi-dry mixture is half that of vibratory molding, and in most cases it is possible to do without them. (When vibrating, the concrete mix must have a sufficient amount of water, otherwise its mobility will be insufficient.) However, an excessive amount of water reduces the final strength of the products.) Two types of blocks are known with the use of cement as binder: 1. Concrete products. They can be made according to the most economical (about the ratio of cement) recipe for direct pressing at the recommendation of Interbok, which has gained popularity with its "dry clutch". To do this, mix 10 pieces of small gravel, 6 parts of sand and 1 part of cement M400. Such products will be ready for laying in a day of drying at plus temperature. Strength - 30 kg / cm2. They can be used in the zero cycle: for foundation, basement, paving roads, making curbs, etc. 2. Cement-sand tiles (block). It can be made by mixing 10 parts of sand, 1 -3 parts of cement. The quantity of cement (it is taken of the mark 'M300 - M400) depends only on the required final strength and its brand. For the production of the protective layer, it is desirable to adhere to the ratio of 10: 2. Cementless soil blocks (terrablocks). They are made from soils with a clay content of no more than 10-15%. It is unsuitable for the manufacture of terracotta-vegetation layer and silted soil. When using lean (with a low content of clay) soils in them add clay. The prepared mixture should have such a moisture, so that the handful of the mixture, compressed in a fist, would grasp into a ball, but not spoil the hands. When using greasy (with a large content of clay) soils in them add sand, ash, slag. The suitability of the applied soil is determined in different ways. If, for example, slopes and ditch walls or deep tracks on dirt roads not overgrown with grass do not crumble, such a soil is suitable for erecting walls or manufacturing wall blocks. If pedestrian roads are not washed away by rain or clods of land do not disintegrate on the shovel, this indicates the suitability of the soil. Soil can be tested and so. Take a bucket without a bottom, put on a flat floor or even a firm lining. In the bucket, fill the soil with layers of 10 - 12 cm, each layer being rammed until the rammer rebounds. Filling the bucket in this way with soil, it is lifted and tipped to a flat board. The resulting cone is protected from rain, wind and sun for 8 to 12 days. If after this the cone, falling from a meter height, does not break, this indicates a high quality of the soil. The formation of cracks suggests that the soil is greasy. If the block is crumbling - the ground is skinny. Do not worry - everything is easily adjusted. Skinny or sand, ash, slag, fire, strawchip, shavings, reed fines are added to the fatty soil. Add clay to the lean ground. A small amount of small stones, crushed stone and organic impurities (up to 30%) does not reduce the quality of the blocks. To facilitate the soil and reduce its thermal conductivity, you can add a heater - fibrous additives. It is also possible to use loesslike soils, but necessarily adding up to 40% of fine slag or up to 15% of lime-lime (it should be borne in mind that with the addition of lime, the initial strength of the material after 20-30 years increases from 15 to 100-120 kg / cm2) . Terrabobs made according to the above recommendations should undergo natural drying. After two weeks of such drying, their strength will be more than 15 -20 kg / cm2, but the sensitivity to moisture will remain. Such blocks are better to use in partitions. To increase the strength and moisture resistance, additives can be introduced into the raw mix: 3-8% low-quality cement or 15-20% lime-lime, or 70-90% kg / m3 peat crumb per 1 m3 of soil. Peat crumb increases moisture resistance by 10 times, while the strength of the blocks does not decrease. The addition of cement to the mixture can give an increase in strength at once three times. When adding cement, the soil mass must be used no later than one hour after its preparation. The best results (in saving binders) with direct compression are additives in the raw mix of low-quality cement 2-4% or lime 5-7%. It should be borne in mind that the use of low-quality cement when adding mixtures is more justified for economic and technological reasons. When using cement grade M300 and above, it is desirable to reduce its brand to M150 and lower by diluting it with slag dust, ash ash or sand, evenly distributed in the mixture. Slag dust is better to take from electrostatic precipitators - it has small binding properties and can completely replace cement; While it is enough to dilute it in 2-3 times more than low-quality cement. Presence of water. With the technology of direct pressing, the prepared mixture should have a moisture content of 6-8%, despite its composition (the compressed lump in the fist does not get dirty and does not crumble). At high humidity, the mixture is mixed with a more dry one of the same composition, followed by stirring until it is uniform. Water is not added: the moisture is sufficient in clay and soil. Samannye blocks. They are prepared in a similar way to ground ones and all recommendations related to the manufacture of thermoblocks can be used, especially for the use of cement or lime additives. The difference from terrablocks is only in the composition of the initial mixture. Saman is made from clay, sand with an admixture of fibrous additives (straw chaff, bonfire, moss, shavings, reed trifles, etc.). The composition of adobe depends on the fatty clay: 1-2 parts of very fat clay - 1 part of sand and 11-14 kg of fibrous additives. Correction of fat content can be made and by changing the amount of sand. To prepare the adobe, first mix the clay with sand until a homogeneous mass is obtained. The strawchuck is pre-wetted with water. Adding it to the mass, everything is thoroughly mixed. The quality of the clay is increased if it is harvested in autumn and placed in a vacant place with a shaft up to 1 m high. After being saturated with water in autumn, clay freezes, swells and bursts in winter. Freshly clay has also good qualities. To clay harvested for future use, do not dry up, it is better to cover with reeds or other mats or straws, occasionally watering mats with water. "Saman-sandwich" and "terra-sandwich". They differ from conventional blocks in that they have a protective facing layer with greater mechanical strength and moisture resistance than the main one. A protective layer with additives of coloring fillers can also have high decorative qualities: it is possible to obtain blocks with a protective layer of all necessary colors. On the protective layer can be applied and ornaments printed technology. Masonry from colored blocks and blocks with printed ornaments creates a unique coloring of the building. Equipment for direct pressing - mini-press (Figure 1). Its main nodes are: M - matrix - fixed part; Is a metal box without a bottom and a cover; П - punch-movable bottom of the mold; Moving the punch up or down is controlled by the operator; The punch transmits the compression force to the mixture; K - removable cover; Covering the matrix from above, it can be fixed by latches. In Fig. 2 shows the sequence of the operations of forming blocks "Saman-sandwich" and "terra-sandwich". In the initial position, the matrix is open (the lid is removed), and the punch is in its lowest position. 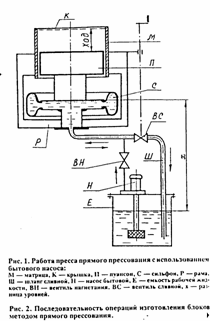 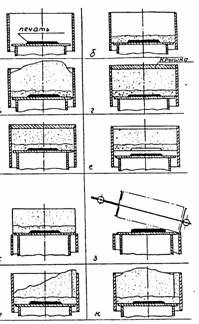 Stacking of the stamp is done (for printing, see Figure 2, a), which is made of sheet rubber of the required thickness (3 - 5 mm); Approximate types of the die pattern are shown in Fig. 3. A cement-sand or lime-sand mixture of a protective layer with a volume of up to 2.0 l is laid and leveled out with a wooden spatula evenly with a layer thickness of 1.5-2.0 cm along the whole bottom and slightly larger at the corners (Fig. 2.6). The main mass (ground or adobe) is laid on the formed layer, which is deformed over the entire area and especially carefully in the corners (Fig. 2, c). After filling the volume of the matrix, close the lid, which is fixed by means of latches (Fig. 2, d). The punch is raised to its upper position (Fig. 2, d). The mixture is compressed to the ultimate pressure (up to the maximum developed by the press force). The punch is slightly lowered (Fig. 2, e). The lid is unfixed and removed. The punch rises to the highest position (Fig. 2, g). At the same time, the finished, molded facing or wall block rises to the top. The finished block lying on the punch is enclosed, and then pulled together by the right and left clamping plates P1 and P2 (Fig. 2, 3 and 4, a). A pallet for removing and carrying tiles that are squeezed by hand (the brush covers the parts of the PZ and P4 of the pallet). In this form, the unit can be transported for long distances to the site of drying, storage or masonry. The pallet releases the finished block if the clamping plates are pulled apart (by pulling the part P4 from the part of the pallet FR). Rubber stamps-seals (see Figure 3), if you want to make a large series of the same type of blocks, you can glue the punch to the glue "Moment" or similar. If the stamp is a complex pattern with small details, these details are glued to the whole sheet in the size of the punch. To facilitate the removal of the finished product, the rubber parts of the stamp must have slopes (the edges of the rubber parts are cut out with slopes). Lubrication of dies is not required. If the rubber stamps (seals) adhere to the product, this indicates that the feedstock has an increased moisture content. In the manufacture of simple blocks, operations a and b (see Figure 4) may be absent. In the manufacture of finer articles such as shingles on the punch, the liner is first laid with a stamp-seal of the required thickness (bar size 200x400x90 mm). A reverse stamp seal is attached to the cover. The product is taken out with the liner, it is transferred, and after laying on the "maturing" the liner can again be reused. Improving the decorative quality of the protective layer. Facing blocks can be done directly when forming blocks with ceramic tiles and glazed tiles or slices, pieces of glass, marble, granite, metal or plastic. For a strong connection of the mosaic to the base layer, use a cement-sand mixture as an intermediate layer or as the main mass. Colored protective layers are best done on the basis of colored cements or with the addition of colorants that are not prone to water washing and fading in the sun. Lime-sand mixture should be used without dyes, as lime, as a rule, decomposes dyes. 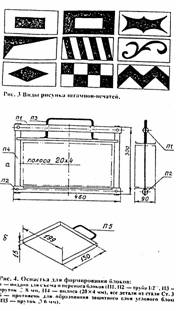 Obtaining a corner block (with two protective sides, designed for laying corners, window and door openings). After laying the protective layer in the plane of the punch, the side-wall of the matrix is pressed (by hand) with a baking tray (Figure 4.6) with a protective mixture, and after laying the main soil mixture and sealing it, the baking tray is removed and the lid is installed. Operations 2, and 2, k are included between 2.6 and 2, in (see Figure 2). The proposed technology for the production of blocks and tiles is very flexible and opens up great opportunities for creativity in their manufacture. It allows to obtain a large variety of building decorations from the outside and inside, and by the cheapest means. 2. Production of bricks and blocks by extrusion (punching) Pressing (extrusion) - a method of producing bricks and blocks by forcing the mass through a part of the press - an extrusion grating. The composition of the mixtures that can be used for the production of bricks and blocks by extrusion is the same as in the direct compression method, but it is better to work them out practically taking into account the properties of local natural materials. Dimensions of additives (gravel or fibrous) can only affect the quality of the cut when cutting a finished product into size. (It is desirable that they are less than 8 mm). In the production of hollow bricks, it is possible to use screening (up to 5 mm in size) instead of fine crushed stone. When pressed (extruded), the direct compression press is used as a feeder. With his punch, he takes the prepared mixture from the bunker and pushes it through an extrusion grate formed by the extruder body from the outside and the void generators inside. When passing through the cavity, the mixture is compacted in section and squeezed out in the form of a bar section of 120x250 mm (for a brick) or 200x200 mm (for blocks) on a table of finished products. 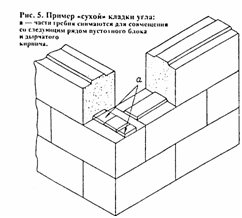 Separation of a piece of bar of the necessary sizes (for a brick -90 mm, and for blocks -400 mm) is produced by a cutting device. The dimensions of the cut pieces can be changed in any desired range. The smaller the raw materials (crushed stone, organic additives), the smoother the edge of the cut. When used as locks in the laying of pile-formers, it is possible to obtain blocks with which it is possible to produce a masonry without the use of solutions, the so-called "dry" masonry (Figure 5), or with "glues" - solutions with the ratio "cement: sand" - 1: 2, creamy state, which are applied by a spatula with a layer of 1-2 mm thick or dipped. Since the basic dimensions of the blocks are sufficiently strictly maintained, the masonry method can be quickly mastered by the masonry blocks from any pile-block unit (the correct arrangement of the blocks with respect to each other is facilitated by the "groove-comb" lock). An example of such dry masonry is shown in Fig. 5. Another advantage of the press is the ability to use it as a trowel-mixer. Since the initial clay can have large pieces, they can be broken down into smaller pieces, but "to obtain a homogeneous composition of the mixture, it must be mashed (as a flour dough) .This effect can be achieved by placing the grate on the extruder's outlet (see Figure 20) From Article 3, a sheet of 8 mm with holes of 0 8 mm throughout the section (as in the meat grinder) and pass through it pieces of clay (where you can immediately add additives: sand, clay). 3. Making bricks by firing Determination of the composition of clay. Checking the clay for suitability for the manufacture of bricks is as follows. First, the clay is dried and then triturated. Powder is poured into a transparent glass vessel (a beaker or just a glass jar), poured into water and mixed well. Можно глину просто залить водой на несколько дней с тем, чтобы она при перемешивании "разошлась" до взвешенного состояния (растворилась в воде полностью), для чего раствор изредка перемешивают. Если глина при перемешивании полностью переходит во взвешенное состояние ("висит" в воде), дайте ей отстояться несколько часов, пока вода не станет прозрачной; внизу увидите слой песка, выше- слой глины, а над глиной может быть слой ила или других примесей. По количеству выпавшего в осадок песка определяется довольно точно пригодность глины для производства кирпича или черепицы. Пользуясь формулой A=100 х n/n+r , вычисляют процентное содержание песка в глине, где П - высота слоя песка в мм; Г- высота слоя чистой глины в мм. Глины бывают тощие, средние и жирные. Тощие глины содержат более 20-30% песка. Они сильно шероховаты на ощупь. Шарик из такой глины 0 5 см при падении с высоты в 1 м на пол разваливается. Средние содержат песок в пределах 10-30%. Они на ощупь шероховаты, и шарик 0 5 см при отпускании с высоты в 1 м сплющивается, но не рассыпается. Жирные содержат менее 12% песка. Эти глины на ощупь мягкие, пластичные. Тесто из них также мягкое. Стержни, изготовленные из него, не ломаются, но при высыхании трескаются. Общее количество песка в глине для изготовления кирпича или черепицы должно быть не менее 12-15% и не более 20-30% в зависимости от качества глины. В глинах, идущих на производство кирпича, не допускаются включения камней, корней, веток и особенно известковых и меловых вкрапин, так как они усложняют переработку глины и резко повышают количество брака при сушке и обжиге. Имеется другой ("народный") способ определения качества глины. Для этого небольшое количество глины замешивают уровня крутого теста и тщательно перемешивают вручную (мнут) до тех пор, пока она не перестанет прилипать к рукам. Изготовленный из этого теста шарик 0 5 см сдавливается двумя дощечками (лучше кусками стекла) до появления трещин. Если трещина появляется при сжатии на 1/4 диаметра (расстояние между дощечками - 4 см) - глина тощая и для обжига не годится. Если трещина появляется при сжатии на 1/3 диаметра (расстояние между дощечками - 3,5 см) - глина средняя и ее можно применять для обжига. Жирная глина дает трещину при сжатии на 1/2 диаметра (расстояние между дощечками- 2,5 см); в такую глину можно добавлять песок и получать кирпич отличного качества. Количество песка, добавляемого в глину, можно рассчитать по вышеуказанной формуле или опытным путем в зависимости от степени жирности глины. Песок необходимо брать промытым, очищенным от нежелательных включений - ила, камешков, растительных остатков. Формовка и сушка. При заготовке глины впрок ее раскладывают на земле слоем толщиной до 40 см. При смешивании нескольких видов глины различной пластичности или при подмешивании добавок (песок, шлак, опилки) дозировку лучше производить не на глаз, а с помощью емкостей (тачки, носилок или ведер), добиваясь строгого соблюдения пропорциональности компонентов и полной однородности массы. Для формовки кирпича используют смесь тестообразного состояния и формуют кирпич обычно методом пластического прессования или путем укладки теста в формы. Состояние этого теста должно быть таким, чтобы сохранялась форма опалубки. Это возможно только при влажности теста не более 18-20%. Такое тесто равномерно и без особого труда формуется, но долго сохнет при естественной сушке (другой возможности обычно ' не бывает). Для достижения конечной влажности кирпича-сырца до 6-8% требуется от недели до месяца сушки в зависимости от погодных условий и места (на сквозняке под кровлей сырец сохнет быстрее и качественнее, чем при других условиях.) Готовность кирпича-сырца к обжигу устанавливают по следующим признакам: взятый из средних рядов кирпич ломают пополам и при отсутствии в середине темного пятна (признака влажности), сырец признается годным для обжига. С помощью описанного пресса, использующего полусухое прессование (в некоторой литературе это называют сухим прессованием, но более правильно название "полусухое прессование"), прессованию подвергается исходная смесь естественной влажности 6-8%, т.е. свежевскопанная глина со снятым сухим слоем. При копке глины ее хорошо размельчают, затем перемешивают с добавками и отправляют на формовку в бункер пресса. Воду при такой заготовке добавлять не нужно, ее в глине достаточно. Готовность такого изделия к обжигу - через сутки сушки при теплой погоде. При излишней влажности исходного сырья требуется досушка кирпича-сырца. Если после предварительной сушки влажность все еще достаточно высокая, сырец необходимо досушить в штабелях: кирпич укладывают в два ряда на ребро с зазором от 2-3 до 5-7 см. Ширина штабеля в основании 80 см, наверху -60 см. Чтобы кирпич не деформировался, в нижние ряды ставят более просушенный сырец, выдерживающий нагрузку 10 рядов, в верхний - менее просушенный. Для укладки кирпича, в целях уменьшения брака (деформации), подготавливают горизонтальную площадку. Эта площадка должна быть выше уровня грунта, чтобы предохранить кирпич от подтекания осадочных вод. После укладки кирпичей штабели прикрывают сверху кусками толя или пластика для защиты от дождя и солнца. Прямое солнечное воздействие производит неравномерную сушку кирпича- в результате образуются трещины. Чтобы уменьшить возможность образования в кирпиче трещин при сушке, следует выкладывать кирпичи их торцовой частью по направлению господствующих ветров. Печь для обжига кирпича. После выравнивания и очистки площадки (под печь) от растительного слоя производят ее горизонтальную планировку и трамбовку. Площадка должна быть на возвышенном месте, защищенном от грунтовых и осадочных вод. Один из видов обжиговой печи представлен на рис. 6. Ее вместимость 700-1500 шт. Это одна из самых маленьких печей. Внутренние размеры ее: ширина- 160 см, длина (в зависимости от предполагаемой загрузки) - от 132 до 208 см, высота укладки сырца колеблется от 165 до 180 см. 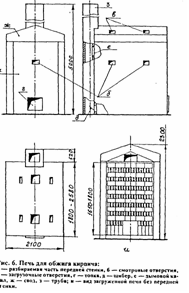 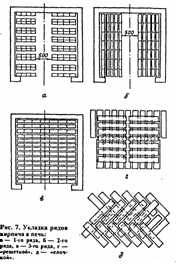 Высота печи выполняется соответственно выбранной высоте укладки. Высота печи выполняется соответственно выбранной высоте укладки. Стены печи изготавливают из кирпича-сырца и делают толщиной в один кирпич (250 мм). Перекрытие желательно сделать на металлическом каркасе, при условии, что каждый ряд кирпичей свода будет ложиться на две стальные полосы 8x40 мм, или стержни 0 20-24 мм, которые собираются в металлическую рамку при помощи сварки. Свод в середине должен иметь высоту над укладкой сырца не менее 30-35 см. Топку формируют при укладке сырца в печи. Ширина топки 48-50 см, высота 38-40 см. В топке по всей длине нужно выполнить на высоте 25-30 см уступы на обеих стенках, куда потом укладывают колосниковые решетки (при использовании в качестве топлива угля). При обжиге дровами колосниковую решетку можно не устанавливать. Топка закрывается дверкой размерами 40X40 см. В своде делают дымовые каналы сечением 25 X 28 см, а если обжиг ведется малокалорийным топливом (торфом или бурым углем), тогда предусматриваются еще и отверстия сечением 25x15 см, в которые по необходимости сверху подсыпается уголь или торф. Эти отверстия должны иметь крышки. Дымовая труба делается высотой до 5 м (из кирпича) с внутренним сечением 40x40 см или из любой огнестойкой трубы 0 30-40 см. Труба устанавливается рядом с печью, с задней стороны печи (можно с одной стороны использовать заднюю стенку печи). Труба соединяется с печью дымовым каналом (сечением 40х30см), который делается в верхней части задней стенки печи. На середине высоты укладки в стенках печи устраивают смотровые отверстия (25x15 см), которые после просмотра закладывают кирпичами и замазывают глиной. Кладку печи производят, учитывая необходимость частичной ее разборки при укладке и разборке садки. Боковые стенки, свод, задняя стенка, труба, а также угловые части передней стенки кладут на обычном глинопесчаном растворе. Та часть передней стенки, которая будет разбираться для разделки садка, укладывается без раствора. После заделки проема кирпичом стенка обмазывается глиной. Укладка. Укладывать в печь можно только хорошо высушенный сырец, иначе при обжиге потребуется много топлива. Кроме того, недостаточно высохший сырец дает до 80% брака (главная причина - вскипающая влага при нагреве кирпича ищет выход - образует трещины). Укладку сырца в печь (рис. 7) производят так, чтобы в первых 3-4 рядах уложенного кирпича просветы между ними были (для кирпичей, расположенных непосредственно вблизи топки) 10-15 мм, а по мере удаления (от топки дальше) увеличивались до 25 мм. Ряды можно укладывать любым способом, например, "решеткой" или "елочкой". Способы можно чередовать. Нужно помнить главное: каждый кирпич должен быть доступен обтеканию его дымовым газам. Расстояние между кирпичами садка и стенками печи должно быть в пределах 20-25 мм. Обжиг. Печь начинают топить соломой, хворостом и затем дровами. Первая стадия -сушка. Это самая ответственная стадия. Топить следует неинтенсивно, используя низкокалорийное топливо (отходы древесины), до тех пор, пока кирпич не избавится от внутренней влаги. Наличие влаги в кирпиче определяется наличием конденсата в верхних рядах. Просушку можно считать законченной, если на опущенном на 2-3 минуты в печь железном штыре не будет влаги. Наличие влаги можно также определить рукой, поместив ладонь над выходящими газами. Процесс сушки обычно занимает до 12 часов. После того как будет установлено, что остаточная влага удалена, огонь постепенно усиливают, доведя кирпич до темно-красного цвета (наблюдая по своду). Подогрев длится до 9 часов, затем переходят на большой огонь до выхода огня наружу. Увеличение тепла производится только увеличением подачи топлива. Если по какой-либо причине пламя начинает выбиваться из какого-либо места, это место сразу засыпают землей. Когда в верхней части печи появится огонь (900-950°)- верхние ряды светло-красного цвета, а нижние- желтого, печь "ставят на остывание". Для этого топочное отверстие закладывают кирпичом и обмазывают глиной, а на верх печи насыпают сухую землю или кирпичную пыль (можно сухой песок) слоем 10-15 см. Температурный режим обжига характеризуется четырьмя этапами: а) Сушка: температура 20-90°С, время 10-13 часов. б) Подогрев: температура 90-600°С; время 8-10 часов. в) Обжиг: температура 600-1000°С; время 10-12 часов. г) Остывание: температура 1000-50°С; время 7-10 часов. Контроль температуры обжига в печи производится визуально по цвету свода: а) Темно-красный, видимый в темноте,- 450- 500°С. б) Темно-красный - 600-650°С. в) Вишнево-красный - 700°С. г) Светло-красный-850°С. д) Желтый-950-1000°С. е) Белый - 1200°С - ПЕРЕЖОГ! Для качественного получения кирпича печь раньше выдерживали в закрытом состоянии до недели и лишь потом приступали к охлаждению. Это давало отличное качество, так как снятие термических напряжений происходило постепенно. Практически достаточно 7-10 часов. Охлаждение печи начинают пробивкой в топке малого отверстия - величиной с куриное яйцо, через час отверстие увеличивают вдвое, еще через час - уже вчетверо. Таким образом, через 6 часов можно открыть топочную дверку и ждать полного остуживания печи. После остуживания разбирается передняя стенка печи и производится разделка садки, начиная с верхних рядов. После разборки, сортировки и выбраковки качественный кирпич складывают штабелем плотно друг к другу. Недообожженный можно использовать в неответственных конструкциях для перегородок или в верхних рядах кладки. Определение качества кирпича. Причина брака. Правильно обожженный кирпич- однородного оранжево-красного цвета. Он имеет правильную форму с прямыми ребрами и ровными поверхностями. При ударе металлическим молотком издает чистый звук. Недообожженный - имеет более светлый цвет, неоднороден на изломе. При ударе издает глухой звук (причина - недостаточная температура или время обжига). Пережженный- имеет темно-серый или сине-черный цвет, часто со следами оплавления по поверхности. При ударе издает высокий звук. Образуется при чрезмерно высокой температуре обжига. Повреждение углов и ребер изделия - результат небрежной переноски, транспортировки или неосторожной укладки изделий в печи. Деформация изделия - недосушенность перед укладкой в печь. Мелкие трещины образуются при слишком быстром нагревании или охлаждении печи. Крупные трещины и сквозное растрескивание изделия - результат неправильного соотношения глины и песка, плохого качества глины, нарушения режима сушки и обжига. Черный кирпич получается из-за недостатка воздуха или из-за плохой его циркуляции в печи. Белые пятна на готовом изделии - следствие неправильной просушки (пересушка). |

Comments
When commenting on, remember that the content and tone of your message can hurt the feelings of real people, show respect and tolerance to your interlocutors even if you do not share their opinion, your behavior in the conditions of freedom of expression and anonymity provided by the Internet, changes Not only virtual, but also the real world. All comments are hidden from the index, spam is controlled.