
JailBreak, Unlock, Activation via iLiberty + [How to unlock iPhone]
![]()
In this manual I will describe in steps how to flash or reflash the iPhone to firmware 1.1.4, make JailBreak (it is necessary to have easy access to all the directories on the phone), Unlock (unlock the phone, that is, to have access to all functions, Except call and sms) and Activation (makes the iPhone accept any SIM card, so you can call from iPhone, send SMS, use GPRS, EDGE, etc.). In short, in this manual we will create a fully functional phone ready for operation in 15-20 minutes! I emphasize that this manual will be useful not only to people who have just pulled a new phone out of the box, but also to those who want to reflash a new one with a new one. So, let's begin! Read on!
STEP 1
Download to my computer a file with firmware 1.1.4 for iPhone. It weighs 166mb. You can download it from our website here: iphonefirware
Download, unpack the archive. Go ahead.
STEP 2
Transfer the iPhone to the recovery mode (DFU mode) by holding Sleep / Wake and Home for 10 seconds. The screen goes out. Release the Sleep / Wake button. Continue to hold the Home button for another 10 seconds and iTunes will detect the iPhone in the recovery mode, which will be seen from the appeared window. The iTunes and cable icons appear on the iPhone. We connect the phone to the computer. Launch iTunes. The iTunes program can be downloaded here:
Itunes
STEP 3
Press the SHIFT key on the keyboard and press the "Restore" button in iTunes at the same time as pressing this button. A window will open, where you need to specify the path to the firmware file that we downloaded in STEP 1. Select it. The flashing starts. At the end of this process, the iPhone will reboot and there will be a cable drawn. Do not close iTunes, minimize it. Do not disconnect your phone from the computer. Download the program iLiberty + here:
Http://idownloads.ru/16/iliberty_plus_12178/
(This is a proven version that works without interruptions and installs Installer, not Cydia)
STEP 4
The program iLiberty + has been downloaded. Unpacked. Install. After installing the program on your computer, run it:
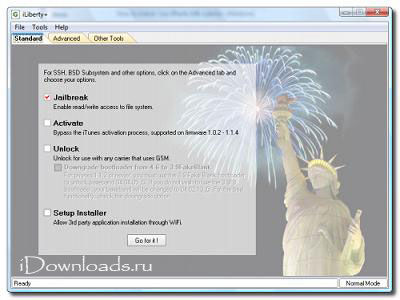
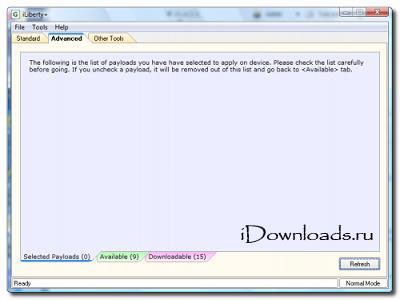
Go to the Advance tab. We choose the programs we need here (I advise Terminal vt100, BSD SubSystem 2, OpenSSH) Click on Download. Programs are downloaded. It should be mentioned that these programs can now not be downloaded. They can be installed later, from the installer. Go back to the Standart tab.
STEP 5
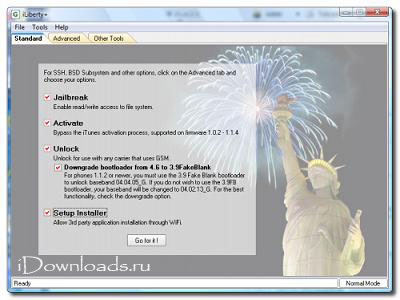
Check all the checkboxes (JailBreak, Activate, Unlock, Downgrade bootloader 4.6 to 3.9 FakeBlank, Setup Installer)
STEP 6
Click on the button "Go For It". The window appears:
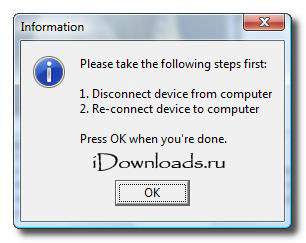
We disconnect the phone from the computer. We wait at least 15 seconds. We connect the phone to the computer. We are waiting for another 10 seconds. Click on the "OK" button.
STEP 7
The command line ran on the phone - operations are being performed. On the phone will run the words on a black background for 10 minutes, when the process is completed the phone itself will reboot and you will be asked to enter the pin code from your sim card. We enter. Us throw out on a springboard. We disconnect the phone from the computer. We close all programs on the computer. If you have a "No Signal" written on the iPhone, please restart your phone. A signal will appear.
STEP 8
That's all. The phone is ready for use. Now it makes sense to Russify your phone with the "Russian Project" program.
STEP 9
Next, I recommend you go to the phone settings and check whether the settings are saved (sometimes it does not). Check and fix it very easily! We check this: in the settings we turn off the sound on the keyboard. If the sound on the printing keyboard is turned off, then everything is fine. If the sound on the typing keyboard remains though you turned it off, then download the Installer program Terminal (Term-vt100). We open this program. If you are asked to enter a password, then write alpine . The password does not appear - print blindly. We press on "Input". Now enter the following line:
chown -R mobile:mobile /var/mobile/Library/Preferences Click on "Enter". Now the settings will be saved.

Comments
When commenting on, remember that the content and tone of your message can hurt the feelings of real people, show respect and tolerance to your interlocutors even if you do not share their opinion, your behavior in the conditions of freedom of expression and anonymity provided by the Internet, changes Not only virtual, but also the real world. All comments are hidden from the index, spam is controlled.