How to take screenshots and anotations in Mac OS X
How to take a screenshot on a Mac
-
The following commands are used to take screenshots in the system:
- Command + Shift + 3 - snapshot of the whole desktop
- Command + Shift + 4 - a snapshot of allocated space of a table
- Command + Shift + 4 and + Space (window selection) and + LMC directly shot.
Where: Command = WinKey, Space = Space, LMC = left mouse button.
On the hackintosh, depending on the type of keyboard and the selected layout in the menu, the Command role can be performed by Option = Alt
To change this state of affairs, please refer to "System Settings / Keyboard / Modification Keys."
-
Additional functions:
- Press Option to start selection from the center
- Press Shift to set the selection only horizontally or vertically
- Hold space to move the selected selection
- Hold shift + space to fix horizontal or vertical selection
- Press Esc or Command + Enter to cancel
- Press spacebar to select the required window
By default, the system has a PNG snapshot format with a shadow. In fact, this is not the only supported format, and the default value can be changed. In this case, there are several ways. The first involves the use of third-party utilities with the appropriate functions (commands). The second is the system through the commands in the terminal. In both cases, for the changes to take effect, you must perform the re-log.
-
In order to change the format in which the screenshot is saved, run in the terminal:Code:Defaults write com.apple.screencapture type png
Killall SystemUIServer
Where: png can be replaced by -
Jpg, pdf, tiff, etc.
From myself, I note that when using the JPG format, the system very optimally balances the quality and weight of the file.
Each of the lines is executed via Enter.
You can get it back with the same command but with a different screenshot format - png
By default, the screenshots are saved to the desktop.
-
To replace the place where the screenshot is saved, write in the terminal:Code:Defaults write com.apple.screencapture location / Users / Roger / Documents / Screenshots
Killall SystemUIServer
Where: as an example of the path / Users / Roger / Documents / Screenshots can be any desired.
Each of the lines is executed via Enter.
You can get back the same command but with the other ~ / Desktop address specified.
-
To disable adding a transparent frame, which in case of using for example the JPG format becomes simply white, you need to enter the command into the terminal:What would I get back to enter the command:Code:Defaults write com.apple.screencapture disable-shadow -bool trueCode:Defaults write com.apple.screencapture disable-shadow -bool falseHow to make quick annotations in a screenshot or PDF
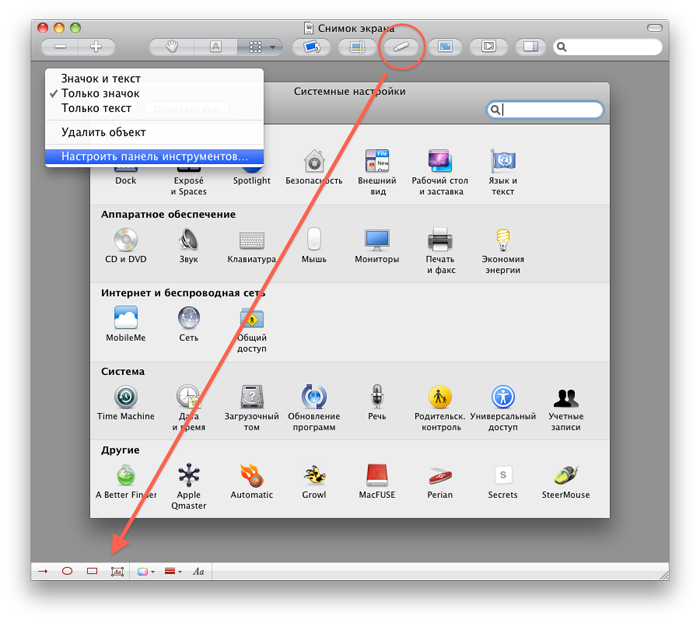
In Snow Leopard, there is a function
Abstract, which is available in the system application
View. You just click on the screenshot file and so on that it opens in the view where you can make all sorts of notes, selections, arrows, write something on the image, select the font and color ...
The "Annotation" toolbar will become available after clicking the corresponding button in the preview panel (it is configured through the context menu)
Then you can optionally select in which format to save the file by means of access to the "View" menu - File / Save as /
Where you can choose the format and the desired quality. All fast, high quality and no Photo-Shop


Comments
When commenting on, remember that the content and tone of your message can hurt the feelings of real people, show respect and tolerance to your interlocutors even if you do not share their opinion, your behavior in the conditions of freedom of expression and anonymity provided by the Internet, changes Not only virtual, but also the real world. All comments are hidden from the index, spam is controlled.