Automatic Site Map Generator

 Automatic Site Map Generator [
  ] [
] [  ] [
] [  ]
]
It often happens that slowly developing your site, it becomes quite difficult for a webmaster to "follow" all the pages of his site. As a result, the user who logged in to the site can search the information he needs for a long time or not find it at all (although, in fact, it is present on the site).
To avoid such "incidents", as a rule, on sites that have several dozen pages and more, the use of the Site Map is a practice - a special page of the site on which (usually in the form of a hierarchical tree) all the pages of the site are represented. But, if the site contains more than a hundred pages, then manually maintain "in working order" The site map is rather troublesome.
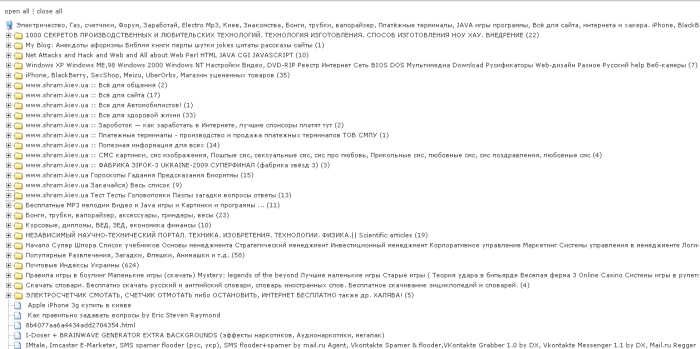
Free script "Site map generator" is designed to automatically create a "Site map" page on the site, on which, in the form of a structured tree, the html pages present on the site are displayed.
ATTENTION!
Do not confuse with SiteMap, which is designed for search engines to index the site!
Download and unpack the archive on your computer.
Enter your settings into the file makesitemap.php :
- $ WorkDir - specifies the path to the disk for the site files (by default, the entire site is indexed).
- $ ExceptionFileList - names of files that will not be indexed and included in the site map tree.
- $ ExceptionDirList - names of folders that will not be indexed and included in the site map tree.
- $ OutFile - the name of the file and the path to which the result of generating the site map will be recorded.
- $ HeaderFile - the name of the file and the path to it, the contents of which will be added to the resulting file in front of the tree.
- $ FooterFile - the name of the file and the path to it, the contents of which will be added to the resulting file after the tree.
In fact, you just need to add in $ exceptionFileList, $ exceptionDirList folders and files, which should not be included in the final file of the site map.
Copy the files dtree.css, dtree.js and the directory img_sm to the directory where the resulting sitemap.html file is located .
Copy the file makesitemap.php to any place.
In order not to be confused, I recommend downloading all the files and directory img_sm to the root of the site.
Be sure to set the permissions on the sitemap.html file to CHMOD 777 .
Initially, the sitemap.html file is empty, but after running the script it is populated with the contents of $ headerFile, $ footerFile, and the directory tree itself.
To generate a sitemap, run the makesitemap.php script file (for this, type the path to this file in the browser line, for example: http: //mysite/makesitemap.php ).
The resulting sitemap file will be located in the sitemap.html file.
The following restrictions apply:
- Only static html-pages are indexed.
- ATTENTION! In order to index a folder, it must contain an index.html file.
It seems everything. Use it! 
Static list based folder tree
This is a list based folder tree. What you have to do is to create a <UL> <LI> list. The script will then create the tree on this list. The script uses cookies. It also includes functions for expanding / collapsing all. You can add and delete nodes dynamically. Static list based folder tre [
  ] [
] [  ] [
] [  ]
] Configuration:
Building a treeThe menu is HTML based. <UL> <LI> list.
Example:
<ul id="dhtmlgoodies_tree" class="dhtmlgoodies_tree">
 <li><a href="#">Main item</a>
 <ul>
 <li><a href="#">Sub menu item</a>
 <ul>
 <li><a href="#">Sub menu item</a>
 <ul>
 <li class="dhtmlgoodies_sheet.gif"><a href="#">Sub menu item</a></li>
 <li class="dhtmlgoodies_sheet.gif"><a href="#">Sub menu item</a></li>
 <li class="dhtmlgoodies_sheet.gif"><a href="#">Sub menu item</a></li>
 <li class="dhtmlgoodies_sheet.gif"><a href="#">Sub menu item</a></li>
 </ul>
 </li>
 <li class="dhtmlgoodies_sheet.gif"><a href="#">Sub menu item</a></li>
 <li class="dhtmlgoodies_sheet.gif"><a href="#">Sub menu item</a></li>
 <li class="dhtmlgoodies_sheet.gif"><a href="#">Sub menu item</a></li>
 <li class="dhtmlgoodies_sheet.gif"><a href="#">Sub menu item</a></li>
 </ul>
 </li>
 <li><a href="#">Sub menu item</a>
 <ul>
 <li><a href="#">Sub menu item</a></li>
 <li><a href="#">Sub menu item</a></li>
 <li><a href="#">Sub menu item</a></li>
 <li><a href="#">Sub menu item</a></li>
 </ul>
 </li>
 <li><a href="#">Sub menu item</a></li>
 <li><a href="#">Sub menu item</a></li>
 <li><a href="#">Sub menu item</a></li>
 </ul>
 </li>
 <li><a href="#">Main item</a></li>
 <li><a href="#">Main item</a>
 <ul>
 <li><a href="#">Sub menu item</a></li>
 <li><a href="#">Sub menu item</a></li>
 </ul>
 </li>
 <li><a href="#">Main item</a>
 <ul>
 <li class="dhtmlgoodies_sheet.gif"><a href="#">Sub menu item</a></li>
 <li><a href="#">Sub menu item</a></li>
 <li class="dhtmlgoodies_sheet.gif"><a href="#">Sub menu item</a></li>
 <li><a href="#">Sub menu item</a></li>
 </ul>
 </li>
 </ul>
<ul id="dhtmlgoodies_tree" class="dhtmlgoodies_tree">
<li><a href="#">Main item</a>
<ul>
<li><a href="#">Sub menu item</a>
<ul>
<li><a href="#">Sub menu item</a>
<ul>
<li class="dhtmlgoodies_sheet.gif"><a href="#">Sub menu item</a></li>
<li class="dhtmlgoodies_sheet.gif"><a href="#">Sub menu item</a></li>
<li class="dhtmlgoodies_sheet.gif"><a href="#">Sub menu item</a></li>
<li class="dhtmlgoodies_sheet.gif"><a href="#">Sub menu item</a></li>
</ul>
</li>
<li class="dhtmlgoodies_sheet.gif"><a href="#">Sub menu item</a></li>
<li class="dhtmlgoodies_sheet.gif"><a href="#">Sub menu item</a></li>
<li class="dhtmlgoodies_sheet.gif"><a href="#">Sub menu item</a></li>
<li class="dhtmlgoodies_sheet.gif"><a href="#">Sub menu item</a></li>
</ul>
</li>
<li><a href="#">Sub menu item</a>
<ul>
<li><a href="#">Sub menu item</a></li>
<li><a href="#">Sub menu item</a></li>
<li><a href="#">Sub menu item</a></li>
<li><a href="#">Sub menu item</a></li>
</ul>
</li>
<li><a href="#">Sub menu item</a></li>
<li><a href="#">Sub menu item</a></li>
<li><a href="#">Sub menu item</a></li>
</ul>
</li>
<li><a href="#">Main item</a></li>
<li><a href="#">Main item</a>
<ul>
<li><a href="#">Sub menu item</a></li>
<li><a href="#">Sub menu item</a></li>
</ul>
</li>
<li><a href="#">Main item</a>
<ul>
<li class="dhtmlgoodies_sheet.gif"><a href="#">Sub menu item</a></li>
<li><a href="#">Sub menu item</a></li>
<li class="dhtmlgoodies_sheet.gif"><a href="#">Sub menu item</a></li>
<li><a href="#">Sub menu item</a></li>
</ul>
</li>
</ul> Ul <ul id="dhtmlgoodies_tree" class="dhtmlgoodies_tree">
<li><a href="#">Main item</a>
<ul>
<li><a href="#">Sub menu item</a>
<ul>
<li><a href="#">Sub menu item</a>
<ul>
<li class="dhtmlgoodies_sheet.gif"><a href="#">Sub menu item</a></li>
<li class="dhtmlgoodies_sheet.gif"><a href="#">Sub menu item</a></li>
<li class="dhtmlgoodies_sheet.gif"><a href="#">Sub menu item</a></li>
<li class="dhtmlgoodies_sheet.gif"><a href="#">Sub menu item</a></li>
</ul>
</li>
<li class="dhtmlgoodies_sheet.gif"><a href="#">Sub menu item</a></li>
<li class="dhtmlgoodies_sheet.gif"><a href="#">Sub menu item</a></li>
<li class="dhtmlgoodies_sheet.gif"><a href="#">Sub menu item</a></li>
<li class="dhtmlgoodies_sheet.gif"><a href="#">Sub menu item</a></li>
</ul>
</li>
<li><a href="#">Sub menu item</a>
<ul>
<li><a href="#">Sub menu item</a></li>
<li><a href="#">Sub menu item</a></li>
<li><a href="#">Sub menu item</a></li>
<li><a href="#">Sub menu item</a></li>
</ul>
</li>
<li><a href="#">Sub menu item</a></li>
<li><a href="#">Sub menu item</a></li>
<li><a href="#">Sub menu item</a></li>
</ul>
</li>
<li><a href="#">Main item</a></li>
<li><a href="#">Main item</a>
<ul>
<li><a href="#">Sub menu item</a></li>
<li><a href="#">Sub menu item</a></li>
</ul>
</li>
<li><a href="#">Main item</a>
<ul>
<li class="dhtmlgoodies_sheet.gif"><a href="#">Sub menu item</a></li>
<li><a href="#">Sub menu item</a></li>
<li class="dhtmlgoodies_sheet.gif"><a href="#">Sub menu item</a></li>
<li><a href="#">Sub menu item</a></li>
</ul>
</li>
</ul> It's important that you give your tree (s) an ID. In the code above, you will see that I have given it the id dhtmlgoodies_tree You should also notice that the tree dhtmlgoodies_tree Example: <ul id="dhtmlgoodies_tree" class="dhtmlgoodies_tree"> Javascript configuration
You have to create a reference to your tree (s) by using of Javascript. This is done by creating an array of the ID (s) of your trees. Example:
var idOfFolderTrees = ['dhtmlgoodies_tree','dhtmlgoodies_tree2']; In the demo, I have two folder trees. The id of the first one is dhtmlgoodies_tree while my second tree got the id dhtmlgoodies_tree2 You will find the ID in the main <UL> tag. Example: <ul id="dhtmlgoodies_tree"> You will find this array code at the top of the <SCRIPT type = "text / javascript"> section. Icons
The tree will use the icon defined in the Javascript variable folderImage as default. However, you may override it by declaring a class in your <LI>. Example:<li class="dhtmlgoodies_sheet.gif"> Here, the image "dhtmlgoodies_sheet.gif" will be used instead of the default icon. Javascript variables and functions
You have these variables available at the top of your <SCRIPT> section:var idOfFolderTrees = ['dhtmlgoodies_tree','dhtmlgoodies_tree2']; var imageFolder = 'images/'; // Path to images
var folderImage = 'dhtmlgoodies_folder.gif'; // Default folder image
var plusImage = 'dhtmlgoodies_plus.gif'; // [+] icon
var minusImage = 'dhtmlgoodies_minus.gif'; // [-] icon
var useAjaxToLoadNodesDynamically = true;
var ajaxRequestFile = 'writeNodes.php'; expandAll('dhtmlgoodies_tree');
collapseAll('dhtmlgoodies_tree2'); If you use AJAX
If you use Ajax to get nodes dynamically from the server, you can follow this recipe:Insert the nodes in your tree like this:
<li><a href="#">Europe</a>
 <ul>
 <li parentId="1"><a href="#">Loading...</a></li>
 </ul>
 </li>
<li><a href="#">Europe</a>
<ul>
<li parentId="1"><a href="#">Loading...</a></li>
</ul>
</li> Notice that I have created an <LI> with a "parentId" parameter. The value of this parameter is sent to the file on your server (writeNodes.php). The file on the server will then output the nodes where parent ID = 1. This will be sent back to the script, and the script will replace the "loading .." <LI> with the new content from the server. The file "writeNodes.php" is only outputting plain HTML. Example:
<li class="dhtmlgoodies_sheet.gif"><a href="#">Bergen</a></li>
 <li class="dhtmlgoodies_sheet.gif"><a href="#">Stavanger</a></li>
 <li class="dhtmlgoodies_sheet.gif"><a href="#">Trondheim</a></li>
 <li class="dhtmlgoodies_sheet.gif"><a href="#">Oslo</a></li>
<li class="dhtmlgoodies_sheet.gif"><a href="#">Bergen</a></li>
<li class="dhtmlgoodies_sheet.gif"><a href="#">Stavanger</a></li>
<li class="dhtmlgoodies_sheet.gif"><a href="#">Trondheim</a></li>
<li class="dhtmlgoodies_sheet.gif"><a href="#">Oslo</a></li> Look inside the writeNodes.php file for more information. I'm not using a database in this demo. If you use a database, the writeNodes.php file can typically look like this: <?php
if(isset($_GET['parentId'])){
$res = mysql_query("select * from category where parentId='".$_GET['parentId']."'");
while($inf = mysql_fetch_array($res)){
echo "<li><a href=\"#\">".$inf["categoryName"]."</a>";
$resSub = mysql_query("select ID from category where parentId='".$inf["ID"]."'");
if($infSub = mysql_fetch_array($resSub)){
echo "<ul><li parentId=\"".$inf["ID"]."\"><a href=\"#\">Loading...</a></li></ul>";
}
echo "</li>";
}
?> Cookies
Cookies are used to remember the state of the nodes. This means that when you revisit the page, the script will expand.Add / Delete nodes dynamically
New nodes can be added and deleted dynamically from a context menu. You can disable this feature by setting the JS variable contextMenuActive to false at the top of the folder-tree-static.js.When a new node is added, a function called saveNewNode () is called. You will find this function inside the folder-tree-static.js. You need to enable the ajax part of this function. You also need to add support to your server. When a node is created, a request is sent to the file specified in the variable ajaxRequestFile. Variables sent to this file are:
The same also applies to what's happening when you delete a node. You have to enable the ajax part of the function deleteNodeOnServer. This will send a request to the server where the node to delete is defined in the variable deleteNodeId


Comments
When commenting on, remember that the content and tone of your message can hurt the feelings of real people, show respect and tolerance to your interlocutors even if you do not share their opinion, your behavior in the conditions of freedom of expression and anonymity provided by the Internet, changes Not only virtual, but also the real world. All comments are hidden from the index, spam is controlled.