
CSS selectors for every day
So, the selector is a formal description of the element or group of elements to which the specified style rule applies. A simple selector is a type selector, a class selector, or an id-selector, followed by pseudo-class selectors and attribute selectors (we will not mention the latter in this brief description). A selector is a sequence of simple selectors separated by spaces or ">" and "+" characters. These delimiters have a practical meaning when creating sites and are designed for convenience.
Despite the fact that many of the selectors mentioned here are part of the CSS3 specification and, therefore, are supported only by modern browsers, you should still familiarize yourself with them and keep them in mind, as they are very practical-convenient.

Types of selectors
The tag selector , as the selector , is the name of the tag for which you want to change the properties.
A universal selector , which is indicated by the symbol * and is used to change the necessary properties of all elements on the page.
Classes are used for elements with the class attribute and the required value.
Identifiers are used for items with the id attribute and the required value. The main difference between classes and identifiers is that the second names must be unique, not repeatable, which allows them to be used together with scripts (JavaScript).
Pseudo-classes are used to change the style of existing page elements depending on their dynamic state, for example, when working with links ( : link ,: visited,: hover,: active,: focus ). Pseudo-elements define the style of elements that are not clearly defined in the document structure ( : first-letter ,: first-line ), and also generate and stylize non-existent content ( : before ,: after and the content property). In CSS3, pseudo-elements start with two colons :: ( :: first-letter , :: first-line , :: before , :: after ).
Attribute selectors . Allows to stylize an element not only by the value of the tag, but also by the value of the attribute (a [attr]).
Context selectors . Styling elements that are inside another element (ab).
Child selectors . Styling an element immediately after the other element and being its direct descendant (a> b).
Neighbor selectors . Designed for styling neighboring elements that share a common parent. (A + b)
Related selectors . They are similar to neighboring selectors, but with the difference that all adjacent elements are stylized, not just the first neighboring element. First appeared in CSS3. (A ~ b).
So, let's get started!
*
  * {
  Margin: 0;
  Padding: 0;
  }
Let's start with the simplest things for beginners before we move on to advanced selectors.
The asterisk symbol allows you to select all the elements on the page. Many web developers use this to "nullify" all external and internal indentations.
Also, the * character can be used for the child elements of the object.
  #container * {
  Border: 1px solid black;
  }
This code targets all elements that are children of the container ID.
| Internet Explorer | Chrome | Opera | Safari | Firefox | Android | IOS |
|---|---|---|---|---|---|---|
| 6.0+ | 1.0+ | 3.5+ | 1.0+ | 1.0+ | 1.0+ | 1.0+ |
#X
  #container {
  Width: 960px;
  Margin: auto;
  }
The lattice symbol allows us to select the elements by the identifier. This is one of the most common ways to select elements, but be careful when using it.
"Ask yourself: Do I really need to use an id for some element to refer to it?"
Selectors id are inflexible and difficult to use repeatedly in different projects. If possible, try first using the tag name or even a pseudo-class.
| Internet Explorer | Chrome | Opera | Safari | Firefox | Android | IOS |
|---|---|---|---|---|---|---|
| 6.0+ | 1.0+ | 3.5+ | 1.0+ | 1.0+ | 1.0+ | 1.0+ |
.X
  .error {
  Color: red;
  }
This is a class selector. The difference between id and classes is that with the help of classes you can select several elements at once. Use classes if you need to apply one style to a group of elements.
Otherwise, use the id to find the "needle in the haystack" and apply the style only to one particular object.
| Internet Explorer | Chrome | Opera | Safari | Firefox | Android | IOS |
|---|---|---|---|---|---|---|
| 6.0+ | 1.0+ | 3.5+ | 1.0+ | 1.0+ | 1.0+ | 1.0+ |
XY
  Li a {
  Text-decoration: none;
  }
The next frequently used selector type is the child selector. It should be used when it is necessary to make more point selection of elements.
For example, what to do if you do not need to select all link tags, but only those that are inside the unordered list? This is just the case when you should use the selector of the child.
"Tip: If your selector is similar to XYZA B.error, then you probably do something on it, always ask yourself, is this really the easiest way to"
| Internet Explorer | Chrome | Opera | Safari | Firefox | Android | IOS |
|---|---|---|---|---|---|---|
| 6.0+ | 1.0+ | 3.5+ | 1.0+ | 1.0+ | 1.0+ | 1.0+ |
X
  A {color: red;}
  Ul {margin-left: 0px;}
What if you want to send to all elements of a certain type on the page, if they do not have an id or classes? Make it easier, use type selectors. If you need to select all unordered lists, use ul {}.
| Internet Explorer | Chrome | Opera | Safari | Firefox | Android | IOS |
|---|---|---|---|---|---|---|
| 6.0+ | 1.0+ | 3.5+ | 1.0+ | 1.0+ | 1.0+ | 1.0+ |
X: visited and X: link
  A: link {color: red;}
  A: visited {color: purple;}
Here we use the pseudo-class: link to select all links that have not yet been clicked.
Also there is a pseudo-class: visited, which, as you would expect, allows us to apply the style only to those links that were clicked or transitioned.
| Internet Explorer | Chrome | Opera | Safari | Firefox | Android | IOS |
|---|---|---|---|---|---|---|
| 7.0+ | 1.0+ | 3.5+ | 1.0+ | 1.0+ | 1.0+ | 1.0+ |
X + Y
  Ul + p {
  Color: red;
  }
This is the so-called adjacent selector. In this case, each paragraph immediately following each ul element will be red.
| Internet Explorer | Chrome | Opera | Safari | Firefox | Android | IOS |
|---|---|---|---|---|---|---|
| 7.0+ | 1.0+ | 3.5+ | 1.0+ | 1.0+ | 1.0+ | 1.0+ |
X> Y
  #container> ul {
  Border: 1px solid black;
  }
The difference between XY and X> Y is that the latter will choose only direct descendants. Consider the following example:
  <Div id = "container">
  <Ul>
  <Li> List item
  <Ul>
  <Li> Descendant </ li>
  </ Ul>
  </ Li>
  <Li> List item </ li>
  <Li> List item </ li>
  <Li> List item </ li>
  </ Ul>
  </ Div>
The selector #container> ul will select only those ul that are direct descendants of the div block with the container identifier . Those. In this case, this selector does not select the element ul , which is a descendant of the first element li .
| Internet Explorer | Chrome | Opera | Safari | Firefox | Android | IOS |
|---|---|---|---|---|---|---|
| 7.0+ | 1.0+ | 3.5+ | 1.0+ | 1.0+ | 1.0+ | 1.0+ |
X ~ Y
  Ul ~ p {
  Color: red;
  }
This combination of sister (sibling) elements is similar to X + Y , but it is less strict. If in the case ul + p only the first elements of p following ul are selected (ie, there is an adjacency in the choice), then the selector we are considering now is more general.
In our case, it will select all the elements of p following ul .
| Internet Explorer | Chrome | Opera | Safari | Firefox | Android | IOS |
|---|---|---|---|---|---|---|
| 7.0+ | 1.0+ | 3.5+ | 1.0+ | 1.0+ | 1.0+ | 1.0+ |
X [title]
  A [title] {
  Color: green;
  }
Here we refer to the selector attribute. In our example, only links that have the title attribute will be colored green.
| Internet Explorer | Chrome | Opera | Safari | Firefox | Android | IOS |
|---|---|---|---|---|---|---|
| 7.0+ | 1.0+ | 3.5+ | 1.0+ | 1.0+ | 1.0+ | 1.0+ |
X [href = "foo"]
  A [href = "http://www.codeharmony.ru"] {
  Color: red;
  }
The above code will give the style to all links, the href attribute of which is http://www.codeharmony.ru. These links will be red. The rest of the links will not get this style.
This works well, but it's a bit inflexible. What if the link actually leads to Codeharmony.com, but perhaps the address is specified as codeharmony.ru and not http://www.codeharmony.ru? In such cases, we can use the basics of regular expressions.
| Internet Explorer | Chrome | Opera | Safari | Firefox | Android | IOS |
|---|---|---|---|---|---|---|
| 7.0+ | 1.0+ | 3.5+ | 1.0+ | 1.0+ | 1.0+ | 1.0+ |
X [href * = "codeharmony"]
  A [href * = "codeharmony"] {
  Color: red;
  }
Let's go further; This is exactly what we need. An asterisk means that the desired value can be in any part of the href attribute. Thus, we can select and http://www.codeharmony.ru and www.codeharmony.ru and codeharmony.ru.
| Internet Explorer | Chrome | Opera | Safari | Firefox | Android | IOS |
|---|---|---|---|---|---|---|
| 7.0+ | 1.0+ | 3.5+ | 1.0+ | 1.0+ | 1.0+ | 1.0+ |
X [href ^ = "http"]
  A [href ^ = "http"] {
  Background: url (path / to / external / icon.png) no-repeat;
  Padding-left: 10px;
  }
Have you ever thought about how on some sites alongside links leading to other sites (external to the current one) are small icons that let the user know about it? These are excellent "reminders" to the user that the link leads to another site.
This is done using the ^ (carat) symbol. It is commonly used in regular expressions to indicate the beginning of a string. If we want to select links whose href attribute starts with http, then we can use the selector from the example above.
"Note that we are not looking for http: // This is optional and, moreover, does not take into account the https: // links."
| Internet Explorer | Chrome | Opera | Safari | Firefox | Android | IOS |
|---|---|---|---|---|---|---|
| 7.0+ | 1.0+ | 3.5+ | 1.0+ | 1.0+ | 1.0+ | 1.0+ |
X [href $ = ". Jpg"]
  A [href $ = ". Jpg"] {
  Color: red;
  }
Again, we use the regular expression and the $ character to denote the end of the line. In this example, we look for all links that refer to images with the .jpg extension. Of course, this approach will not work for images with .gif , .png , etc. extensions.
| Internet Explorer | Chrome | Opera | Safari | Firefox | Android | IOS |
|---|---|---|---|---|---|---|
| 7.0+ | 1.0+ | 3.5+ | 1.0+ | 1.0+ | 1.0+ | 1.0+ |
X [data - * = "foo"]
  A [data-filetype = "image"] {
  Color: red;
  }
How can we cover different types of pictures? We can create, for example, several selectors:
  A [href $ = ". Jpg"],
  A [href $ = ". Jpeg"],
  A [href $ = ". Png"],
  A [href $ = ". Gif"] {
  Color: red;
  }
But it's dreary and not elegant. Another option is to create your own data-filetype attribute and add it to each link leading to the picture.
<a href="path/to/image.jpg" data-filetype="image"> Link </a>
In doing so, we can use the code for this example:
  A [data-filetype = "image"] {
  Color: red;
  }
| Internet Explorer | Chrome | Opera | Safari | Firefox | Android | IOS |
|---|---|---|---|---|---|---|
| 7.0+ | 1.0+ | 3.5+ | 1.0+ | 1.0+ | 1.0+ | 1.0+ |
X [foo ~ = "bar"]
  A [data-info ~ = "external"] {
  Color: red;
  }

  A [data-info ~ = "image"] {
  Border: 1px solid black;
  }
Here's another interesting trick that not everyone knows about. The ~ (tilde) character allows us to select attributes with values separated by spaces, i.e.
<a href="path/to/image.jpg" data-info="external image"> Click here </a>
Using this technique, we can make selections with the necessary combinations:
  / * Select the attribute data-info, which contains the value of external * /
  A [data-info ~ = "external"] {
  Color: red;
  }

  / * And select the attribute data-info, which contains the value of image * /
  A [data-info ~ = "image"] {
  Border: 1px solid black;
  }
| Internet Explorer | Chrome | Opera | Safari | Firefox | Android | IOS |
|---|---|---|---|---|---|---|
| 7.0+ | 1.0+ | 3.5+ | 1.0+ | 1.0+ | 1.0+ | 1.0+ |
X: checked
  Input [type = radio]: checked {
  Border: 1px solid black;
  }
This pseudo-class selects those items that have been marked, for example, a radio button or checkbox.
| Internet Explorer | Chrome | Opera | Safari | Firefox | Android | IOS |
|---|---|---|---|---|---|---|
| 9.0+ | 1.0+ | 3.5+ | 1.0+ | 1.0+ | 1.0+ | 1.0+ |
X: after
  .clearfix: after {
  Content: "";
  Display: block;
  Clear: both;
  Visibility: hidden;
  Font-size: 0;
  Height: 0;
  }

  .clearfix {
  * Display: inline-block;
  _height: 1%;
  }
This pseudo-class allows you to generate content around the selected item.
This example shows how using the pseudo-class : after, after the block with the class .clearfix, an empty string is created, and then it is cleared. A good method when you can not apply overflow: hidden .
| Internet Explorer | Chrome | Opera | Safari | Firefox | Android | IOS |
|---|---|---|---|---|---|---|
| 8.0+ | 1.0+ | 3.5+ | 1.0+ | 1.0+ | 1.0+ | 1.0+ |
X: hover
  Div: hover {
  Background: # e3e3e3;
  }
That you know for sure. The official name sounds like a "pseudo-class based on user action". It sounds scary, although in reality everything is simple. Do you want to apply a certain style to an element when the mouse cursor is hovering over it? This is it!
"Remember that the old versions of IE do not understand this pseudo-class in relation to anything, except the tag a."
Often, this technique is used to set the lower bound for links when you hover over them:
  A: hover {
  Border-bottom: 1px solid black;
  }
"Mega-cheat: border-bottom: 1px solid black; looks better than text-decoration: underline;"
| Internet Explorer | Chrome | Opera | Safari | Firefox | Android | IOS |
|---|---|---|---|---|---|---|
| 6.0+ (in IE6 only works with respect to links) | 1.0+ | 3.5+ | 1.0+ | 1.0+ | 1.0+ | 1.0+ |
X: not (selector)
  Div: not (#container) {
  Color: blue;
  }
Negation can also be very useful. Suppose I want to select all the div blocks except one with the container identifier . For this, the code with the negation (not equal) is fine.
If I need to select all the elements except the paragraph tags, then I can write this:
  *: Not (p) {
  Color: green;
  }
| Internet Explorer | Chrome | Opera | Safari | Firefox | Android | IOS |
|---|---|---|---|---|---|---|
| 9.0+ | 1.0+ | 3.5+ | 1.0+ | 1.0+ | 1.0+ | 1.0+ |
X :: pseudoElement
  P :: first-line {
  Font-weight: bold;
  Font-size: 1.2em;
  }
Pseudo-elements can be used to style the fragment of an element, for example, the first line or the first letter. Applies only to block elements.
We choose the first letter of the paragraph:
  P :: first-letter {
  Float: left;
  Font-size: 2em;
  Font-weight: bold;
  Font-family: cursive;
  Padding-right: 2px;
  }
This piece of code will find all the paragraphs on the page and apply the specified styles to the first letter of each of them. Often this is used to create a "newspaper headline" effect.
We select the first line of the paragraph:
  P :: first-line {
  Font-weight: bold;
  Font-size: 1.2em;
  }
Similar to the previous example, but in this case the first line of each paragraph will be selected.
| Internet Explorer | Chrome | Opera | Safari | Firefox | Android | IOS |
|---|---|---|---|---|---|---|
| 6.0+ | 1.0+ | 3.5+ | 1.0+ | 1.0+ | 1.0+ | 1.0+ |
X: nth-child (n)
  Li: nth-child (3) {
  Color: red;
  }
Remember the times when we were not able to refer to a particular descendant order element? This pseudo-class solves this problem!
The parameter is an integer. If you want to select the 2nd item in the list, you need to use the construct: li: nth-child (2) .
We can even select groups of descendant elements. For example, to select every fourth element of the list, you need to use the construct: li: nth-child (4n) .
| Internet Explorer | Chrome | Opera | Safari | Firefox | Android | IOS |
|---|---|---|---|---|---|---|
| 9.0+ | 1.0+ | 3.5+ | 1.0+ | 1.0+ | 1.0+ | 1.0+ |
X: nth-last-child (n)
  Li: nth-last-child (2) {
  Color: red;
  }
What if you have a large unordered list and you need, for example, to select the third element from the end. Instead of writing li: nth-child (397) , you can use the pseudo-class nth-last-child .
| Internet Explorer | Chrome | Opera | Safari | Firefox | Android | IOS |
|---|---|---|---|---|---|---|
| 9.0+ | 1.0+ | 3.5+ | 1.0+ | 1.0+ | 1.0+ | 1.0+ |
X: nth-of-type (n)
  Ul: nth-of-type (3) {
  Border: 1px solid black;
  }
Sometimes there are situations when, instead of choosing certain descendants, you need to make a choice by the type of the element.
Imagine that there are five unordered lists on the page. If you need to apply styles only to the third list, but it does not have a unique identifier and other "hooks", then you can use the pseudo-class nth-of-type (n) . The code above shows how to give the style to only the third unordered list.
| Internet Explorer | Chrome | Opera | Safari | Firefox | Android | IOS |
|---|---|---|---|---|---|---|
| 9.0+ | 1.0+ | 1.0+ | 1.0+ | 1.0+ | 1.0+ |
X: nth-last-of-type (n)
  Ul: nth-last-of-type (3) {
  Border: 1px solid black;
  }
Yes, for completeness, there is such an option. So you can choose the n-th element of a certain type from the end.
| Internet Explorer | Chrome | Opera | Safari | Firefox | Android | IOS |
|---|---|---|---|---|---|---|
| 9.0+ | 1.0+ | 3.5+ | 1.0+ | 1.0+ | 1.0+ | 1.0+ |
X: first-child
  Ul li: first-child {
  Border-top: none;
  }
This pseudo-class allows you to select only the first child of the parent element. It is often used to delete the boundaries of the first and last elements of the list.
For example, if you have a list of rows, each of which has border-top and border-bottom , then the last and first elements of the list will be slightly out of the general order.
To eliminate this disadvantage, you can use this pseudo-class.
| Internet Explorer | Chrome | Opera | Safari | Firefox | Android | IOS |
|---|---|---|---|---|---|---|
| 7.0+ | 1.0+ | 3.5+ | 1.0+ | 1.0+ | 1.0+ | 1.0+ |
X: last-child
  Ul> li: last-child {
  Color: green;
  }
In contrast to the first-child class, last-child will select the last element of the parent element.
| Internet Explorer | Chrome | Opera | Safari | Firefox | Android | IOS |
|---|---|---|---|---|---|---|
| 9.0+ | 1.0+ | 3.5+ | 1.0+ | 1.0+ | 1.0+ | 1.0+ |
X: only-child
  Div p: only-child {
  Color: red;
  }
Frankly, this is a fairly rarely used pseudo-class, but, nevertheless, it is also useful. It allows you to select those elements that are the only descendants for your parents.
In our example, the style will be applied only to the paragraph, which is the only descendant of the div block.
Let's consider for clarity such markup:
<Div> <p> Here is the only paragraph in the block. </ P> </ div> <div> <p> Here comes the first paragraph in the block. </ P> <p> Here comes the second paragraph in the block. P> </ div>
In this case, the paragraphs in the second div block will not be selected. The style will be applied only to the paragraph from the first div block.
| Internet Explorer | Chrome | Opera | Safari | Firefox | Android | IOS |
|---|---|---|---|---|---|---|
| 9.0+ | 1.0+ | 3.5+ | 1.0+ | 1.0+ | 1.0+ | 1.0+ |
X: only-of-type
  Li: only-of-type {
  Font-weight: bold;
  }
This pseudo-class selects items that do not have sister elements in the container that contains them. For example, let's select all ul that contain single li .
You could write ul li , but this method will select all li elements. The only way is to use only-of-type .
  Ul> li: only-of-type {
  Font-weight: bold;
  }
| Internet Explorer | Chrome | Opera | Safari | Firefox | Android | IOS |
|---|---|---|---|---|---|---|
| 9.0+ | 1.0+ | 3.5+ | 1.0+ | 1.0+ | 1.0+ | 1.0+ |
X: first-of-type
This pseudo-class allows you to select the first sibling of the same type.
To better understand this, copy the following code to your editor:
  <Div>
  <P> Here is the paragraph. </ P>
  <Ul>
  <Li> Element 1. </ li>
  <Li> Element 2 </ li>
  </ Ul>

  <Ul>
  <Li> Element 3 </ li>
  <Li> Element 4. </ li>
  </ Ul>
  </ Div>
Now, without reading further, try to give the style only to "element 2". When you guess (or give up), read on.
Solution 1
There are many ways to solve this problem. Consider only some of them. Let's start with the use of first-of-type :
  Ul: first-of-type> li: nth-child (2) {
  Font-weight: bold;
  }
This code says: "Find the first unordered list on the page, then find only its direct descendants that are elements of li. After that, select only the second element in the order li."
Solution 2
Another option is to use the adjacent selector :
  P + ul li: last-child {
  Font-weight: bold;
  }
Here we find ul , which follows immediately after the tag of the paragraph, after which we find the last child element of it.
Solution 3
You can play a little more with the selectors and do this:
  Ul: first-of-type li: nth-last-child (1) {
  Font-weight: bold;
  }
Now we already get the first ul element on the page, then look for the very first li element, but from the end.
| Internet Explorer | Chrome | Opera | Safari | Firefox | Android | IOS |
|---|---|---|---|---|---|---|
| 9.0+ | 1.0+ | 3.5+ | 1.0+ | 1.0+ | 1.0+ | 1.0+ |
Conclusion
If you are still writing code, taking into account the existence of IE6, then you need to be extremely careful when using new selectors. But do not make this excuse, do not say that you do not need to know - this you complicate life to yourself.
If you work with any JavaScript libraries, for example, with jQuery, then always try to use "native" CSS3 selectors when possible. In this case, your code will work faster.
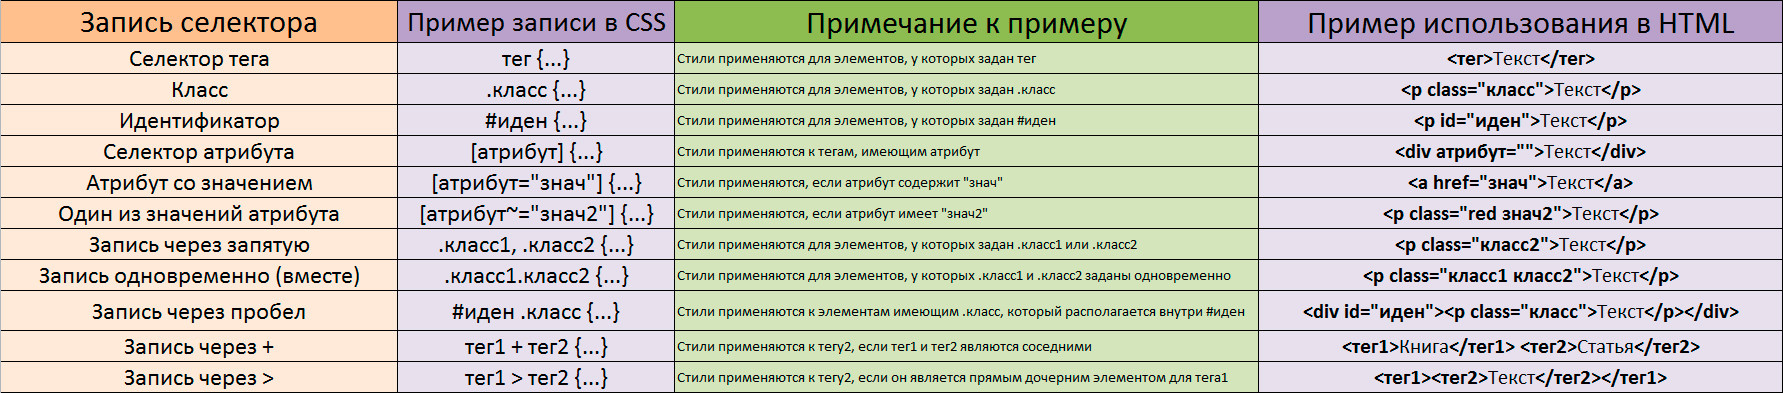
CSS selector memo
Via codeharmony.ru

Comments
When commenting on, remember that the content and tone of your message can hurt the feelings of real people, show respect and tolerance to your interlocutors even if you do not share their opinion, your behavior in the conditions of freedom of expression and anonymity provided by the Internet, changes Not only virtual, but also the real world. All comments are hidden from the index, spam is controlled.