
Additional HTML features
![]()
Additional Features
Dave Ragett , August 29, 2000
Having studied the main possibilities, let's move on to more complex ones. Now you will learn:
- Use forced line breaks
- Use non-breaking spaces
- Use codes for special characters
- Create links to text fragments
- Use preformatted text
- Place text around images
- Define in the images of the district links
- Create tables
- Use roll-overs also other techniques
Ps To maintain the order in the markup I recommend using HTML Tidy .
Forced line breaks
Sometimes you may need to force line breaks. This is done using the br elements. For example, you want to include a mailing address:
 <P> The Willows
 21 Runnymede Avenue <br>
 Morton-in-the-marsh <br>
 Oxfordshire OX27 3BQ </ p>
Element br does not own the final tag. Common elements that do not have finite tags are called empty .
Using non-breaking spaces
Browsers automatically break the text so that it matches the fields. Line breaks are made in places of spaces. Sometimes it is necessary to prevent a line break between certain words. For example, between the words of the company name - "Coke Cola". To do this, use a combination of & nbsp; , eg:
Sweetened carbonated drinks such as Coke & nbsp; Cola have become popular throughout the universe.
Do not use multiple non-breaking spaces in a row to offset the text. Displacement should be organized using style rules.
Special character codes
For the designation of copyrights or trademarks it is convenient to use the appropriate signs:
| Symbol | Combination | Example |
|---|---|---|
| Copyright mark | & Copy; | Copyright © 1999 W3C |
| Registered Trademark | & Gt; | MagiCo ® |
| Trademark | & # 8482; | Webfarer ™ |
Note that in HTML 4.0, the combination of trade is defined to denote a trade mark, but it is not as widely supported as & # 8482;
Other useful combinations:
| Symbol | Combination | Example |
|---|---|---|
| The sign "less" | & Lt; | < |
| The sign "more" | & Gt; | > |
| Ampersand | & Amp; | & |
| Indissoluble gap | & Nbsp; | |
| Long dash | & # 8212; | - |
| Quotation mark | & Quot; | " |
In addition, there are combinations for symbols with diacritic marks also for various other Latin-1 character sets:
| & Nbsp; | & # 160; | A | & ETH; | & # 208; | |
|---|---|---|---|---|---|
| ¡ | & Iexcl; | & # 161; | Ñ | & Ntilde; | & # 209; |
| ¢ | & Gt; | & # 162; | N | & Ograve; | & # 210; |
| £ | & Pound; | & # 163; | Ó | & Oacute; | & # 211; |
| ¤ | & Curren; | & # 164; | Ô | & Ocirc; | & # 212; |
| ¥ | & Yen; | & # 165; | Q | & Otilde; | & # 213; |
| | | | | & Brvbar; | & # 166; | Ö | & Ouml; | & # 214; |
| § | & Sect; | & # 167; | × | X & gt; | & # 215; |
| ¨ | & Uml; | & # 168; | Ø | & Oslash; | & # 216; |
| © | & Copy; | & # 169; | Ù | & Ugrave; | & # 217; |
| ª | & Ordf; | & # 170; | Ú | & Uacute; | & # 218; |
| « | & Laquo; | & # 171; | Û | & Ucirc; | & # 219; |
| ¬ | & Not; | & # 172; | Ü | & Uuml; | & # 220; |
| & Shy; | & # 173; | Ý | & Yacute; | & # 221; | |
| ® | & Gt; | & # 174; | Þ | & THORN; | & # 222; |
| ¯ | & Macr; | & # 175; | ß | & Szlig; | & # 223; |
| ° | Gt; | & # 176; | À | & Agrave; | & # 224; |
| ± | & Gt; | & # 177; | Á | & Aacute; | & # 225; |
| ² | & Sup2; | & # 178; | Â | & Acirc; | & # 226; |
| ³ | & Sup3; | & # 179; | Ã | & Atilde; | & # 227; |
| ' | & Gt; | & # 180; | Ä | & Auml; | & # 228; |
| Μ | & Micro; | & # 181; | Å | & Amp; | & # 229; |
| ¶ | & Para; | & # 182; | Æ | & Aelig; | & # 230; |
| · | & Lt; / RTI & gt; | & # 183; | Ç | & Ccedil; | & # 231; |
| ¸ | & Cedil; | & # 184; | È | & Egrave; | & # 232; |
| ¹ | & Sup1; | & # 185; | É | & Eacute | & # 233; |
| º | & Ord; | & # 186; | Ê | & Ecirc; | & # 234; |
| " | & Raquo; | & # 187; | Ë | & Euml; | & # 235; |
| ¼ | & Frac14; | & # 188; | Ð | & Igrave; | & # 236; |
| ½ | & Frac12; | & # 189; | Í | & Iacute; | & # 237; |
| ¾ | & Frac34; | & # 190; | Î | & Icirc; | & # 238; |
| ¿ | & Iquest; | & # 191; | Ï | & Iuml; | & # 239; |
| À | & Agrave; | & # 192; | Ð | & Eth; | & # 240; |
| Á | & Aacute; | & # 193; | Ñ | & Nt; | & # 241; |
| Â | & Acirc; | & # 194; | Ò | & Ograve; | & # 242; |
| Ã | & Atilde; | & # 195; | Ó | & Oacute; | & # 243; |
| Ä | & Auml; | & # 196; | Ô | & Ocirc; | & # 244; |
| Å | & Amp; Aring; | & # 197; | Õ | & Otilde; | & # 245; |
| Æ | & AElig; | & # 198; | Ö | & Ouml; | & # 246; |
| Ç | & Ccedil; | & # 199; | ÷ | & Divide; | & # 247; |
| È | & Egrave; | & # 200; | Ø | & Oslash; | & # 248; |
| É | & Eacute; | & # 201; | ù | & Ugrave; | & # 249; |
| Ê | & Ecirc; | & # 202; | Ú | & Uacute; | & # 250; |
| Ë | & Euml; | & # 203; | û | & Ucirc; | & # 251; |
| Ì | & Igrave; | & # 204; | Ü | & Uuml; | & # 252; |
| Í | & Iacute; | & # 205; | Ý | & Yacute; | & # 253; |
| Î | & Icirc; | & # 206; | þ | & Thorn; | & # 254; |
| Ï | & Iuml; | & # 207; | ÿ | & Yuml; | & # 255; |
For Greek mathematical symbols, defined in Unicode, numeric references are allowed. This is discussed in more detail in the HTML 4 specification. Note that the combination names are not recognized in Navigator 4, so it is recommended to use numeric references.
References to fragments of Web pages
Imagine that you wrote a long Web page with a table of contents at the beginning. How do I make the table of contents links to relevant sections?
Suppose that each section starts with a header, for example:
<H2> Local Night Spots </ h2>
To make the heading the purpose of the hypertext link is possible using the following code: lt; a name = identifier > .... </a>
<H2> <a name="night-spots"> Local Night Spots </a> </ h2>
The name attribute specifies the name used to identify the target of the link, in this case: "night-spots". In essence now it is allowed to include the following link:
 <Ul>
  ...
  <Li> <a href="#night-spots"> Local Night Spots </a> </ li>
  ...
 </ Ul>
The symbol # before the target name is required. If the target of the link is in the friend's act, put the web address of this act before the # symbol. For example, if the act is located at "http://www.bath.co.uk/", the link should exist as follows:
<a href="http://www.bath.co.uk/#night-spots"> Local Night Spots </a>
In the future, it will be possible to define link targets without the <a> element. The newly-made method is much simpler, because you only need to add the id property to the header, for example:
<H2 id = "night-spots"> Local Night Spots </ h2>
This method does not work for the 4th generation of browsers or even older browsers, so it should be used cautiously!
Formatted text
One of the advantages of the Web is the automatic division of text into lines according to the current window size. But sometimes it starts to avoid it. For example, if the program code is displayed. This is done using the pre element. For example:
 <Pre>
  Void Node :: Remove ()
  {
  If (prev)
  Prev-> next = next;
  Else if (parent)
  Parent-> SetContent (null);

  If (next)
  Next-> prev = prev;

  Parent = null;
  }
 </ Pre>
Which is presented in the following form:
  Void Node :: Remove ()
  {
  If (prev)
  Prev-> next = next;
  Else if (parent)
  Parent-> SetContent (null);

  If (next)
  Next-> prev = prev;

  Parent = null;
  }
Text colors are also set using the style sheet. Note that all line breaks are also generated as exactly as they are in the HTML code. An exception is the translation of the line immediately after the initial <pre> tag, also immediately before the end tag </ pre> , which is not taken into account in any way. This means that the next pair of samples will be generated identically:
 <Pre> formatted text </ pre>

 <Pre>
 Rich Text
 </ Pre>
Typically, formatted text is generated using a monospaced font, in which all characters have the same width. If you define the position of the style for the pre element, some browsers do not use the monospaced font in any way, so you should always define the font-family property. For example, if you want all pre elements to be green, you can define the following style position:
 <Style type = "text / css">
  Pre {color: green;  Background: white;  Font-family: monospace;  }
 </ Style>
When setting the color of the text, it is advisable to also set the background color. This ensures that there are no situations, at what time it is difficult to distinguish the background paint from the color of the text. Instead of setting the background color for the pre element, you can set it for the body element, for example:
 <Style type = "text / css">
  Body {color: black;  Background: white;  }
  Pre {color: green;  Font-family: monospace;  }
 </ Style>
Placing text around images
In HTML, you can choose whether the image will be considered part of the current line of text or become attached to the right or left margin. This is determined by the align attribute. If the align attribute is left , the image is attached to the left margin. If set to right , to the right. For example:
 <P> <img src = "sun.jpg" alt = "sunburst graphic"
 Width = "32" height = "21" align = "left"> This text wraps the image on the right. </ P>
It will be presented like this:
![]() This text wraps around the image on the right.
This text wraps around the image on the right.
Here's how to use align = "right"
 <P> <img src = "sun.jpg" alt = "sunburst graphic"
 Width = "32" height = "21" align = "right"> This text wraps the image on the left. </ P>
It will be presented like this:
![]() This text wraps around the image on the left.
This text wraps around the image on the left.
In order for text generation to continue under the attached image, it is allowed to use the <br clear =all> element, for example:
  <P> <img src = "/ img / site / sun.jpg" alt = "sunburst graphic"
 Width = "32" height = "21" align = "right"> This text starts to the left of the image.
 <br clear="all">
 Here begins a new line, located under the attached image. </ P>
It will be presented like this:
![]() This text starts to the left of the image.
This text starts to the left of the image.
Here begins a new line, located under the attached image.
Image areas as links
The following image is a map of several Web pages. To go to the appropriate page, you need to click on the mug.
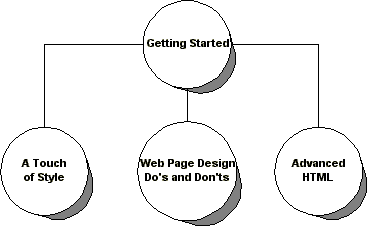
Such a map is marked as follows:
 <P align = "center">
  <Img src = "pages.gif" width = "384" height = "245"
  Alt = "sitemap" usemap = "# sitemap" border = "0">
  <Map name = "sitemap">
  <Area shape = "circle" coords = "186,44,45"
  Href = "Overview.html" alt = "Getting Started">
  <Area shape = "circle" coords = "42,171,45"
  Href = "Style.html" alt = "A little style">
  <Area shape = "circle" coords = "186,171,45"
  Alt = "Design of Web Pages">
  <Area shape = "circle" coords = "318,173,45"
  Href = "Advanced.html" alt = "Advanced HTML Course">
  </ Map>
 </ P>
The src attribute of the img element defines the image "pages.gif". The usemap attribute specifies a reference to the map element. The Web address is used for this, so the # symbol is also used. For the border attribute, set the value to "0", so that the blue border does not appear around the image.
The map element determines which areas of the image will serve as references. The name attribute corresponds to the usemap attribute of the img element, which also acts in much the same way as the name property of the <a> element. In practice, the map element is forced to be in that good file, which is also an img element.
The area element is used to determine the county of the image and also associate it with the Web address. The shape attribute defines the shape of the circle: "rect", "circle" or "poly". The coords attribute determines the coordinates of the district, depending on the form.
- Rect : the x coordinate of the left edge, the y coordinate of the top edge, the x coordinate of the right edge, the y coordinate of the left edge
- Circle: the x coordinate of the center, the y coordinate of the center, the radius
- Poly: x 1 , y 1 , x 2 , y 2 , ... x n , y n
The left upper speckle is considered to be the source of the image, the x and y coordinates of it are equal to zero, the x coordinate increases along the course to the right, the y coordinate is down. Most of the tools for labor with images allow you to acquire the coordinates of any given point of the image.
If several regions intersect, the priority is assigned to the area defined by the first of the intersecting (ie, the corresponding action will result from clicking the mouse). To obtain more complex figures, the district's share is allowed to be made inactive by overlapping it with another district using the nohref attribute, for example:
  <Area shape = "circle" coords = "186,44,50" nohref>
  <Area shape = "circle" coords = "186,44,100"
  Href = "Overview.html" alt = "Getting Started">
The first circle creates an inactive circle in a circle of larger diameter created by the second area element. In order for an inactive district to have an effect, it must exist until it is active, otherwise the priority will become the active region.
Why use the alt property
The alt attribute of the area element is used to specify a text reference for the link. Without this attribute, the map will not be accessible to people who for some reason will not see the images in any way.
Tables
Tables are used for information also for the arrangement of elements on the page. You can draw tables to populate fields, set them to a fixed width, or allow the browser to automatically resize the tables according to their occurrence.
Tables consist of one or more rows of cells. Here is a simple example:
| Year | Sales |
|---|---|
| 2000 | $ 18M |
| 2001 | $ 25M |
| 2002 | $ 36M |
Here's the markup for this table:
 <Table border = "1">
 <Tr> <th> Year </ th> <th> Sales </ th> </ tr>
 <Tr> <td> 2000 </ td> <td> $ 18M </ td> </ tr>
 <Tr> <td> 2001 </ td> <td> $ 25M </ td> </ tr>
 <Tr> <td> 2002 </ td> <td> $ 36M </ td> </ tr>
 </ Table>
The table element serves as the table container. The border attribute specifies the thickness of the face in pixels. The element tr serves as the container of the table row. The elements of th also td serve as containers for the headers of the data cells, respectively.
Fields in a cell
Increase the fields in all cells at once is enabled by using the cellpadding attribute for the table element. For example, set the fields to 10 pixels:
<Table border = "1" cellpadding = "10">
It will look like this:
| Year | Sales |
|---|---|
| 2000 | $ 18M |
| 2001 | $ 25M |
| 2002 | $ 36M |
Distance between cells
The cellpacing attribute specifies the spacing between cells. Set the gap between cells to 10:
<Table border = "1" cellpadding = "10" cellspacing = "10">
The table will look like this:
| Year | Sales |
|---|---|
| 2000 | $ 18M |
| 2001 | $ 25M |
| 2002 | $ 36M |
Table Width
You can set the width of the table using the width attribute. Its value can be either a width in pixels, or a percentage value representing the percentage of space between the left and right fields. For example, we set the table width to 80% of the space between the fields:
<Table border = "1" cellpadding = "10" width = "80%">
The table will look like this:
| Year | Sales |
|---|---|
| 2000 | $ 18M |
| 2001 | $ 25M |
| 2002 | $ 36M |
Align text in cells
By default, browsers smooth the text in the header cells (th) in the center, but in the data cells (td) to the left. The alignment is allowed with the align attribute, which can be applied to a cell or to a row (tr element). It can hold the values "left", "center" (center) or "right" (right):
 <Table border = "1" cellpadding = "10" width = "80%">
 <Tr align = "center"> <th> Year </ th> <th> Sales </ th> </ tr>
 <Tr align = "center"> <td> 2000 </ td> <td> $ 18M </ td> </ tr>
 <Tr align = "center"> <td> 2001 </ td> <td> $ 25M </ td> </ tr>
 <Tr align = "center"> <td> 2002 </ td> <td> $ 36M </ td> </ tr>
 </ Table>
The table will look like this:
| Year | Sales |
|---|---|
| 2000 | $ 18M |
| 2001 | $ 25M |
| 2002 | $ 36M |
The valign attribute exactly determines the vertical alignment of the contents of the cell. It is used with the values "top", "middle" or "bottom" can also be used with any cell or line. By default, the content of the header cells (th) is centered, but the contents of the data cells are aligned to the left margin also at the top of the cell.
Blank cells
Browsers differently process empty cells. Compare:
| Year | Sales |
|---|---|
| 2000 | $ 18M |
| 2001 | $ 25M |
| 2002 | $ 36M |
| 2003 |
a plus
| Year | Sales |
|---|---|
| 2000 | $ 18M |
| 2001 | $ 25M |
| 2002 |
The latter results if the cell is empty:
<Td> </ td>
To avoid this, put a non-breaking space in it:
<Td> & nbsp; </ td>
Cells that occupy multiple rows or columns
Let's complete the previous sample by dividing the sales in the northern also southern region:
| Year | Sales | ||
|---|---|---|---|
| North | South | Total | |
| 2000 | $ 10M | $ 8M | $ 18M |
| 2001 | $ 14M | $ 11M | $ 25M |
The heading "Year" now takes two lines, but the heading "Sales" - three columns. This is achieved by the route of setting the rowspan attributes as well colspan, respectively. Here's the markup for this example:
 <Table border = "1" cellpadding = "10" width = "80%">
 <Tr align = "center"> <th rowspan = "2"> Year </ th> <th colspan = "3"> Sales </ th> </ tr>
 <Tr align = "center"> <th> North </ th> <th> South </ th> <th> Total </ th> </ tr>
 <Tr align = "Center"> <td> 2000 </ td> <td> $ 10M </ td> <td> $ 8M </ td> <td> $ 18M </ td> </ tr>
 <Tr align = "center"> <td> 2001 </ td> <td> $ 14M </ td> <td> $ 11M </ td> <td> $ 25M </ td> </ tr>
 </ Table>
This is allowed to be simplified by taking advantage of the fact that browsers do not in any way require end tags for cells, as well as table rows:
 <Table border = "1" cellpadding = "10" width = "80%">
 <Tr align = "center"> <th rowspan = "2"> Year <th colspan = "3"> Sales
 <Tr align = "center"> <th> North <th> South <th> Total
 <Tr align = "center"> <td> 2000 <td> $ 10M <td> $ 8M <td> $ 18M
 <Tr align = "center"> <td> 2001 <td> $ 14M <td> $ 11M <td> $ 25M
 </ Table>
Note that since the "Year" header occupies two lines, the main element th in the other row is located in another column, but not in the first column.
Tables without borders
Such tables are widely used for formatting pages and creating a grid on them. To do this, you just need to add the border = "0" property and cellspacing = "0" to the table element:
| Year | Sales |
|---|---|
| 2000 | $ 18M |
| 2001 | $ 25M |
| 2002 | $ 36M |
This is achieved using the following markup:
 <Table border = "0" cellspacing = "0" cellpadding = "10">
 <Tr> <th> Year </ th> <th> Sales </ th> </ tr>
 <Tr> <td> 2000 </ td> <td> $ 18M </ td> </ tr>
 <Tr> <td> 2001 </ td> <td> $ 25M </ td> </ tr>
 <Tr> <td> 2002 </ td> <td> $ 36M </ td> </ tr>
 </ Table>
If you do not specify the cellspacing property, there will be a space between the cells, as shown below:
| Year | Sales |
|---|---|
| 2000 | $ 18M |
| 2001 | $ 25M |
| 2002 | $ 36M |
Use in color tables
On this page, a style sheet is used to set a different background color for the cells of headers and data. Here are the style positions we used:
 Table {
  Margin-left: -4%
  Font-family: sans-serif;
  Background: white;
  Border-width: 2;
  Border-color: white;
 }
 Th {font-family: sans-serif;  Background: rgb (204, 204, 153)}
 Td {font-family: sans-serif;  Background: rgb (255, 255, 153)}
The last two lines set the background paint for the cells th also td according to the specified red / green / blue colors. The numbers must lie in the range from 0 up to 255 (fully saturated color).
In another way, you can set background paint with the bgcolor attribute. This method works in almost all browsers and does not require any support for style sheets. First, determine the hexadecimal values of the red, green, and blue components of the color you want to use. The style guide has a converter .
 <Table border = "0" cellspacing = "0" cellpadding = "10">
  <Tr>
  <Th bgcolor = "# CCCC99"> Year </ th>
  <Th bgcolor = "# CCCC99"> Sales </ th>
  </ Tr>
  <Tr>
  <Td bgcolor = "# FFFF66"> 2000 </ td>
  <Td bgcolor = "# FFFF66"> $ 18M </ td>
  </ Tr>
  <Tr>
  <Td bgcolor = "# FFFF66"> 2001 </ td>
  <Td bgcolor = "# FFFF66"> $ 25M </ td>
  </ Tr>
  <Tr>
  <Td bgcolor = "# FFFF66"> 2002 </ td>
  <Td bgcolor = "# FFFF66"> $ 36M </ td>
  </ Tr>
 </ Table>
Access to tables
If you do not observe the table in any way, it is difficult to understand what the word is about in it. It makes sense to specify information about the assignment of the table structure as well. The caption element allows you to specify a title to also place it above or below the table. The caption element must be placed later than the tr element of the first line.
| Year | Sales |
|---|---|
| 2000 | $ 18M |
| 2001 | $ 25M |
This table is specified by the following markup:
 <Table border = "1" cellpadding = "10" width = "80%">
 <Caption> Estimated revenue from sales by year </ caption>
 <Tr align = "center">
  <Th> Year </ th> <th> Sales </ th>
 </ Tr>
 <Tr align = "center"> <td> 2000 </ td> <td> $ 18M </ td> </ tr>
 <Tr align = "center"> <td> 2001 </ td> <td> $ 25M </ td> </ tr>
 </ Table>
Here is that blah blah the most table, but the caption element added the property align = "bottom" :
| Year | Sales |
|---|---|
| 2000 | $ 18M |
| 2001 | $ 25M |
The summary attribute of the table element should be used to describe the table structure for those who can not see the table in any way. For example: "in the main column years are given, but in another - the arrival for this year."
<Table summary = "in the main column years are given, but in another - the arrival for this year">
Determine the relationship between the header cells and the data
If the table is generated on the audio device or on the device to enclose the Braille alphabet, it makes sense to specify which cell which headers belong to. For example, an audio browser can also move upwards either downward or to the right also to the left along the cells of a table with a prefixed message before each cell of the corresponding header.
To do this, you need to provide each header / data cell with an annotation. The easiest way is to add the scope property to the header cells. It can be used with the following values:
- Row : The cell contains the title for the remaining elements of the current row.
- Col : The cell contains the title for the remaining elements of the current column.
Apply this to our table:
 <Table border = "1" cellpadding = "10" width = "80%">
 <Caption> Estimated revenue from sales by year </ caption>
 <Tr align = "center">
  <Th scope = "col"> Year </ th>
  <Th scope = "col"> Sales </ th>
 </ Tr>
 <Tr align = "center"> <td> 2000 </ td> <td> $ 18M </ td> </ tr>
 <Tr align = "center"> <td> 2001 </ td> <td> $ 25M </ td> </ tr>
 </ Table>
For more complex tables, it is allowed to use the headers property for individual data cells to also specify a space-separated list of header cell identifiers. Each header cell must own the id property with the corresponding identifier.
And in the end, think about using the abbr attribute to define abbreviations for long headers. This will make it easier to listen to the header lists for cells, for example:
<Th abbr = "W3C"> World Wide Web Consortium </ th>
Roll-Overs also other techniques
A small JavaScript can significantly revitalize the page. Here's how to create "rollovers", at what time the appearance of the link changes when the mouse pointer is placed on it. In addition, you will learn how to create cyclical banners that will help you redirect visitors to your sponsor's sites
Roll-Overs
Most often, roll-over is an image serving as a hypertext link. When the mouse pointer pleases this image, it changes to attract attention to the link. For example, you can add a glow effect, a shadow, or just change the background color. Here's an example:
 <Script type = "text / javascript">
 If (document.images)
 {
  Image1 = new Image;
  Image2 = new Image;
  Image1.src = "enter1.gif";
  Image2.src = "enter2.gif";
 }

 Function chgImg (name, image)
 {
  If (document.images)
  {
  Document [name] .src = eval (image + ". Src");
  }
 }
 </ Script>

 ...

 <A href = "/" onMouseOver = 'chgImg ("enter", "image2")'
 OnMouseOut = 'chgImg ("enter", "image1")'> <img name = "enter"
 Src = "enter1.gif" border = "0" alt = "Come in if you risk!"> </a>
And that's how it looks ...

I created image data using a royalty-free image editor, adding a hot wax effect also to the shadow. With the help of search engines on the Web are allowed to find a lot of tips also for royalty-free pictures.
Banners
If your site owns several sponsors, it is allowed to use a cyclic change of banners of all sponsors in turn. First of all, you should create a banner for each sponsor. All images must exist the same size. The corresponding image URLs of the sites are then placed in arrays with the names adImages also adURLs defined in the source of the script. The element img for each link is forced to be initialized by the main image from the array. The loop starts with the onload event in the body element.
 <Html>
 <Head>
 <Title> cyclic banners </ title>
 <Script type = "text / javascript">
 If (document.images)
 {
  AdImages = new Array ("/ img / site / mit.gif",
  "/img/site/inria.gif", "/site/img/keio.gif");
  AdURLs = new Array ("www.lcs.mit.edu",
  "Www.inria.fr", "www.keio.ac.jp");
  ThisAd = 0;
 }

 Function cycleAds ()
 {
  If (document.images)
  {
  If (document.adBanner.complete)
  {
  If (++ thisAd == adImages.length)
  ThisAd = 0;

  Document.adBanner.src = adImages [thisAd];
  }
  }

  // change banner every 3 seconds
  SetTimeout ("cycleAds ()", 3000);
 }

 Function gotoAd ()
 {
  Document.location.href = "http: //" + adURLs [thisAd];
 }
 </ Script>
 </ Head>
 <Body onload = "cycleAds ()">
 ...

 <a href="javascript:gotoAd()"> <img name = "adBanner"
 Src = "/ img / site / mit.gif" border = "0" alt = "Our sponsors"> </a>
Our sponsors: ![]()
Note: I recommend checking whether all images have the same height as the width. You can similarly set the width attributes also height for the img element, in order to ensure the same size of all images.
And what if browsers do not support scripts in any way?
The content of the noscript element is displayed only if the browser does not support the scripts in any way. It is forced to be used if you want to give people access to information that would otherwise be inaccessible to them, if the browser does not support scripts in any way. Suppose you want to link to sponsors in text form:
 <Noscript>
 Our sponsors: <a href="/click?http://www.lcs.mit.edu/"> MIT <,
 <a href="/click?http://www.inria.fr/"> INRIA </a>, and
 <a href="/click?http://www.keio.ac.jp/"> Keio University </a>.
 </ Noscript>
A lot of gratuitous information about scripts is allowed to be found in search engines.

Comments
When commenting on, remember that the content and tone of your message can hurt the feelings of real people, show respect and tolerance to your interlocutors even if you do not share their opinion, your behavior in the conditions of freedom of expression and anonymity provided by the Internet, changes Not only virtual, but also the real world. All comments are hidden from the index, spam is controlled.