
JavaScript Virtual Keyboard
Introduction
Imagine that you are sitting in a London Internet cafe wishing to write an e-mail to your family living in Athens. It's good if someone in your family speaks English. If not, where would you find a keyboard with a Greek layout? I'm sure you can recall a dozen situations when you thought, "I wish I had another keyboard." This article presents the Virtual Keyboard that solves this usability problem. The design task for it can be specified as follows:
- Allow text input from computers without the user's native language layout installed, so allowing the creation of a national and multilingual interfaces-eg Web-based e-mail.
- Allow text input from computers without keyboards or with sensor screens - hand-held PCs, smartphones, etc. - or with remote controls such as mice, e-pens, etc. Being the only input devices.
- Protect users from keylogger-type spyware.
Installation of the Virtual Keyboard requires a casual knowledge of HTML and JavaScript. W3C DOM Level 1, CSS Level 1 and the DOM / Microsoft Internet Explorer event model. Virtual Keyboard is an open-source script distributed under the zlib / libpng license.
Setup
Six easy steps:
Download the source archive .
-
-
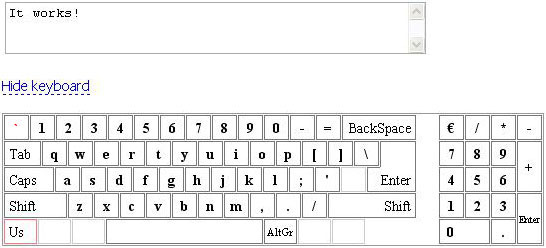
Vkboard.js ( 1-vkboard folder in the archive) is the primary script. Full keyboard is simulated as follows:
-
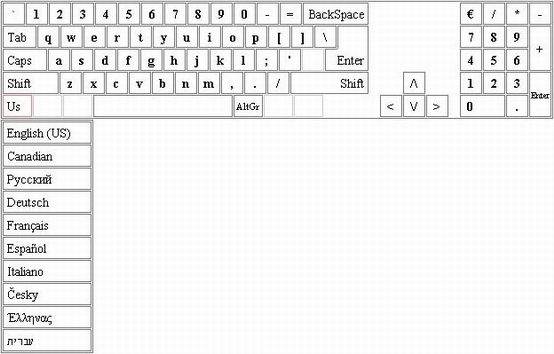
Vkboards.js (2-vkboard_slim folder) is almost the same as the previous, but the language menu, which can be accessed by clicking on the red rectangle in the left-bottom corner of the keyboard. The cells are arranged in rows, not as a simple drop-down menu like in the previous variant.

-
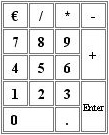
Vnumpad.js (3-numpad_full folder) is the numpad part of the keyboard.
-
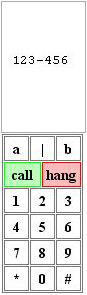
Vatmpad.js (4-numpad_atm folder) is a stripped numpad that contains only the Enter and number keys.
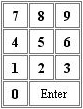
This installation is recommended if you are short on space (UMPC, touchscreen kiosk, etc.) or if you have 4 or more layouts installed
-
-
Include a reference to the chosen script file in your HTML page.
  < HTML > < HEAD > < SCRIPT type = " text / javascript" src = " vkboard.js" > </ SCRIPT > ...
  < / HEAD >


  ...
Note that for each type of installation, two script files are available:
- Vkboard.js / vkboards.js / vnumpad.js / vatmpad.js are the original script. If you want to change the script or just want to learn how to use it.
- Vkboardc.js / vkboardsc.js / vnumpadc.js / vatmpadc.js is a compressed version of the script, respectively 30.5% / 30.5% / 39.8% / 39.5% smaller than the original. This is the file you should use on the web.
-
Define a callback function:
  < HTML > < HEAD > < SCRIPT type = " text / javascript" src = " vkboard.js" > </ SCRIPT > < SCRIPT > // Minimal callback function:
  Function keyb_callback ( char ) {
  // Let 's bind vkeyboard to the <TEXTAREA>

  // with id = " textfield" :
  Var text =
  Document.getElementById ( " textfield" ), val = text.value;
  Switch (ch)
  {
  Case " BackSpace" :
  Var min = (val.charCodeAt (val.length - 1 ) == 10 )?  2 : 1;
  Text.value = val.substr (0, val.length - min);
  Break;
  Case " Enter" :
  Text.value + = " \ n" ;
  Break;
  Default:
  Text.value + = ch;
  }
  }
  </ SCRIPT > < / HEAD >

  ...
The callback function must have one or two parameters. The first parameter is mandatory and accepts a string value returned by the vkeyboard script. The second parameter is optional and accepts the
idof the container of the vkeyboard. It may be useful if you bind a single callback function to multiple vkeyboards. Note that this is the most basic callback function. An example of a more advanced code snippet is given later . - Define a container for the keyboard, which must be an empty
DIVorSPAN.< HTML > ... < BODY > ... < TEXTAREA id = " textfield" rows = " 10" cols = " 50" > < / TEXTAREA > < DIV id = " keyboard" > < / DIV > < / BODY > < / HTML >
- Finally, show the keyboard.
  < BODY onload = " new VKeyboard (" keyboard ", keyb_callback);" > <! - VKeyboard is shown on load, bound to container with

   Id = "keyboard" and with callback function "keyb_callback" ->
Of course, the creation of
VKeyboard- numpad:VNumpad, ATM-style numpad:VATMpad- can be used anywhere.
API
The VKeyboard constructor has a myriad of parameters to help you control its look and feel. Here is the full list, together with parameter defaults.
  Var vkb =
  New VKeyboard ( " keyboard" , // container's id, mandatory

  Keyb_callback , // reference to callback function, mandatory

  // (this & following parameters are optional)

  True , // create the arrow keys or not?

  True , // create up and down arrow keys?

  False , // reserved

  True , // create the numpad or not?

  " " , // font name ("" == system default)

  " 14px" , // font size in px

  " # 000" , // font color

  " # F00" , // font color for the dead keys

  " #FFF" , // keyboard base background color

  " #FFF" , // keys' background color

  " #DDD" , // background color of switched / selected item

  " # 777" , // border color

  " #CCC" , // border / font color of "inactive" key

  // (key with no value / disabled)

  " #FFF" , // background color of "inactive" key

  // (key with no value / disabled)

  " # F77" , // border color of language selector's cell

  True , // show key flash on click?
  (False by default)

  " # CC3300" , // font color during flash

  " # FF9966" , // key background color during flash

  " # CC3300" , // key border color during flash

  False , // embed VKeyboard into the page?

  True , // use 1-pixel gap between the keys?

  0 );  // index (0-based) of the initial layout
Please be careful when upgrading vkeyboard from earlier versions. Always check the number / flow of the parameters. VNumpad and VATMpad have a limited set of parameters:
  Var vkb =
  New VNumpad ( " numpad" , // container's id, mandatory

  Pad_callback , // reference to the callback function, mandatory

  " " , // font name ("" == system default)

  // (this and the following parameters are optional)

  " 14px" , // font size in px

  " # 000" , // font color

  " #FFF" , // keyboard base background color

  " #FFF" , // keys' background color

  " # 777" , // border color

  True , // show key flash on click?
  (False by default * )

  " # CC3300" , // font color for flash event

  " # FF9966" , // key background color for flash event

  " # CC3300" , // key border color for flash event

  False , // embed VNumpad into the page?

  True );  // use 1-pixel gap between the keys?
Note that although "flash switch" is off by default, it is switched on. VKeyboard has the following public methods.
-
Show: Shows or hides the whole vkeyboard. It has a single optional parameter, a Boolean value that states whether to show or hide.Vkb.Show ( true ); // Shows the vkeyboard Vkb.Show ( false ); // Hides the vkeyboard Vkb.Show (); // Shows the vkeyboard again. Action is by default.
-
ShowNumpad(full and slim variants only): Shows or hides the numpad. It has a single optional parameter, a Boolean value that dictates whether to show or hide.Vkb.ShowNumpad ( true ); // Shows the numpad Vkb.ShowNumpad ( false ); // Hides the numpad Vkb.ShowNumpad (); // Shows the numpad again. This action is by default.
-
" set-param" >SetParameters: Allows you to adjust vkeyboard parameters at runtime. The function accepts an even number of values in pairs: the vkeyboard parameter name and parameter value.// Adjusting single parameter: Vkb.SetParameters ( " font-color" , " # F0A050" ); // Adjusting two parameters at once: Vkb.SetParameters ( " font-name" , " Arial" , " font-color" , " # F0A050" );
Valid parameter names are:
-
callback- callback function reference. Valid parameter value: reference to any function with 1 or 2 formal parameters -
font-name-name of keyboard font. Valid parameter value: font name or empty string (= default font) -
font-size-font-size in pixels. Valid value: font size in pixels -
font-color- font color. Valid parameter value here and further on: string in format of#xxxxxxor#xxx, wherexis any valid hexadecimal digit -
dead-color- color of the dead keys -
base-color- color of the keyboard base -
key-color- color of the keys -
selection-color-color of: selected item in the language menu or active modifier key -
border-color- color of key border -
inactive-border-color-border color of the disabled key -
inactive-key-color-background color of the disabled key -
lang-cell-color-border color of the language menu item -
click-font-color-border color of the language menu item -
click-key-color-border color of the language menu item -
click-border-color-border color of the language menu item -
show-click-show key flash on click. Valid parameter value:trueorfalse -
layout- index (0-based integer) of the layout to switch to. Use it to programmatically switch layouts
-
Test suite
The script comes with the following samples:
1-edit-simple.html . The most basic installation of the JavaScript Virtual Keyboard.
2-edit-full.html . Almost the same as above, but the
keyb_callbackfunction is not as simple as it was. While simple installation only appends or deletes characters from the end of the text in aTEXTAREA, this sample allows you to edit text in the way you're used to with any other text processor. This sample shows how the JavaScript Virtual Keyboard should normally be used. All other samples are derived from this one.3-edit-translator.html . This one is useful if you have it on your keys. Simply run this installation, switch vkeyboard to your native layout and type with a real keyboard, not a mouse. The script will substitute the typed characters with those chosen in the vkeyboard.
4-test-change.html . Sample of the use of the
SetParametersAPI. Watch how vkeyboard changes its color.5-test-fly.html . Sample shows how to handle multiple INPUT fields with a single vkeyboard.
6-test-fly-anonym.html . Almost the same as above, but INPUT fields are allowed to omit the property. / Where page changes are undesirable.
7-test-any-css.html . Sample shows how to set the vkeyboard font size with units other than pixels. A special function,
convert_to_px, is used to convert arbitrary unit strings to pixel-based values. The following units are allowed:px,%,em,ex,pt,pc,cm,mmandin. Note that theconvert_to_pxfunction is still quite experimental. DPI setting, which is used to convert from absolute to relative length units. With any other browser, onlypx,%,emandexcan be used safely. A "usual" setting of 96 dots per inch - quite common for Windows machines - is used if other length units are specified.8-test-scale.html . This sample shows how to sidestep the font scaling problem in Mozilla and MS IE browsers. The problem with MS IE is that only zooms, that is, changes in size, on elements that do not have the
font-sizestyle explicitly. The Mozilla browser has a similar problem: it does not change the dimensions of the text's container element. In this sample, the script tracks the changes to the basefont-sizeand uses theSetParametersAPI to appropriately scale the vkeyboard layout. This sample should be viewed only in Mozilla (Firefox) and MS IE. Opera browser implements a smart zoom - ie it just zooms the whole page - and thus does not suffer from the problem. MS IE's wrapper browsers. For example, MyIE2 (Maxthon) also implements a smart zoom. There are also rumors that the Firefox 3 browser will feature an Opera-like page zoom behaviour.
Note that all of the above samples can be found in the vkboard folder of the source archive . Variants other than the full keyboard are not provided with the full test suite, only with a single sample that shows the most simple installation of every variant.
Creating your own language layout
Two easy steps:
- Append the
avail_langsarray with a two-member array of the language abbreviation - usually an ISO 639-1 language code - and the layout name written in that language, using Unicode hex values where required.Avail_langs: [[ " Us" , " English (US)" ], [ " Ca" , " Canadian" ], [ " Ru" , " & # x0420; & # x0443; & # x0441;" + " & # X0441; & # x043A; & # x0438; & # x0439;" ], [ " De" , " Deutsch" ], [ " Fr" , " Fran & # x00E7; ais" ], [ " Es" , " Espa & # x00F1; ol" ], [ " It" , " Italiano" ], [ " Cz" , " & # x010C; esky" ] , [ " El" , " & # x0388; & # x03BB; & # x03BB;" + " & # X03B7; & # x03BD; & # x03B1; & # x03C2;" ], [ " He" , " & # x05E2; & # x05D1; & # x05E8; & # x05D9; & # x05EA;" ]];
- Define "normal" and, optionally, the "Caps Lock" ed, "Shift" ed, "AltGr" ed and "AltGr + Shift" ed arrays. The following rules apply:
- Each array's name must begin with the language abbreviation and the underscore symbol.
- Names of arrays with values presenting symbols for a keyboard with "Caps Lock".
  // Czech layout:

  Cz_caps: [ " & # x003B;"
  , ..., " & # x002D;"
  ];
- Names of arrays with values presenting symbols for a keyboard with "Shift".
  Cz_shift: [ " & # x00BA;"
  , ..., " & # x005F;"
  ];
- Names of arrays with values presenting symbols for a keyboard with "AltGr".
  Cz_alt_gr: [..., " & # x0021;"
  , " & # X002F;"
  ];
- Names of arrays with values representing symbols for the keyboard with the "AltGr" and "Shift" keys pressed must end with "alt_gr_shift."
  Cz_alt_gr_shift: [ " & # x007E;"
  , ..., " & # x003F;"
  ];
- Names of arrays with values representing symbols for a keyboard's normal condition - with no modifier keys pressed - must end with "normal."
  Cz_normal: [ " & # x003B;"
  , ..., " & # x002D;"
  ];
- Each array must have exactly 48 entries, each containing either the hexadecimal value of the appropriate symbol or, in the case of a dead key,
-
Acute(?) -
Breve(˘) -
Caron() -
Cedilla(?) -
Circumflex(^) -
DialytikaTonos(, dialytika tonos, combined acute + umlaut) -
DotAbove(˙, dot above) -
DoubleAcute(˝, double acute) -
Grave(`) -
Ogonek(˛) -
RingAbove(°, ring above) -
Tilde(~) -
Umlaut(?)
Also, the
Macron(ˉ) diacritic array is available via the macron.txt file in the 1-folder folder of the archive . It is not included in the main script.Cz_alt_gr: [ [ " & # x0060;" , " Grave" ] , // dead key " & # X0021;" , ... // simple key
-
- Arrays are mapped to the layout according to the following illustration, where numbers are in the array indices.
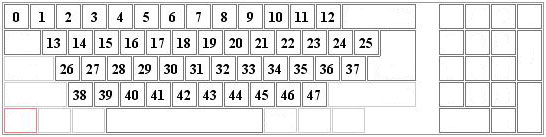
- The "normal" array is mandatory; Others are optional.
The following layouts are built into the full and slim keyboard variants. The number / index next to the layout name is the layout index in the IBM Globalization database:
- English (US International) - 103P
- Canadian (multilingual standard) - taken from Wikipedia article on keyboard layouts
- German - 129
- French - 189
- Spanish - 173
- Italian - 142
- Russian - 443
- Czech - 243
- Greek - 319
- Hebrew - 212
24 other layouts are available in a separate layout pack that can be found in the 5-layout_pack folder in the archive . It includes:
- European:
- Bulgarian - 442
- Czech - alternative variant of Bohemica.com
- Danish - 159 and 281
- Dutch - 143
- Estonian - 454
- Finnish - 153
- Hungarian - 208
- Icelandic - 197
- Latvian - 455
- Lithuanian - 456
- Macedonian - 449
- Norwegian - 155 and 281N
- Polish - 214 and 457 (programmer's)
- Portugese - 163
- Romanian - 446
- Serbian - 450 (cyrillic script)
- Serbo-Croatian / Slovene - 234 (latin script)
- Slovak - 245
- Swedish - 285
- Ukrainian - 465
- Asian:
- Arabic - 470
Please see the readme.txt file in the 5-layout_pack folder in the archive for instructions for these layouts.
Creating your own keyboard layout
You may want to create a custom key layout. There are two ways to achieve this:
-
Use atm.js as a template; It is the simplest script of four. See the numpad_atm folder in the archive for more details. In short, the script flow is as follows:
-
Create the outer box.
  Var initX = 0 , initY = 0 ;
 ...
 Var kb = document.createElement ( " DIV" );
 Ct.appendChild (kb);
 Ct.style.display = " block" ;
 Ct.style.position = " absolute" ;
 Ct.style.top = initY + " px" , ct.style.left = initX + " px" ;
 Kb.style.position = " relative" ;
 Kb.style.top = " 0px" , kb.style.left = " 0px" ;
 Kb.style.border = " 1px solid" + bc;
 Var kb_main = document.createElement ( " DIV" );
 Kb.appendChild (kb_main);
 Kb_main.style.position = " relative" ;
 Kb_main.style.width = " 1px" ;
 Kb_main.style.cursor = " default" ;
 Kb_main.style.backgroundColor = bkc;

 ...
-
Create the keys with the
_setup_keymethod.Var kb_pad_7 = this ._setup_key (kb_main, " 1px" , " 1px" , cp, cp, bc, c, lh, fs); Kb_pad_7.sub.innerHTML = " 7" ; Kb_pad_7.sub.id = container_id + " ___pad_7" ;
-
Route all output to the
_generic_callback_procmethod. For theVATMpadobject, this is done in the_set_key_statemethod while refreshing the layout.This ._setup_event (key_sub, ' mousedown' , This ._generic_callback_proc);
-
Invoke the callback function. This happens when the user "presses" a "key."
  _generic_callback_proc: function (event)
 {
  ...
  If (val && vkboard.Callback).
  Vkboard.Callback (val);
 }
-
Call from beyond
One natural feature that all users expect from a text field is the ability to edit the text at any position within a field. However, it is impossible to do so with a function described earlier , which only appends symbols to or removes from the end of the text. The following script is an attempt to write a compatible callback. It is largely based on the discussion in thescripts.com forum.
  <HEAD>
  <SCRIPT type = " text / javascript" > <! -
  Var opened = false ,
  InsertionS = -1, // selection start

  InsertionE = 0 ;  // end end

  Var userstr = navigator.userAgent.toLowerCase ();
  Var safari = (userstr.indexOf ( ' applewebkit' )! = -1);
  Var gecko = (userstr.indexOf ( ' gecko' )! = -1) &&! Safari;
  Var standr = gecko ||  Window.opera ||  Safari;
  ...
  // Advanced callback function:

  //
   Function keyb_callback (ch)
  {
  Var val = text.value;
  Switch (ch)
  {
  Case " BackSpace" :
  If (val.length)
  {
  Var span = null ;
  If (document.selection)
  Span = document.selection.createRange (). Duplicate ();
  If (span && span.text.length> 0 )
  {
  Span.text = " " ;
  GetCaretPositions (text);
  }
  Else deleteAtCaret (text);
  }
  Break ;
  Case " <" :
  If (insertionS> 0 )
  SetRange (text, insertionS - 1 , insertionE - 1 );
  Break ;
  Case " >" :
  If (insertionE <val.length)
  SetRange (text, insertionS + 1 , insertionE + 1 );
  Break ;
  Case " / \\":

   If (! Standr) break;

   Var prev = val.lastIndexOf (" \ n " , insertionS) + 1;

   Var pprev = val.lastIndexOf (" \ n " , prev - 2);

   Var next = val.indexOf (" \ n " , insertionS);

   If (next == -1) next = val.length;

   Var nnext = next - insertionS;

   If (prev> next)

   {

   Prev = val.lastIndexOf (" \ n " , insertionS - 1) + 1;

   Pprev = val.lastIndexOf (" \ n " , prev - 2);

   }

   // number of chars in the current line to the left of the caret:

   Var left = insertionS - prev;

   // length of the prev.
  Line:

   Var plen = prev - pprev - 1;

   // number of chars in the prev.
  Line to

   // the right of the caret:

   Var right = (plen <= left)?
  1: (plen - left);

   Var change = left + right;

   SetRange (text, insertionS - change, insertionE - change);

   Break;

   Case " \\ / " :

   If (! Standr) break;

   Var prev = val.lastIndexOf (" \ n " , insertionS) + 1;

   Var next = val.indexOf (" \ n " , insertionS);

   Var pnext = val.indexOf (" \ n " , next + 1);

   If (next == -1) next = val.length;

   If (pnext == -1) pnext = val.length;

   If (pnext <next) pnext = next;

   If (prev> next)

   Prev = val.lastIndexOf (" \ n " , insertionS - 1) + 1;

   // number of chars in current line to the left of the caret:

   Var left = insertionS - prev;

   // length of the next line:

   Var nlen = pnext - next;

   // number of chars in the next line to the left of the caret:

   Var right = (nlen <= left)?
  0: (nlen - left - 1);

   Var change = (next - insertionS) + nlen - right;

   SetRange (text, insertionS + change, insertionE + change);

   Break;

   Default:

   InsertAtCaret (text,

   ( Ch == " Enter " ? (Window.opera? '\ R \ n': '\ n'): ch));

   }

   }

   }


   // This function retrieves the position (in chars, relative to

   // the start of the text of the edit cursor (caret), or, if

   // text is selected in the TEXTAREA, the start and end positions

   // of the selection.

   //

   Function getCaretPositions (ctrl)

   {

   Var CaretPosS = -1, CaretPosE = 0;

   // Mozilla way:

   If (ctrl.selectionStart || (ctrl.selectionStart == '0'))

   {

   CaretPosS = ctrl.selectionStart;

   CaretPosE = ctrl.selectionEnd;

   InsertionS = CaretPosS == -1?
  CaretPosE: CaretPosS;

   InsertionE = CaretPosE;

   }

   // IE way:

   Else if (document.selection && ctrl.createTextRange)

   {

   Var start = end = 0;

   Try

   {

   Start =

   Math.abs (

   Document.selection.createRange (). MoveStart (" character " ,

   -10000000));
  // start

   If (start> 0)

   {

   Try

   {

   Var endReal =

   Math.abs (

   Ctrl.createTextRange (). MoveEnd (" character " ,

   -10000000));

   Var r = document.body.createTextRange ();

   R.moveToElementText (ctrl);

   Var sTest =

   Math.abs (r.moveStart (" character " , -10000000));

   Var eTest =

   Math.abs (r.moveEnd (" character " , -10000000));

   If ((ctrl.tagName.toLowerCase ()! = 'Input') &&

   (ETest-endReal == sTest))

   Start - = sTest;

   }

   Catch (err) {}

   }

   }

   Catch (e) {}

   Try

   {

   End =

   Math.abs (

   Document.selection.createRange (). MoveEnd (" character " ,

   -10000000));
  // end

   If (end> 0)

   {

   Try

   {

   Var endReal =

   Math.abs (

   Ctrl.createTextRange (). MoveEnd (" character " ,

   -10000000));

   Var r = document.body.createTextRange ();

   R.moveToElementText (ctrl);

   Var sTest =

   Math.abs (r.moveStart (" character " , -10000000));

   Var eTest =

   Math.abs (r.moveEnd (" character " , -10000000));

   If ((ctrl.tagName.toLowerCase ()! = 'Input') &&

   (ETest-endReal == sTest))

   End - = sTest;

   }

   Catch (err) {}

   }

   }

   Catch (e) {}

   InsertionS = start;

   InsertionE = end

   }

   }

   Function setRange (ctrl, start, end)

   {

   If (ctrl.setSelectionRange) // Standard way (Mozilla, Opera, ...)

   {

   Ctrl.setSelectionRange (start, end);

   }

   Else // MS IE

   {

   Var range;

   Try

   {

   Range = ctrl.createTextRange ();

   }

   Catch (e)

   {

   Try

   {

   Range = document.body.createTextRange ();

   Range.moveToElementText (ctrl);

   }

   Catch (e)

   {

   Range = null;

   }

   }

   If (! Range) return;

   Range.collapse (true);

   Range.moveStart (" character " , start);

   Range.moveEnd (" character " , end - start);

   Range.select ();

   }

   InsertionS = start;

   InsertionE = end;

   }

   Function deleteSelection (ctrl)

   {

   If (insertionS == insertionE) return;

   Var tmp =

   (Document.selection &&

   ! Window.opera)?
  Ctrl.value.replace (/ \ r / g, " " ): ctrl.value;

   Ctrl.value =

   Tmp.substring (0, insertionS) + tmp.substring (insertionE,

   Tmp.length);

   SetRange (ctrl, insertionS, insertionS);

   }

   Function deleteAtCaret (ctrl)

   {

   If (insertionS! = InsertionE)

   {

   DeleteSelection (ctrl);

   Return

   }

   If (insertionS == insertionE)

   InsertionS = insertionS - 1;

   Var tmp =

   (Document.selection &&

   ! Window.opera)?
  Ctrl.value.replace (/ \ r / g, " " ): ctrl.value;

   Ctrl.value =

   Tmp.substring (0,

   InsertionS) + tmp.substring (insertionE, tmp.length);

   SetRange (ctrl, insertionS, insertionS);

   }

   // This function inserts text at the caret position:

   //

   Function insertAtCaret (ctrl, val)

   {

   If (insertionS! = InsertionE) deleteSelection (ctrl);

   If (isgecko && document.createEvent &&! Window.opera)

   {

   Var e = document.createEvent (" KeyboardEvent " );

   If (e.initKeyEvent && ctrl.dispatchEvent)

   {

   E.initKeyEvent (" keypress " , // in DOMString typeArg,

   False, // in boolean canBubbleArg,

   True, // in boolean cancelableArg,

   Null, // in nsIDOMAbstractView viewArg,

   False, // in boolean ctrlKeyArg,

   False, // in boolean altKeyArg,

   False, // in boolean shiftKeyArg,

   False, // in boolean metaKeyArg,

   Null, // key code;

   Val.charCodeAt (0));
  // char code.

   Ctrl.dispatchEvent (e);

   }

   }

   Else

   {

   Var tmp =

   (Document.selection &&

   ! Window.opera)?
  Ctrl.value.replace (/ \ r / g, " " ): ctrl.value;

   Ctrl.value =

   Tmp.substring (0,

   InsertionS) + val + tmp.substring (insertionS,

   Tmp.length);

   }

   SetRange (ctrl, insertionS + val.length, insertionS + val.length);

   }

   // -> </ SCRIPT>

  </ HEAD>

  <BODY>

   ...

   <- Do not forget this 'onclick' and 'onkeyup': ->

   <TEXTAREA onkeyup = " getCaretPositions ( this ); " onclick = " getCaretPositions ( this ); " id = " textfield " rows = " 12 " cols = " 50 " >

   </ TEXTAREA>

   ...

  </ BODY>
Note that the up and down arrows on standard-compliant browsers! Take this into account when creating touch screen applications. You can test the above script by running the 2-edit-full.html file in the vkboard folder of the attached attached archive . The basic callback is shown in 1-edit-simple.html .
Tips and tricks
Script flow is quite straightforward, so I hope it will not be hard to dive into it. Here is a couple of words on a few tricky places.
-
Event set-up . We need to handle both MS IE and W3C DOM event models.
  _setup_event: function (elem, eventType, handler)
 {
  Return (elem.attachEvent? // MS IE way

  Elem.attachEvent ( " on" + eventType, handler):
  ((Elem.addEventListener)? // W3C way

  Elem.addEventListener (eventType, handler, false ): null ));
 }
-
Key container set-up. Each key consists of the "outer"
DIV, which accepts padding, border color and other parameters.DIV- where we set the top, left, width and height parameters only. We use such a complex construction. Note that there is the JavaScript solution. Trenton Moss (see item # 6). If you want to avoid the box model problem._setup_key: function (parent, id, top, left, width, height, Text_align, line_height, font_size, Font_weight, padding_left, padding_right) { Var exists = document.getElementById (id); // Outer DIV: Var key = Exists? Exists.parentNode: document.createElement ( " DIV" ); This ._setup_style (key, ! Exists, top, left, width, height, " absolute" ); // Inner DIV: Var key_sub = exists? Exists: document.createElement ( " DIV" ); Key.appendChild (key_sub); Parent.appendChild (key); This ._setup_style (key_sub, ! Exists, " " , " " , " " , line_height, " relative" , Text_align, line_height, font_size, font_weight, Padding_left, padding_right); Key_sub.id = id; Return key_sub; }
-
Disabling content selection. This one is very important due to the very high typing speed that some people can achieve and, as a result, the inevitable vkeyboard content selection. It can be used instead of the
UNSELECTABLE(MS IE) and-moz-user-select(Gecko-based browsers) properties.This ._setup_event (kb_main, " selectstart" , Function (event) { Return false ; }); This ._setup_event (kb_main, " mousedown" , Function (event) { If (event.preventDefault) Event.preventDefault (); Return false ; });
Code
Virtual Keyboard features at a glance
- A complete JavaScript toolkit suitable for simulating every single aspect of a real keyboard device
- Compact (42.8 Kb - compressed full variant) script that does not require any images, for faster download
- Works and looks the same way on all mainstream browsers, tested on Mozilla Firefox 1.5 / 2, Opera 7.5 / 9.22, Safari 3, MS IE 6/7
- Very simple set-up procedure
- Self-contained, with no external dependencies
- Customizable font, font size and colors; Perfect for skinned environments
- Several variants are available, including full keyboard, slim full keyboard, numpad and ATM-style numpad
- Compressed scripts are bundled, ie full script: 42.8 Kb, slim: 43 Kb, numpad: 9.30 Kb, atm-numpad: 8.62 Kb
- Ten frequently used keyboard layouts are bundled with the full and slim scripts, 24 more layouts are in the provided layout pack
- Flexible installation options, ie any number of vkeyboards per page, adjustable callbacks
- Open-source script distributed under the zlib / libpng license, meaning that it can be used free of charge even on sites
Script requirements
Any browser that is aware of:
- JavaScript (implementation compliant with ECMAScript Edition 3)
- W3C DOM Level 1
- CSS Level 1 (at least, most of the elements)
- W3C or MS IE event model

Comments
When commenting on, remember that the content and tone of your message can hurt the feelings of real people, show respect and tolerance to your interlocutors even if you do not share their opinion, your behavior in the conditions of freedom of expression and anonymity provided by the Internet, changes Not only virtual, but also the real world. All comments are hidden from the index, spam is controlled.