
How to make an avatar (animated) from a cool photo
Table of contents:
1. What is an avatar and where can I use it?
2. What programs are needed to create an avatar?
3. From what to do the avatar and where does it come from?
4. Let's get to work.
4.1. Cutting, shredding and fitting to dimensions.
4.2. Adding beauty and originality.
4.3. Correctly save.
5. What is good, and what is bad.
6. I do not want to study, but I want to ...
1. What is an avatar and where can I use it?
For an example, compare these three avatars, they are more eloquent than any words:


2. What programs are needed to create an avatar?
I will teach you on the basis of the old (or new) good (and not very) photoshop. If you do not have any version of this program, then I advise you to buy it (do not worry, it's free to some extent, it's just a lot of weight and it's easier to buy it on a disk than half-day downloading from Ineta).
We can also use the following programs: Vindosovsky Paint (Paint), any Vinamp (if you like to listen to music at work), well, and something at hand - to eat (or if inspiration spills, even with a strong hunger to the refrigerator, ).
3. From what to do the avatar and where does it come from?
From scanned drawings . The option is ideal, since such an avatar will certainly be unique throughout the Internet. Truth for a while. After all, you can not forbid anyone to take your avatar.
Use wallpaper . Wallpaper is your background on the desktop, and there are a fair amount of them on the network. Any search engine will give you a bunch of sites with wallpaper. But do not count on absolute uniqueness, since this is the simplest way. Avatar of course, although it will be unique, but the source - no.
Screenshots from games, movies and cartoons . The method is pretty good, because Not everyone has the intelligence to make a screenshot of exactly the same moment as yours. This is done like this:
1) let's say we are a cartoon,
2) look, until we find something interesting,
3) We press a pause,
4) Hit Ctrl + Prt Screen - i.e. Take a screenshot, this button near the backspace,
5) Open Paint, select the highlight button, right click on the white background of the picture and select "paste",
6) Choose to save as ... with the jpg extension. And we already have ready-made wallpaper in our hands.
Use the ready avatar for the change . The situation is about the same as with the wallpaper, but there's less to mess around.
4. Let's get to work.
4.1. Cutting, shredding and fitting to dimensions.
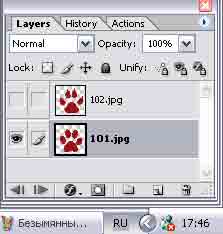
We approached this stage with the fact that we should already have two pictures. Why two? And we will immediately make an animated avatar, if you learn how to make animated, then without animation, even more so. These two experimental pictures:
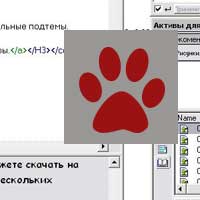
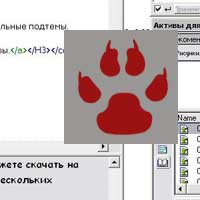
And now we need an application "Photos Ready". Run it. Create a folder named 1 on the desktop. Copy into our folder our pictures. Now, in the program, select File => Import => Folder as Frames => Folder 1 on the desktop.
You can see the zero animation by clicking on the play button at the bottom. There will be frequent flashing of frames (frames). Click on the stop, get down to work ...
Since we want to make an avatar only of our paw, not of the entire background, then we need to get rid of all that is superfluous: select using a square selection (holding Shift) a gray square on one of the frames.
Next, choose Image => Crop (Crop) - We got rid of the background! (Low quality images to save traffic)

After all, we do not need an arbitrary size. To proportionally change the size of the entire avatar, select Image => Image Size => dimensions for example 64.
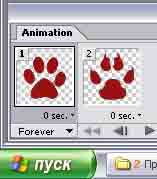
Now let's make the animation smoother, choose the second below the frames of the second delay (see the middle picture), say 0.5 seconds to each frame. On the play you can see the result. For better animation in the gap between them, you can cram more frames (I like that much more) or make the animation automatically with the button
4.2. Adding beauty and originality.
4.3. Correctly save.
Begin. Select the tab above the image of the Optimized avatar. So it will really look like your avatar after saving, at the bottom you can see how much it will weigh. You need to reduce its size and the number of colors until you reach the acceptable weight. The colors change on the right in the Color Table. Fit to the desired result, select Save Optimized as ... and AVatara READY !

5. What is good, and what is bad.
 .
. 
Comments
When commenting on, remember that the content and tone of your message can hurt the feelings of real people, show respect and tolerance to your interlocutors even if you do not share their opinion, your behavior in the conditions of freedom of expression and anonymity provided by the Internet, changes Not only virtual, but also the real world. All comments are hidden from the index, spam is controlled.