
| Start of section
Production, amateur Radio amateurs Aircraft model, rocket-model Useful, entertaining |
Stealth Master
Electronics Physics Technologies Inventions |
Secrets of the cosmos
Secrets of the Earth Secrets of the Ocean Tricks Map of section |
  |
| Use of the site materials is allowed subject to the link (for websites - hyperlinks) | |||
Navigation: => |
Home / Electronics / Circuits / Special devices ... / |
|
Homemade holographic installation
See also: |
 Fig. 1 |
Holography is a method of recording and reproducing a three-dimensional image with a laser. But before proceeding to obtain holograms, you need to re-arrange the laser several times so that it emits a continuous beam. On the trigger wind 8 to 10 turns of wire diameter 0.3 mm in varnish insulation. Complete the laser circuit with a transformer, a capacitor and a switch (Figure 1). The primary winding of the transformer contains 40 turns of PEL wire 0.3, the secondary winding - 800 turns of PEL 0.1. Do not forget to leave the grounding. Turn on the main circuit and pump air out of the trigger, but in such a way that the pressure in it exceeds the breakdown pressure by about 10 mmHg. Close the hermetic cock, through which the air is pumped out. Now turn on the additional circuit. As soon as high voltage is applied to the winding of the trigger lamp, a flash occurs, as the air in the lamp is more ionized and the breakdown occurs at a higher air pressure. The frequency of radiation will be about 25 flashes per second, and this is enough for your eye to perceive the laser beam as continuous. Note: the additional circuit is activated when the toggle switch is turned off. |
|
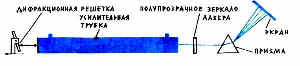
The laser beam must be monochromatic - to have a strictly defined wavelength. For this it is necessary to replace the opaque mirror of the laser with a diffraction grating - it decomposes the light into composite colors. In our case, the diffraction grating will serve as a filter, which will return only the main wavelength of the light wave to the amplifying tube, and the rest will filter out. (The diffraction grating could earlier be ordered by cash on delivery in the "collector", today it can be difficult to obtain it.) It is a film with lines on it (100 lines per 1 mm). Carefully paste it on a small (1x1 cm) glass plate so that the lines on the film are on the outside. The plate is fixed in a holder, the construction of which is shown in Fig. 2. The rotation of the holder in the horizontal plane is carried out by a worm pair: a gear from the old alarm clock and a screw with a neatly soldered wire. The system of horizontal rotation on the base of the small screw is fixed, and it should be tightened so that it is possible to turn the system with a light screwdriver force on the worm. Rotate in the vertical plane by a stop screw. The lines on the diffraction grating should be strictly parallel to the horizontal plane and perpendicular to the amplifying tube. And the grid itself is installed at some angle to the tube. How to determine this angle? On the path of the laser beam, set the prism (Fig. 3). It will decompose the light of the beam into several shades - say, yellow, yellow-green, green. Slowly change the angle of the diffraction grating until you get only one shade - the most intense one. Now the laser beam is monochromatic, and you can proceed with holography. |
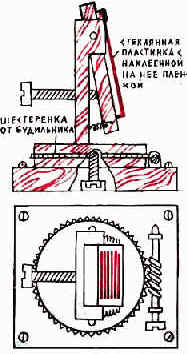 Fig. 2 |
|
Fig. 3 |
Fig. 4 |

The optical system of holography is shown in Fig. 4. The beam hits the thick glass and splits: the main one goes in the same direction, passes through the lens, is reflected from the subject and falls onto the photographic plate. The rejected beam - the so-called reference beam - is reflected from the mirror, passes through the lens, is reflected from another mirror and also falls on the photographic plate. The splitter reflects the light with both its surfaces forming two reference beams. One of them needs to be blocked by an opaque object. How to do this is shown in Fig. 5. The laser should be about a meter from the splitter. | |
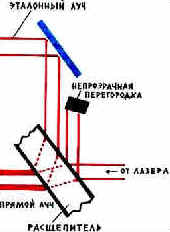 Fig. 5 |
When installing and setting up the system, instead of a plate, use a piece of white cardboard of the same size. When two beams are directed onto the cardboard - reflected by the object and the reference one - it is necessary to make it so that the light from the reference beam is 2 to 3 times stronger than reflected by the object. This is achieved by a slight displacement of the lens. In addition, the path of light from the splitter through the mirrors to the photographic plate should be approximately equal to the path of the direct beam from the splitter to the object and back to the photographic plate. The resolution of the emulsion of a photographic plate plays an important role. The higher the resolution, the better. You can use the plates and with a small emulsion resolution, but then the angle between the beams from the object and the second mirror should be less than 30 о - and the less, the better. When you are firmly convinced that everything has been done correctly, you can start working. In the dark, the cardboard is replaced with a photographic plate - an emulsion to the object. The laser turns on for a few seconds. It must be remembered that the slightest shaking of the system or some of its elements during the exposition will "smear" the hologram. After the manifestation of the plate, you will not see anything on it. But if a well-dried plate is placed in a reflected laser beam and viewed through it, a three-dimensional image of the object will appear in the field of vision. |
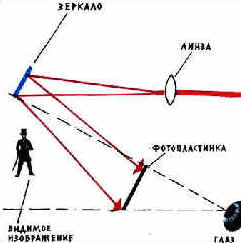 Fig. 6th |
The hologram reproduction system is shown in Fig. 6. The laser light reflected by the mirror should fall on the photographic plate at the same angle as the standard beam under which it fell during the exposure. Slightly rotate the plate to achieve the highest brightness of the image. If you failed to reproduce the hologram, then something shifted during the exposure. Another reason may be insufficient or, conversely, an excessively long exposure. Repeat the experiment by changing the exposure time. Take more careful precautions against shaking. In conclusion, a little about the elements of the system. The focal length of the lenses is 15 - 20 mm. Suitable, for example, lenses from the door eyes. The splitter is a glass 25-130 mm thick. Mirrors should be with an external reflective surface. The object to be shot is better to take a small one. Diffraction grating before work should be wiped with alcohol. |
Date of publication 30.12.2003gg.
![]()

Comments
When commenting on, remember that the content and tone of your message can hurt the feelings of real people, show respect and tolerance to your interlocutors even if you do not share their opinion, your behavior in the conditions of freedom of expression and anonymity provided by the Internet, changes Not only virtual, but also the real world. All comments are hidden from the index, spam is controlled.