
Self-made external filter for the aquarium.
Being an amateur of aquarium with a small experience, I came to the fact that the internal filter in my aquarium does not cope with its task. And from the frequent maintenance of the filter, only the inhabitants of my aquarium suffered.
 Having studied the information on the filters, I came to the conclusion that an unambiguous correct solution is the use of an external filter. Biofiltration is extremely effective, and none of the methods of water purification can even partially replace it.
The composition of water purified by an external filter is approximately similar to water in slow-flowing natural reservoirs. With weekly refreshing of a third of the volume of the main aquarium, it can be assumed that the ichthyofauna and hydroflora are contained practically in flowing natural water - hence all the advances achieved in systems with biofiltration.
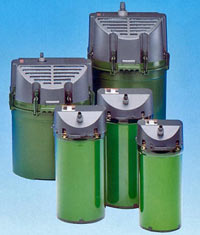
It was not pleasant news for me that the cost of an external filter was commensurate with the cost of the aquarium itself.
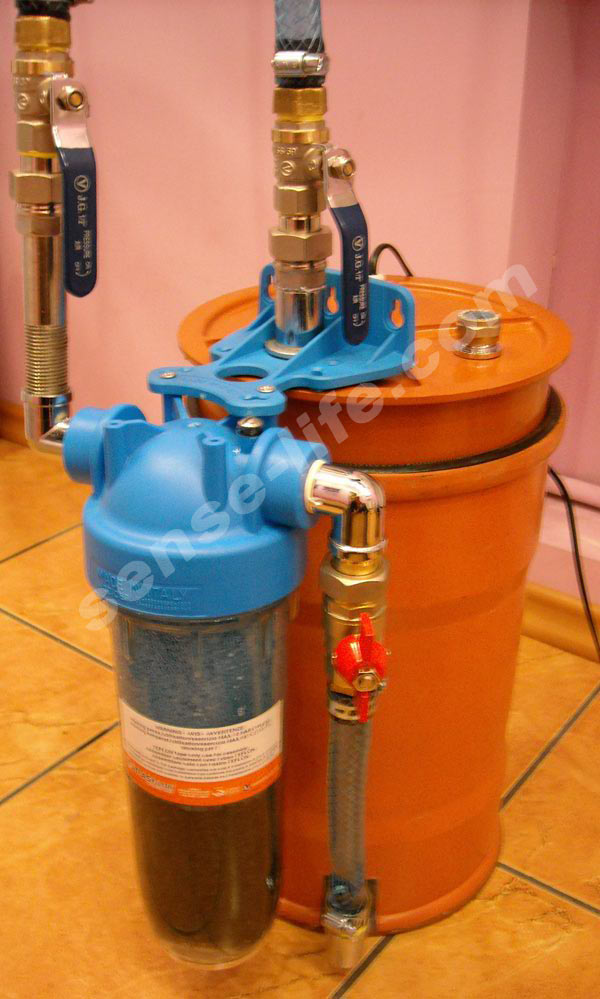
Having familiarized myself with the design of the men, I decided to make by myself an analog of the external filter Eheim.
For the repetition of the structure were purchased:
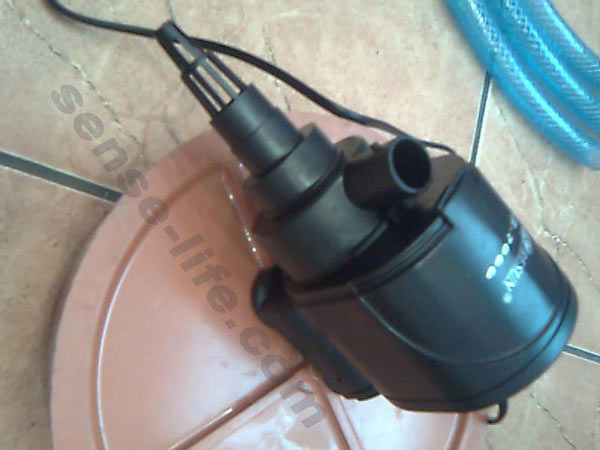
- Pump (water pump), RESUN company of Chinese production 30 W., 2000 l / h, water column lift 2 m.
- PVC coupling for sewage pipe d = 200 mm. + 2 stubs to it,
- cranes, corners, drivings, etc.,
- PVC pipe d = 20 mm. For receiving and supplying water to the aquarium 4 m.,
- the bulb from the household filter,
- Fillers for the filter.

For insertion into the plugs, the following fittings were used.


My choice on this pump stopped due to the rise of the water column of 2 m. Because the outfitter will stand on the floor.
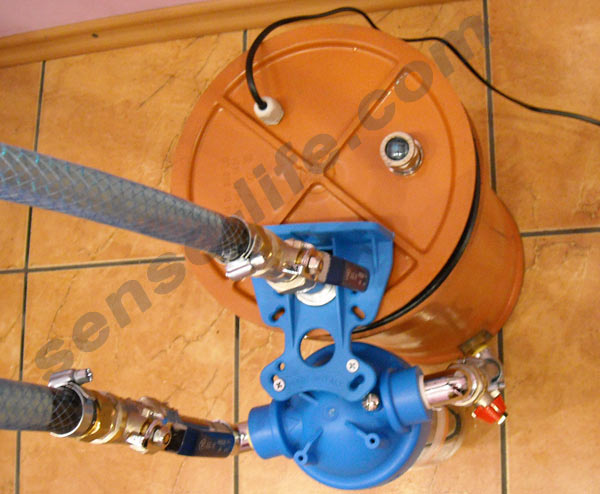
Drilled holes in the top and bottom plug for feeding and pumping water. When fitting the fittings, rubber gaskets were used with the additional use of a silicone sealant.

I tried to insert the plugs into the sleeve with sealing rubber bands and it did not work out for me, it turned out too tightly. Realizing that if I manage to insert a stub, I will not pull it out from there. Proceeding from this, cut off the edges of the coupling so that to disassemble the filter if that, you could remove the elastic and thereby depressurize the filter. At the bottom of the coupling made a seat under the inlet fitting.

The clipping edge of the coupling will then be installed inside the coupling, and will hold the mesh.

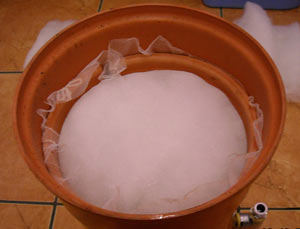
The mesh above the nozzle level is installed in the lower plug. To do this, I had to patch a box for vegetables.


After this, with a clear conscience, we can install the lower plug in the coupling. Since the rubber band will not be used here, it is obligatory to cover the entire area of the plug with silicone. And after installing the cap, we additionally lubricate the joints inside and outside with a sealant.

In the lid, I drilled an additional hole for the power cable and air vent. It was not necessary to fasten the pump to the plug, it was safely secured without this because of the length of the hose and the power cable.

To seal the network wire used fitting, similar to that used in street lamps. At the place of the wire break, I installed a switch.
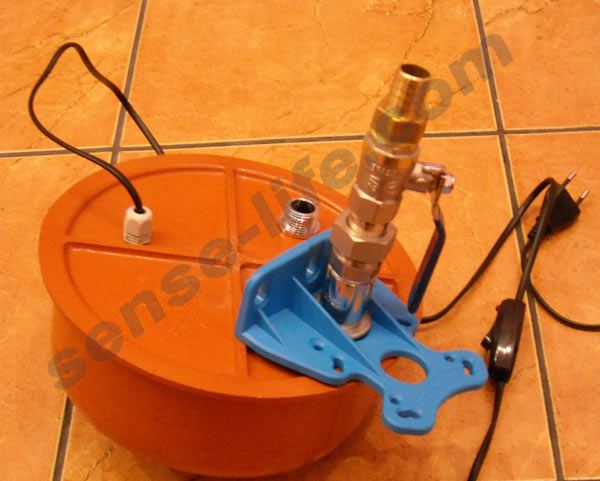
Under the inlet nozzle, a bracket for fixing the bulb of the household filter, which will serve as a preliminary filter for rough cleaning, was installed. You could do without it, but then you would have to install a sponge on the inlet pipe directly in the aquarium, or wash the canister every month (in my plans, the washing of the canister will take place at least every 6 months).

For the manufacture of the prev. Filter needed a sewer PVC pipe d = 32 mm. In which a lot of holes were drilled. It could be used, in addition, in the pre. Filter activated charcoal or zeolite, but first decided to dispense a foam rubber sponge.
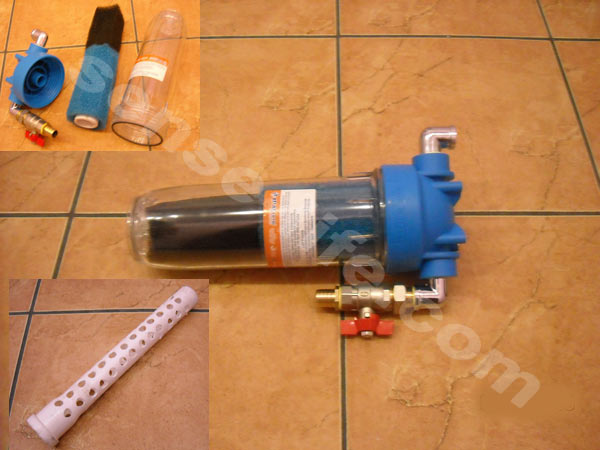
When all the details of the filter assembly begin to fill with fillers.
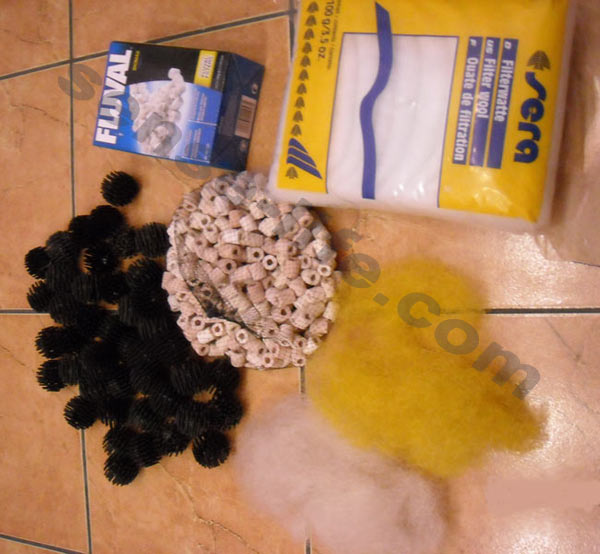
1 layer. At the bottom, first of all, we settle the material for coarse filtration. For these purposes, foam with a large cell is most suitable. But unfortunately I could not find a sheet of foam for aquariums of the appropriate size. And instead he used something like a lump of fishing line.
2 layer. We fill with ceramic rings. The purpose of their application in the filter, is to divide the flow of water and uniform distribution of its current across the entire transverse area of the filter material.


3 layer. We lay a layer of foam rubber with a shallow cell. In my case, a sintepon was used.
4 layer. We fill the "bio balls" with a substrate for colonies of bacteria-nitrifiers. In this section, all the mysteries of the nitrogen cycle occur. Here, heterotrophs, and nitrifiers, and denitrifying agents peacefully coexist, properly fulfilling the duties assigned to them; The working volume of the chamber should be 4/5 of the capacity of the body of the biofilter. As a substrate for bacteria, claydite (preferably crushed) can be used because it has a porous structure.


5 layer. It is optional, but I decided to add a FLUVAL substrate. Outwardly it looks like ceramic rings, only the material has a porous structure. If you take a ring in your hand, plug a hole on one side with your finger, and blow it on the other, then all air will exit through the micropores
6 layer. The final layer, just before the exhaust port (that is, in front of the filter pump, the sintepon should be placed, it will protect the rotor from getting dirt particles into it.

The filter assembly was successful. Testing showed very good performance of the pump, although the performance of the pump was 2 times less. The top cover is not fully installed, due to the strong tight seal of the sealing rubber. If you close the lid to the end, then in full it is possible that the filter you will no longer open.
Maintenance of the filter reduces to cleaning the pre-filter as it gets dirty. Opening and washing the can through half a year. I want to note that it is necessary to wash the filter only with ceramics and foam rubber and with necessarily aquarium water. The extract is washed only as needed.
The first time after starting the external filter works in fact only as a mechanical one. Useful bacteria have not yet settled the substrate. Dirt fills the filter, which leads to a decrease in its performance. The water pressure gradually decreases. But there is also a reverse process. Dirt is food for bacteria. They split the organic substances accumulating here and are processed into nitrate, i.e. Biological self-cleaning of the filter begins.
Complete colonization of the substrate by colonies of beneficial bacteria occurs in 2-4 weeks. And then everything depends on what process will take up - pollution or self-cleaning. If the first, then the filter will continue to be contaminated. Not as intense as the first two weeks, but inevitable. When the performance of the filter falls below 30% of the maximum, it must be cleaned and restarted, otherwise the so-called. "Overturning" is a violation of biological processes, as a result of which toxic substances are produced and thrown into the aquarium.
If self-cleaning takes over, the filter on the contrary is gradually freed from dirt and the productivity that has fallen to 50-70% of the maximum is restored. Theoretically, after this, the filter should work forever. In practice, productivity is not fully recovered, and stagnant zones still form inside the canister with times. Therefore, I recommend that it be cleaned from time to time, even if the water pressure is strong.
In addition, I want to note that all metal parts must be free from lubrication. Since a drop of oil can spoil a ton of water and thereby destroy all of your inhabitants. Therefore, it is desirable to use plastic parts (chokes, corners, taps), which in turn are much cheaper than metal ones.
PS I replaced the hoses later with corrugated ones (which are used for draining the washing machine), since PVC hoses were easily crumbled and thus blocked the access of water.
The lid will need to be pulled off with studs, otherwise the light can be pulled out by cutting it off.
Metal taps and fittings have been replaced with plastic taps that are used for irrigation.
You can see one more interesting design of the filter , which was sent by the visitor of this site.

Comments
When commenting on, remember that the content and tone of your message can hurt the feelings of real people, show respect and tolerance to your interlocutors even if you do not share their opinion, your behavior in the conditions of freedom of expression and anonymity provided by the Internet, changes Not only virtual, but also the real world. All comments are hidden from the index, spam is controlled.