
The problem of ensuring security and protecting yourself and your loved ones from encroachment on life or property excites every person. There are many ways and means for self-defense, but not all of them are available for purchase and use. The best weapon for protection and self-defense is an electric shock, which does not require a license and registration with the Interior Ministry. Electric shock can be purchased by anyone who is at the age of 18, and thanks to the compact size and light weight, the shock can be worn in a pocket or in a women's handbag.
A typical electric shock consists of several units - a converter (1), a capacitor (2), an arrester (3) and a transformer (4). All this you see in the picture below. It works, too, is simple. The capacitor is periodically discharged to the transformer, producing a spark discharge at its output. It would seem very simple, but as practice showed there is a hidden trick (© fulminat) and it is hidden in this very transformer. At home it is almost impossible to make sure that it correctly transmits the impulse and was sufficiently effective, for this you need special materials, equipment, and most importantly - calculations that are kept in great secret - on the network you will not find anything on this topic. In addition, the transformer has purely constructive limitations that do not allow us to transmit through it the powerful single impulses we need.


We decided to cheat and figured out how to do the same thing 3 times easier while keeping all the power. The action is as follows: the ignition capacitor operates on the spark gap-transformer system in a manner similar to the electric shock, so that a high-voltage pulse piercing several centimeters of air is produced at its output. And at that moment the main, military condenser enters the case, which, through the formed ionized channel, beats all its joules directly. The point here is that at the time of the formation of an electrical discharge, a conducting channel appears, which essentially replaces a piece of wire. Thus, using high voltage, we charge the object with practically no losses, which allows us to reduce the dimensions, and the actual power of the device necessary to achieve the wild anger of its action.

We will begin the manufacture of the shocker with the most difficult part - transformers. As practice has shown, difficulties with repetition of shockers are usually in the winding - in the process many people give up their nerves and the structure is subjected to premature breaking with a hammer :-D Therefore, we went through an industry where it is known that it is easier to make large quantities and without problems. The process becomes almost entertainment, but do not forget about care - the transformer does not cease to be the most responsible part of the device.
TRANSFORMER OF CONVERTER
You will need an armor core B22 from ferrite 2000NM. I will explain armor does not mean bulletproof  But just such a design is closed on all sides in which only holes for wires are left. It is two small cups between which is located the bobbin almost like in a sewing machine
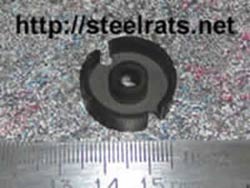
Only reel on it you need not thread, a thin enamel wire with a diameter of about 0.1mm, it can be obtained from a Chinese alarm clock. We take this wire and wind it on the bobbin, not counting the coil until the remaining space is about 1.5mm.


For the best result, you need to wool layers, laying a thin tape between them. So you should get 5-6 layers. If you are lucky enough to get the PELSHO wire, simply shove it in, without any insulation, periodically dropping some of the engine oil. To the ends of the wire it is useful to attach thin, multicore leads for greater reliability.

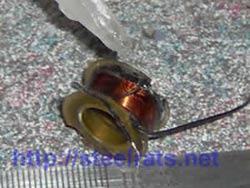
Next, we isolate all this in 1-2 layers of electrical tape and reel 6 turns of a thicker wire, which is about 0.7-0.9 mm, with a tap from the middle, i.е. On the third turn we stop the process and make a withdrawal (twist), then we build the remaining 3 turns. All this will not be superfluous to fix super-glue or anything else. At the end, we glue the cups together, or simply wrap the tape with spruce, not sure about the quality of the winding.
OUTPUT TRANSFORMER
Practiced and enough. Now a really difficult part. Although running ahead I will say that this is compared to what I had to do before just fun ;-) Because I wound the traditional layer transformer at home and from the first time so that it worked NEVYDETET. Instead of layers in our transformer there will be sections.
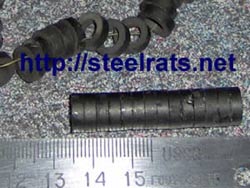
First you need to get a tube made of polypropylene with a diameter of 20mm. They are sold in the sanitary ware shop as a replacement for ordinary water pipes. By appearance white taka with a thick wall, clean plastic. There is a very similar but metaloplastic - not suitable. We need a piece of just 5-6cm in length.


By a complex process this piece must become a sectional framework. This is done in the following way: we take a drill, into which we grip a bit or bolt close in diameter to fit into the tube, wrapping the tape on it, making sure that the tube is seated tightly and evenly. Next, we take a cutter which can be made from a steel plate, emery cloth, etc., and begin to turn the grooves in such a way that they do not cut through the pipe. As a result, we should get sections of approximately 2 x 2 mm. 2 mm deep and wide. That they were more equal after sharpening it is possible to underline a little nadfil. After that we take a clerical paper knife and along the whole frame we make an incision of 2-3mm wide, look more carefully. It is possible to cut through the wall of the pipe which is crooked by remaking. This completes the preparation.


... Because then the fun begins. This time we need a wire with a diameter of about 0.2 mm. It can be in the power supply, starter, etc. This wire needs to be wound up on all sections of our frame, not too zealous, so that the wire does not go beyond the section, but better so that it does not go far. Before winding to the beginning of the wire, a small multicore wire is soldered again, which must be fixed with glue so that it does not come off in case of anything. The end of the wire is not connected to anything yet.
Now we need to find a ferrite rod about 10mm in diameter and about 50mm long. We need 2000NM ferrite, for this purpose a horizontal line transformer from a domestic TV set is suitable. We need to remove all unnecessary things from him. Then gently cut it as shown. If the line from the small halves, they can be glued together with a superglue to produce a longer rod. To process the ferrite, you need to apply a sharpener (emery wheel) to eventually get a round rod with a diameter of about 10mm and a length of about 50. The process is very heavy, during which you can feel the full extent of the coal mine worker :-D Instead of the rod, you can use a lot of small ferrite Rings glued together - some of them are easier to buy, and they are also made of ferrite 2000NM


The rod needs to be wrapped around with a layer of electrical tape and wound 20 turns of 0.8 wire - the one we used in the first transformer, stretching the winding to its full length, only 5-10 mm behind the edges and fixing the wire with threads or the same electrical tape. WRAPPING THE WIRE NEEDLY IN THE SAME DIRECTION THAT AND ON THE SECTION, for example clockwise or against whom one likes ;-) After that everything is insulated in several layers, as far as the inside diameter of the tube allows, so that it enters inside tightly but without effort.
After the preparatory and winding process, do the following trick. We insert the rod inside the frame, and on the side where the HV winding ends (where there is no output in the form of a wiring) WE CONNECT 2 WINDINGS TOGETHER !!! Thus, the transformer will have 3 outputs instead of the usual 4x: the end of the 1st winding, the common point and the HV output. ATTENTION! Follow the phasing (winding in the same direction) otherwise the shocker will not work.

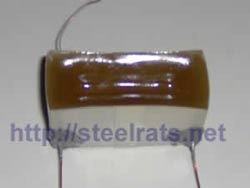
At the end of the process, the transformer should be placed in a cardboard box and filled with hot paraffin. To do this, melt the paraffin in the tin but do not need to heat, otherwise hot paraffin will damage the frame and all the work will go wrong. Conclusions must be glued in advance with some glue so that the paraffin does not leak out It is best to produce the process in two stages. First pour paraffin, then put in front of the fan heater or the radiator so that it warms up for 10-15 minutes so all the air bubbles will float and go away. Boxes need to be done with a reserve of HEIGHT tk after cooling, paraffin strongly shrinks. You can remove the excess with a knife. This technology is almost inferior to the vacuum process in the factory, but it can be used in the kitchen. If you have the opportunity to borrow an industrial vacuum pump, then instead of paraffin it is better to use an epoxy - it is more reliable.
Pages: [ 1 ] [ 2 ]

Comments
When commenting on, remember that the content and tone of your message can hurt the feelings of real people, show respect and tolerance to your interlocutors even if you do not share their opinion, your behavior in the conditions of freedom of expression and anonymity provided by the Internet, changes Not only virtual, but also the real world. All comments are hidden from the index, spam is controlled.