
As a receiver, a fire extinguisher OXP-10 was procured with the declared volume of 8.7 liters, in fact measured and amounting to 10.5 liters. The fire extinguisher obtained practicing at the enterprise. Just went to the head of the department of fire safety or xs as he is called, and asked if there is a decommissioned fire extinguisher. They gave him.
Go tell, do not you dare to release its contents in the bathroom. For the time being I dragged him to the house, went behind the garages and let him out there (he will bring a lot of childish pleasure;). Also, the PM5 pressure switch, intended for water, was purchased, but also suitable for air. I also bought two filters of a dehumidifier, and one car fuel, a fine cleaning (I immediately put it on the entrance to the compressor.
I bought any adapters, crosses, as well as reinforced PVC hose with an internal diameter of 10 mm. All that was included in the set, look at the photo. I also bought a valve (at first I thought that I would regulate the pressure, and that it was not different from the reducer (naive).
After I figured out that the valve and reducer are different things, I bought a reducer with a pressure gauge, and a separate pressure gauge, for measuring the pressure inside the receiver. Were also bought hose a thin x3 of what diameter, in a pet store, worth as much as 10 rubles / meter  )). He either silicone, or xs what, but very flexible, light and durable, there is nothing better to approach the airbrush.
Well, of course, where without the tape FUM, which is sold in any sanitary ware shop.

The first thing we screw the ball to the bottom (I think it's up to you how, there are no tricks here). From the lid we remove all the goods, and from the inside of the fire extinguisher, we leave only the balloon and the lid.

In the hole in the cast-iron lid, cut the pipe thread, 1/4 inch. As for the wide thread on the ball, we wind the tape FUM, we make a rubber gasket (in theory, it should be, I had it, but I did it somewhere, and eventually cut myself out of the camera for the car, after building found my native))) ) And screw the cast iron cover.
We screw into the opening of the lid the adapter with 1 / 4НР on 1 / 2НР inches.
Next, screwing the cross 1/2 inch (then I'll just write 1/2), of course, all the connections with the tape FUM, I will not mention this more.

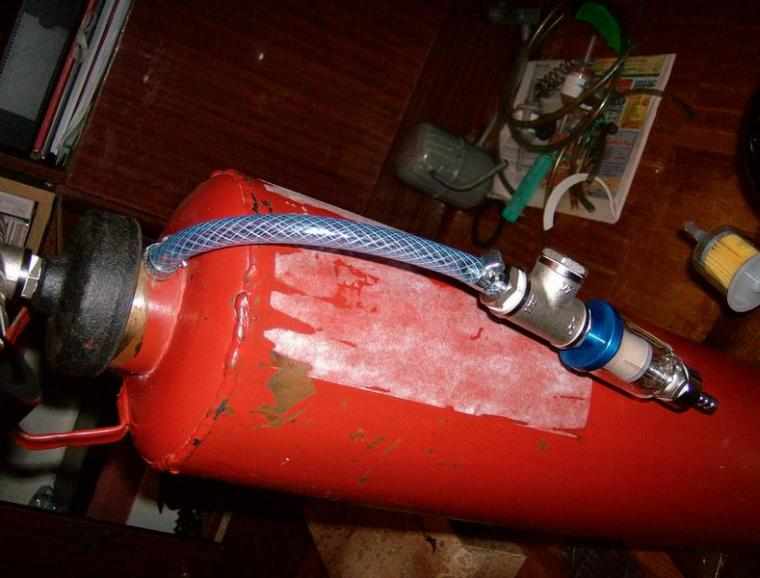
We screw the pressure switch through the adapter 1 / 2НР-1 / 4НР, screw in the adapter 1 / 2НР-1 / 2НР from the side.

Next, screw the tee on the side.

To it, on the one hand, we fasten through a reducer 1 / 2НР-1 / 4ВР a reducer, in which the thread is 1 / 4НР.

On the other end, also through a 1 / 2HP-1 / 4VN adapter screw the pressure gauge, which has a thread of 1 / 4HP. On the opposite side of the spider, screw the valve (to drain the air from the cylinder), which has a thread 1 / 2НР.

To the reducer, screw the filter-moisture separator, which has a thread 1 / 4НР and will go straight to the reducer. Nyuans is here that the filter should stand properly (keep the top and bottom), and make sure that at the lowest point was a drain hole.

Next, draw a line of another filter, on the side of the inlet there is a 1 / 2BP connection, which is connected through the 1 / 2HP-1 / 4VP adapter, screw it onto the filter having a thread 1/4HP. From the outlet I made a little, because there were unnecessary details, and there were some necessary ones, in the end it turned out that way.
A 1 / 4HP-1 / 2NP adapter is screwed into the hole in the 1 / 4BP filter, a tee is screwed onto it (I had one extra one), on one side of which is screwed a 1 / 2HP plug, on the other side of the tee opposite the filter, 1 / 2H.
ATTENTION: I did so tricky because there were extra details that you did not allow this error, do so, the 1 / 4HP-1 / 2NR adapter is screwed into the outlet hole and a 1 / 2VP hose connection is screwed onto it. Layout from below will be given for this option.

Further, to the hole with an external thread of incomprehensible cross-section and step (and could not find) that exits the extinguisher as the output nozzle, the reinforced hose is ideally suited, which we fix with the clamp on top.
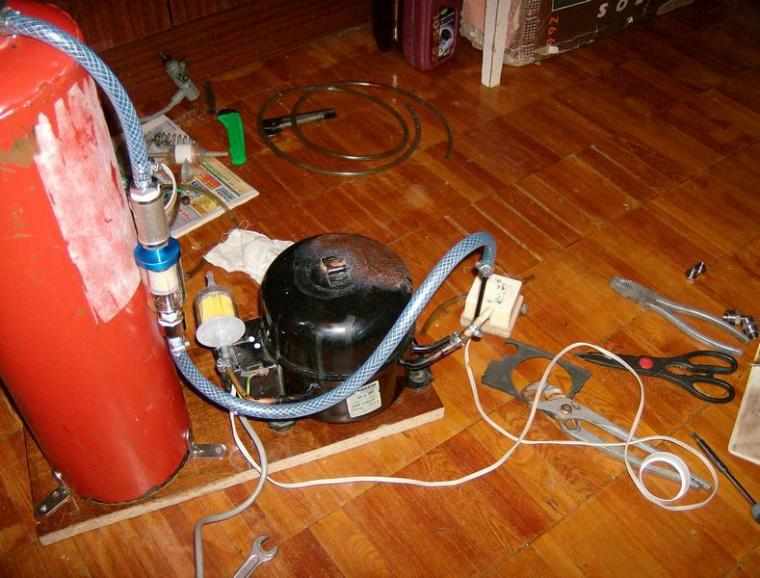
From the other end of the hose we insert the fitting from the filter and also fix it with a yoke.
Then, from the incoming filter union, we again insert the reinforced hose and connect it to the outlet tube of the compressor. How there to consolidate this good, I think you will think up. I have a tricky system out of several gaskets and everything is clamped on top.
Finally, in the 1 / 4VR filter outlet, screw the 1 / 4HR connector onto which the silicone tube is placed, which almost perfectly fits on it, and does not even require the clamp to tighten, the second end of the tube is already to the airbrush.
Since the pressure after the reducer is small compared to the receiver, the tube completely sustains it without any effort. At the entrance to the compressor, as I already said, put the car filter to clean the air. Butter...
About the oil change, three tubes come out of the compressor. One input, the other output, the third sealed-and there is for topping up the oil. Here it we razderbaniem (I just had a bite of pliers), but look so that the sawdust does not get inside, otherwise the motor may end.
From there, drain the oil. How many merged, I honestly did not measure, but something about the glass. Back I poured an automobile oil of the formula 10W40, volume about 350grams. IMHO car oil is better that in the first has a bunch of additives that protect from any threshing floor, secondly, unlike spindle oil, it does not "absorb" moisture.
Now the layout for prices, and that's where to buy ....
1) Compressor from the chopper - or screw, or buy in organizations dealing with the repair of refrigerators. How much he there can cost I have no idea, was not interested.
2) Receiver (I have a fire extinguisher) - to get at an enterprise or organization, can be written off, or buy, I heard that the price for such is about 200 rubles
3) Pressure switch - 250 rubles, in a store selling heaters, water pumps, and other sanitary engineering specialized garbage.
4) Reducer - 500 rubles, bought in the car market, because nowhere else just did not find, ran around all the shops of the city. Perhaps one of the most expensive assembly units.
5) Reinforced hose with ext. Dia. 10 mm.- 55 rubles / meter, in the car market I bought two meters, although one would suffice.
6) Silicone hose - 10 rubles / m, a pet store, bought three meters.
7) Air filters-dehumidifiers - 170 rubles pcs., In the car market, bought a pair.
8) Automobile gasoline filter of fine cleaning - 35 rubles, car market.
9) Crosspiece - 1 piece
- Tee - 1 pc.
- Valve - 1 piece.
- Adapter 1 / 2НР-1 / 2НР - 1 pc.
- Adapter 1 / 2НР-1 / 4НР - 3pcs.
- Adapter 1 / 2НР-1 / 4ВР - 3pcs.
- connection 1 / 2VR - 2 pieces.
- Connecting 1 / 4HP - 1 pc.
All this is bought in sanitary ware shops, and in the sum will leave somewhere on 500 rubles.
10) Manometer - 1 pc., 90 rubles in the store selling heaters, water pumps, and other sanitary engineering specialized garbage.
11) FUM tape - 12 rubles, in any sanitary ware shop.
12) Clamps - 5-10 rubles / piece. 6 pcs (or better 8 just in case), in the car market.
Amount: 1897 rubles.
Agree not so bad for an excellent compressor with their own hands ))) This does not consider the screws, bolts, corners, etc. elements that you will attach the receiver and compressor to the base.
All prices are given for August 2008 for the city of Arkhangelsk, and may vary in other cities.
Note: НР-external thread, ВР-internal thread!

Comments
When commenting on, remember that the content and tone of your message can hurt the feelings of real people, show respect and tolerance to your interlocutors even if you do not share their opinion, your behavior in the conditions of freedom of expression and anonymity provided by the Internet, changes Not only virtual, but also the real world. All comments are hidden from the index, spam is controlled.