
Rabitz netting machine
| Rabitz netting machine |
|
The fence made of metal mesh is better than any wooden fence. And it lasts longer, and does not obscure the plants. Pillars for its installation can be any: steel or asbestos cement, reinforced concrete or, at worst, wooden. However, reinforced concrete poles are not difficult to manufacture by themselves. The form for them is an asbestos cement pipe. And that the concrete does not stick to the walls, from the inside they oil it. In concrete, it is necessary in advance to make holes for the installation of anchor bolts and fixing the wire. After all, when the concrete hardens, hollowing out them will be very difficult. And now we will proceed to the most troublesome business - the manufacture of wire mesh. The most common sizes of cells are 80х80, 60х60 and 45х45 mm. Figure 1 shows the device of a simple device that will make it easier for us to work. It is designed for a cell 80x80 mm. Wire, so as not to be confused, concentric circles are thrown on the feeding drum - an inverted bucket, put on a wide board. The position of the bucket is fixed with a load. From the drum, the wire is fed to a section of the steel channel, on which three rollers are mounted. Changing the position of the central one, adjust the tension of the wire. And that the rollers are easier to rotate, on the bolts serving as axles, on both sides, the washers are placed with a thickness of 1-1.5 mm. The wire prepared for braiding is wiped with a cloth moistened with engine oil, and sent to a bending machine mounted on a flat steel plate. The length of the plate corresponds to the height of the grid. It is attached to a solid working table. 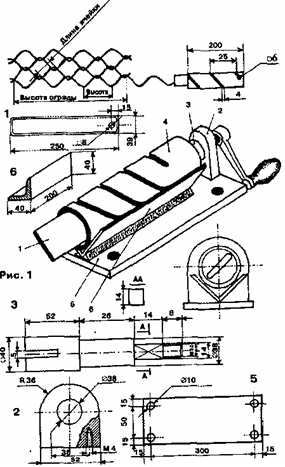 The machine itself (Figure 1) is a thick-walled steel pipe in which a knife of solid strip steel rotates. In the pipe, a 4 - 5 mm spiral groove is cut at an angle of 45 degrees to the axis. At a distance of 5 ohms from the edge of the pipe, the groove ends with a round hole. The pipe is welded to the steel corner so that the welding does not close the groove. A corner is attached to the base. Correct installation of the support is controlled by washers. The knife in the groove of the shaft is fixed with a screw or a stud. In Figure 1, the numbers indicate: 1 - a knife; 2 - support; 3-shaft; 4 - pipe; 5 - base; 6 - corner. The shaft should be free to rotate, and the gap between the walls of the pipe and the knife is 0.5-1 m. The working table is positioned so that the wire stretched at an angle comes up on the receiving drum. This may be a rack to which a wooden shaft or a pole is attached (Figure 2). The braiding operation is carried out in such a manner that the wire end is folded in the form of a hook for half the length of the cell, the wire is drawn through the groove of the tube and attached to the edge of the knife. Then rotate the handle until the wire becomes wave-like. The wave-like workpiece that emerged from the machine is cut into lengths equal to the height of the fence plus half the height of the cell, and are interlaced on the desktop. The finished mesh is wound on the shaft of the receiving drum. The most suitable material for netting is a soft wire with a diameter of 2.2 mm. Note that from a 1.45 m piece of flat wire, 1 m is wavy. So, for the manufacture of a grid with a cell 80x80 mm, a coil of wire 36.35 m long (25 segments of 1 m) will be required. Before stretching the grid, dock the individual pieces together (Figure 3). The easiest way to do this is by removing the end wire. By attaching the ends of pieces to each other, connect them with the wire taken out. No trace will be noticeable. There is another way: the ends are connected by a piece of straight wire, threading the cells with them like a spoke (Figure 3). But in either case, the wire is better divided into two parts and connect pieces from two sides. After all, stretching the wire half the width of the net is much easier. 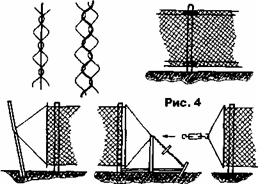 When the grid is connected, it can be hung to posts. If wooden cross-pieces are mounted on them, the operation is not difficult: the net is slightly pulled and nailed. Unprepared poles require a lot of tension. It is so. A steel rod is passed through the outermost cells. A cable is attached to it, and with it, pull the net. Figure 4 shows several devices for this operation. The easiest way is to use the lever - a long sturdy pole, one end of which, so that it does not slip, is lowered into the hole, and the other is pulled by ropes. You can apply a threaded tension clutch or beam, twisting a strong double rope or rope. But at the same time it is necessary to have a support, for which one it would be possible to hook a ray or a coupling: a tree, a pole or a wall of a building. And the simplest thing is to dig a log into the ground. 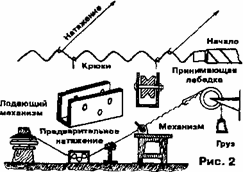 To the posts the grid is fixed with wire or bolts with a large-diameter washer. The last fastening, of course, is more reliable and accurate. The painting ends. It is more convenient to work together, standing on either side of the hedge. Everyone paints their side, helping a friend paint over the interlacing - the most inaccessible places. Use a better brush, the paint roller interlacing does not paint. And here do not spare the time. Because the quality of the grid is painted, the life of the grid depends. In short, conscientious work pays off with interest. |

Comments
When commenting on, remember that the content and tone of your message can hurt the feelings of real people, show respect and tolerance to your interlocutors even if you do not share their opinion, your behavior in the conditions of freedom of expression and anonymity provided by the Internet, changes Not only virtual, but also the real world. All comments are hidden from the index, spam is controlled.