
How to connect a webcam
Web cameras connect to the Internet
- Through the port over a 10/100 MbitEthernet network , the most popular method of data transmission. There are two standards for 10 Mbit Ethernet networks : 10Base2 (using a coaxial cable) and 10BaseT (using a twisted pair). 10Base2 is used extremely rarely due to the sensitivity of the coaxial cable to external interference. The 100BaseTX standard uses a twisted pair and provides a data rate of 100 Mbps. 1000 Mbit Ethrnet, Gigabit Ethernet The 1000BaseTX standard used here is an enhanced version of 100BaseTX. This standard is used mainly for building backbones of local networks.
- With the help of a standard modem through the serial port. This is a cheap and fairly common way of connecting a web-camera to a global network. The main disadvantage of this method of connection is a low data transfer rate (the maximum data download speed is 56 kbit / s, the maximum paging speed is 33.6 kbps.
- Through ISDN modems. The ISDN (Integrated Services Digital Network) standard is used to transmit digitized graphics, audio and video information and other digital data through private or public digital telephone networks. The ISDN standard provides data transmission at speeds up to 128 kbit / s via two channels. XDSL modems DSL (Digital Subscriber Line) - technology that provides a wide bandwidth for simple copper telephone wires. The data transfer rate may vary depending on the company providing this service. On average, it is 1 Mbit / s for downloading data and 250 kbps for paging.
- A cable modem is a modem that provides access to the Internet via cable television networks. Cable modems use asymmetric technology, which is most suitable for user access to the Internet. At the same time, the maximum possible data reception speed for such a modem can reach about 40 Mbit / s (although it usually does not exceed 1 Mbit / s), and the transmission speed is about 10 Mbit / s.
- Cellular modems With the help of a cellular modem, you can connect a web-camera to the Internet using cellular communication lines. The data transfer rate is usually 5 to 20 kbit / s.
After a physical connection to the network, the web camera is assigned an IP address. Most often, the web-camera does not have an IP address by default; It is installed either with the appropriate function of a standard web browser, or with the DOS command, which uses the serial number of the web camera to identify it. In addition, manufacturers are developing special programs for web cameras, greatly simplifying the procedure for assigning an IP-address to the web-camera. Thanks to the built-in software for the web server, FTP server, FTP client, e-mail client, etc., the web camera connects directly to the LAN / WAN / Internet network and works as an independent network device in it. This distinguishes web cameras from conventional computer cameras that require mandatory connection to a personal computer via a USB or LPT port. In addition, web-cameras can support work with user scripts and JAVA-applets. To install the web camera outdoors or indoors, many manufacturers provide in the design of the camera body special fasteners, intended for installation on walls, ceilings, brackets and rotary devices. Some Internet cameras have built-in rotary devices designed for mounting on a horizontal or vertical surface
How to connect a webcam on a local network
You will need the following components: computer, switch, network camera and local Ethernet. There are also wireless options
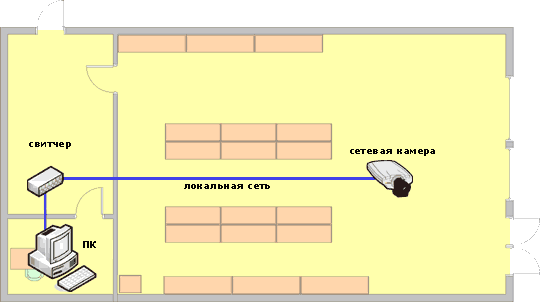
Example of the organization of video surveillance in the Office behind the front door
Step 1: Identify your needs
- Do you want to use the camera only indoors? Or for outdoor use?
- Do you want a camera with a fixed viewing angle or with variables that will allow you to remotely pan, tilt or zoom?
- You will need additional options, such as motion detection, alarm notification, camera power over Ethernet, audio?
- Do you want to just watch or also record what is happening?
- Do you need to protect the camera from external influences?
- Determine how many cameras you need for your needs.
Step 2: System Requirements
If your building does not already have a local network that allows you to simply turn on the network camera in a network outlet, you will need the following equipment:
- a switch that will serve as the central point of connection between your network camera and your local computer
- at least two Ethernet cables: one to connect your network camera with a switch and another to connect the local with the switch of your computer.
Step 3: Installation.
- Connect all devices to each other via a switch
Step 4: Assign an IP address for the network camera.
- You must assign an IP address for your network camera so that you can access it via a Web browser on your local computer. You can choose between an automatic and a static IP address. A static IP address is recommended, since you do not have to search each time for the IP address of the camera.
To set the IP address of the network camera. You can use the software that is on the CD that comes with the product, or can be downloaded from the manufacturer's website or by using the protocol definition method, the ping utilities were addressed. In any case, you will find all the information in the installation manual of the network camera
Step 5: Finish the installation of the network camera.
Once the IP address has been assigned, you can open the Web browser on your local computer and enter the IP address of the network camera in the address field. For new visitors with the Internet browser Internet Explorer, the browser will ask, you want to download the program to work with the camera. This program is mandatory in order to watch live video from a video server or video camera. It also provides control over MPEG-2, MPEG-4, audio streams, motion detection and pan / tilt / zoom in the browser window. (Other Web browsers can support native video streaming and do not require the installation of additional components.)
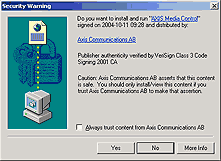
Click the "Yes" button to install the program.
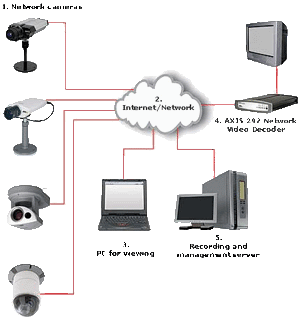
How to access the webcam via the Internet
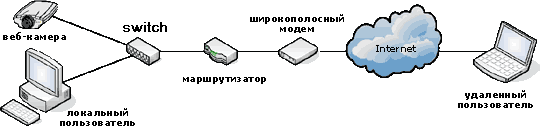
Example: After you already receive an image from a webcam on your computer, you decide that it would be nice to be able to access the camera wherever there is Internet. For example, as a store owner, you want to monitor activities in the store from your home, instead of having to be present every minute in the workplace
Step 1: System Requirements
Scenario A)
If your building (where the camera is to be located) is already connected via Ethernet to the Internet Service Provider (ISP), simply configure the account, turn on the network camera in the switch through the network output, and you need to get a dynamically assigned public IP for the network camera -address. Follow the installation instructions for the network camera. A special software or utility to the webcam will be useful in identifying the IP address.
Since the assigned IP address can be changed by your ISP (due to the limited supply of IP addresses shared among its customers), you can find out how you can assign a specific IP address to the cameras in Step 4 below.
Scenario B)
If your building is not equipped with Ethernet access, in most cases you may need the following devices:
- a broadband modem for connecting an asymmetric digital subscriber line (usually supplied by your internet service provider) or cable television
- A broadband router that can still be called an Internet Gateway (A broadband router allows users of a local network to share a single Internet connection and also serves as an interface between the Internet, the Provider and the Local Network.)

- a switch that allows different devices from the network to communicate directly with each other and allows devices from the local network to have separate IP addresses),
NOTE: Most broadband routers have a built-in switch function, so no separate equipment is required
- network camera
- local computer
- computer for remote monitoring
Step 2: Assign an IP address for your camera
- Since a broadband router typically assigns automatic, local IP addresses for devices from the local network, such IP addresses have the properties to change. A static (permanent) IP address is recommended for a network camera. To assign a static IP address, find out the range of IP addresses of the router, which, for example, can be from 192.168.0.2 to 192.168.0.35. If you want to use an IP address outside the range, such as 192.168.0.100, as a static IP address for the camera, it's likely that you will not risk that your device will conflict with other devices that receive automatic addresses.
- Setting the IP address for your camera can be done in three different ways, as indicated in the camera manual. Once the IP address is assigned, set the subnet and the gateway (this information can be obtained from the router), and configure the camera settings: password, registered users to restrict access to the camera.
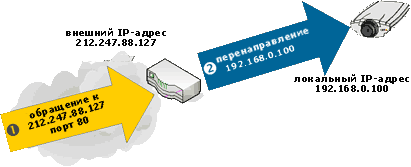
Step 3: Port forwarding
- A broadband router, as mentioned earlier, provides an interface between the Internet, the Provider and the Local Network. The router receives an external IP address from the Internet service provider and delivers internal (local) IP addresses for devices on the local network.
To access the network camera permanently on the local network, you must identify the external IP address of your router (see your router's manual) and configure your router so that the external IP address is directed to the static, local IP address of the network camera . This process is called the opening of the port; That is, when you print the external IP address of the router from any network computer, the Internet locates your router, in turn, redirects your request to the local IP address that is assigned to the network camera.
- Start the Web browser and log in to the embedded Web pages of the router through the Login to the router configuration pages.
- Find the menu item "port forwarding" (or similar), with the table roughly as shown below:
| Service name | Start port | End Port | IP address of the server |
| FTP | 21 | 21 | Not Configured |
| HTTP (Network) | 80 | 80 | Not Configured |
| Not Configured |
Since the camera sends its video over HTTP, you must configure the HTTP service in this way:
| Service name | Start port | End Port | IP address of the server |
| FTP | 21 | 21 | Not Configured |
| HTTP (Network) | 80 | 80 | 192.168.0.100 |
| Unofficial port | 80xx | 80xx | 192.168.0.10x |
- Save the configuration in the router and exit the configuration pages. Configuration completed. Any requests that reach the external IP address of the router on port 80 will now be sent to the IP address of the camera: 192.168.0.100.
- If you want to make more than one network camera available via the Internet, then you must use the additional (unofficial) ports of the router, such as 80xx and associate them with the network IP address of the camera.
Step 4: What can you do if your Internet service provider often changes the Dfi external IP address
- Create an account with the DNS service that serves and registers domain names (for example, www.nic.ru , etc.) and binds it to an external IP address. The domain name, such as www.web-kamera.ru , is understandable to the user, it's easy to remember, and you can assign each domain your own network device, i.e. Its IP address. Whenever the router's IP address changes, it will be automatically registered by the DNS service in order to update your IP address so that you can access your network camera at the same address.
- Most broadband routers have native DNS support, such as www.dyndns.org .
- Another alternative: you can buy or rent a static external IP-address from your Internet service provider.
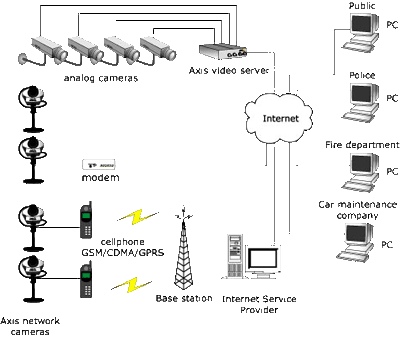
How to build a security system using webcams
An effective way to expand security systems in construction, in a factory, in a hospital or campus is to use the existing infrastructure:
- - During the day, the guards watch the monitor in the control room
- At night and on weekends, surveillance can be performed remotely at a central monitoring station serving several companies
- The built-in motion detector can trigger an alarm and start recording an alarm event
- In the event of an alarm, the security chief can view the images on the computer closest to him or remotely through the Internet connection.
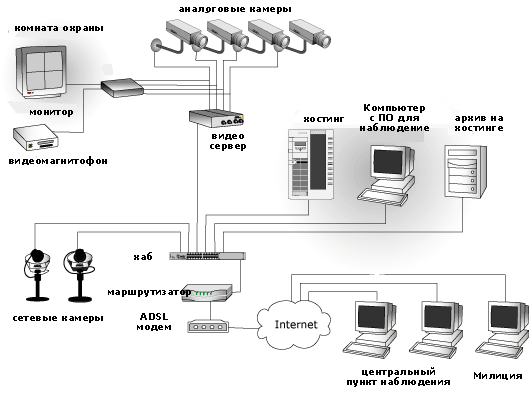
Images can be wounded in the computer in the enterprise or on the server of the provider of the Internet service (provider). Storing images in remote locations eliminates the risk that an attacker will uncommit the evidence of crime.
Cameras can also send images automatically to the host computer, or the host computer itself can search for images from cameras. If you have Windows installed on the host computer, you can use special software designed for network cameras. The program can display a picture in real time or work with archives. When the period of storage of video images becomes, for example, two weeks, the program automatically erases them.

Comments
Commenting on, remember that the content and tone of your message can hurt the feelings of real people, show respect and tolerance to your interlocutors even if you do not share their opinion, your behavior in the conditions of freedom of expression and anonymity provided by the Internet, changes Not only virtual, but also the real world. All comments are hidden from the index, spam is controlled.