
How to build a 2.4 GHz can antenna
WiFi Signal Amplifier
Does your apartment do not accept Wi-Fi?
A soldering iron and a can of coffee
The author of this antenna was able to connect to the free "wi-fayu" of the hotel, located more than 400 meters from the house

How to build a 2.4 GHz can antenna
Suitable for 802.11b wireless networks and probably for other applications running at this frequency.

What you need:
1) a tin can
2) N-socket ("mother") and a pair of cogs
3) A piece of 2mm copper wire
TIN

First, you will need canning, from under paint, coffee, etc. bank. Naturally, empty and clean inside. The diameter of the can should be within 7.5 cm - 10 cm, according to calculations, the most optimal size is approximately 9.2 - 9.3 cm (banks with a half of this diameter were successfully used, did not try it). The height of the can should be more than 13.5 cm, but good results can give both lower and, of course, higher cans.
The can, or at least the bottom of the jar, should be made of flat tin, not wavy. I also tried a wavy, optimally short jar , the result was just as good and even better than with a jar of absolutely flat tin. So you can freely experiment with different banks.
However, it does not make sense to cut off the top edge of the can, as I did . Of course you will get more or less even edges, but without the bearing part of the bank it will easily fall apart on the seam.
N-socket

I bought myself an N-socket in Tevalo, however, they can be found in other similar stores. N-nests are mainly of two types: fixed with screws and such that have their own nut of attachment. It does not matter which of the nests to take, I bought a variant with screws (worth about 40 kroons). If the cable that comes out of your wireless network card has any other contact on the end, then you will need a corresponding socket.
Copper wire
The diameter of the wire should be about 2 mm, the length of about 3.1 cm. I obtained this segment from the cable left after electrical work, removing the insulation from it. Some sources recommend using a 4 mm wire. I have not tried it myself, so I can not advise.
Construction
Cut a straight piece from the copper wire about 3.1 cm long and solder it to the center pin of the N-socket, holding the wire as straight as possible. Be careful not to accidentally close the central contact with the side. The waveguide, or the same piece of wire, after fixing it on the inner surface of the can, should be above this surface by 3.07 = ~ 3.1 cm. The exact length you get already having secured the socket to the bank and having measured. The more accurate the dimensions, the better the result and the stronger the signal.
Enter your data and calculate

Now calculate the appropriate distance from the waveguide (piece of wire) to the bottom of the can by the diameter of its can. For this distance is well suited? The wavelength of the conductor. This distance means the distance from the inner wall of the can, and not from the place where the wall of the can end. It is also necessary to accurately drill a hole, as well. The correct distance depends on how the waves will interfere and, accordingly, how the signal will amplify or weaken. The more precise the dimensions, the better the result and the stronger the signal. The waves are reflected from the inner walls of the can and therefore, when looking for the right place, it should be borne in mind that the bottom of the can is higher than the end of the wall. Then you need to drill a hole in the right place to properly fix the socket. If necessary, drill the holes for the fastening screws. If you do not have a drill at your fingertips, you can use a nail and file. Now it remains to fix on the wall of the can of the N-socket with soldered to it a piece of wire. It does not hurt to clean the paint in the place of attachment, which will improve the contact of the socket with the jar. The antenna is ready, you can connect the cable and start testing.
Direction
The strength of the signal in many respects depends on the direction, so it is necessary to guide the antenna precisely enough. I, for example, direct it so that I first set it in the horizontal direction, and then gently move in the vertical direction. You should send almost the same as the barrel of a gun; Directly in the direction of the goal. But sometimes it also happens that the connection is best when the direction of the antenna is not exactly the same as the direction to the aiming point. You just need to try.
Cap
Yeah ... to protect against the radiation of inanimate and living nature, it is necessary to close something with the open end of the antenna. For example, a suitable plastic cover that lets microwaves pass. The lid is suitable or not, it can be checked in the microwave oven, since it operates at similar frequencies. Place the test cover in a microwave oven with a glass of water (since an empty or almost empty oven can not be turned on), turn on for 1-2 minutes, until water boils. And if you find that the lid has heated up with the water, then this material is not suitable for closing the antenna opening, because He does not miss microwaves.
To remove condensation, you can make a small hole in the bottom of the antenna. This should prevent rapid rusting of the antenna.
In general, rust weakens the signal, and cans rust for a long time do not resist. So if the connection begins to deteriorate and the direction (aiming) of the antenna, etc. Does not help anymore, it's worth to go to the store for a new bank.
Also, each signal or each meter of cable connecting the antenna and the network card attenuates the signal. My approximately 10 meter cable weakens the signal for at least a couple decibels. So, the fewer things, the better.
Those. characteristics
Used Buffalo AirStation WLI-PCM-L11G card, at a frequency of 2425 MHz. Access point is on the mast , at a distance of about 1-1.5 km. The best stable signal that I received, directing my bank exactly, was this:
- Link Quality: 13/92 (connection quality)
- Signal level: -85 dBm (signal level)
- Noise level: -98 dBm (noise level)
For comparison, the previous "antenna", which was a sticking piece of wire behind which was a piece of tin, showed the following maximum results:
- Link Quality: 6/92 (connection quality)
- Signal level: -91 dBm (signal level)
- Noise level: -98 dBm (noise level)
Strengthening the signal by 3 db means improving the signal almost twice, in my case this is a fourfold difference. Link Quality at approximately 6-9 allows the data to move already at a speed of ~ 150-250 kb / s, so at 13 it would be quite a good speed.
By the address Find homemade antennas that show better results, but have been tested at a shorter distance and slightly better visibility.
Cost
My antenna cost me about 45 CZK, because I already had a piece of wire and a bank. The search for banks and the construction of the antenna was spent about 2 hours. It did not take into account the time spent on making the fastener for the jar. The cost of a new commercial antenna would probably be four-digit.
A photo
Photo of the first antenna or what happens when you thoughtlessly cut off the top edge of the can
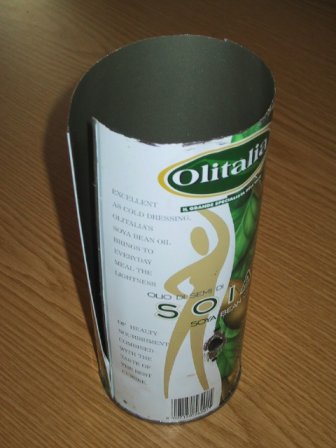
The bank with the best signal (canned pineapple d = 9.9 cm l = 11.5cm) - but with wavy bottom and walls and shorter than ideal - it did not work because it was holed during the samples in several places.
The Mast is at a distance of 1-1.5 km.
Additional Information
(C) Asko Tamm 2002

Comments
When commenting on, remember that the content and tone of your message can hurt the feelings of real people, show respect and tolerance to your interlocutors even if you do not share their opinion, your behavior in the conditions of freedom of expression and anonymity provided by the Internet, changes Not only virtual, but also the real world. All comments are hidden from the index, spam is controlled.