
Instructions for using the "PS Jailbreak"
At the moment, you can run games downloaded from the Internet that are on a flash drive or an external and internal hard drive.
And in the near future there will be a launch from discs, they are already writing software.
What is PS Jailbreak?
- This is a hacked version of USB-dongle, used by developers to test and debug games and software not yet signed by the corporation $ ony. That is, before downloading the firmware, the PS3 console is put into developer mode, allowing you to run non-signed code.
What is Backup Manager?
- This is not a signed custom program, which can be launched using the USB-dongle "PS Jailbreak", which has the functions of removing and playing images of BRD-disks.
What is necessary for the functioning of the kit?
- USB-dongle "PS Jailbreak".
- The program "Backup Manager".
- Installed on the console firmware 3.41, tk. Files were optimized for this version.
What does this give us?
- There is no need for any upgrade of the console.
- Save the guarantee of the console.
- Completely Plug & Play solution.
- Easy to use and intuitive interface.
- Compatible with all PS3 models - FAT and SLIM, as well as support for all regions.
- Support for online games (if there is no "basic updates" in the game).
- Support for Homebrew, that is, all sorts of developer programs that are not signed ony.
- Ability to use backups compatible with "PS Jailbreak", on any console.
- There is no need for expensive BlueRay blanks and their long burning.
- Playback of backups from your hard drive is as fast as with a BlueRay drive.
- If the console is started without "PS Jailbreak", it works normally, as after the purchase (Retail).
On September 7, 2010, the next update was released 3.42, in which the possibility of using the "PS Jailbreak" was closed, and the rollback of the firmware was never possible. So, keep in mind that if you browse the firmware higher, you will probably never return to the firmware lower.
Step # 1 - Check the version of the sewing set on the PS3.
- You must first make sure that you have installed the firmware is 3.41.
Go to Settings -> System Settings :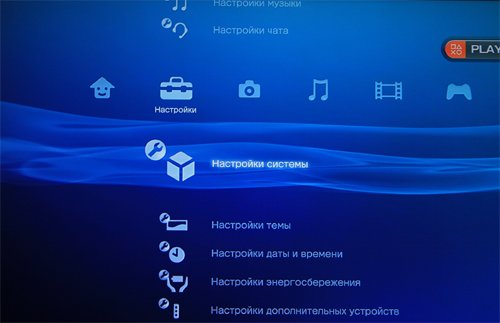
- We get down almost to the very bottom on the penultimate item " Information about the system "
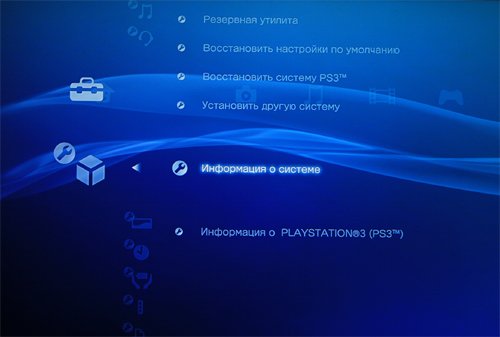
- If your firmware is lower than 3.41, then you need to update it. Therefore, we proceed to the next step.
Step # 2 - Firmware update from external media.
-
Download and unzip
 Archive with the official firmware 3.41 [
  ] [
] [  ]
]
- We carefully learn the following couple of subtleties:
- To install the firmware, you can use the following media: Memory Stick, Memory Stick Duo, USB-Flash (USB-Flash), external USB 2.0 HDD (portable hard disk with USB 2.0 support) or PSP.
- It is necessary that the medium used for firmware be formatted in FAT32, since the PlayStation 3 does not support the NTFS file system.
- We copy the firmware to the carrier you prepared. In order for the PS3 to see the firmware on the media, the firmware file must be on the following path: PS3 / UPDATE / PS3UPDAT.PUP (the names of the folders and the firmware file PS3UPDAT.PUP, must be written in capital letters).
- Insert the media with the firmware on the PlayStation 3
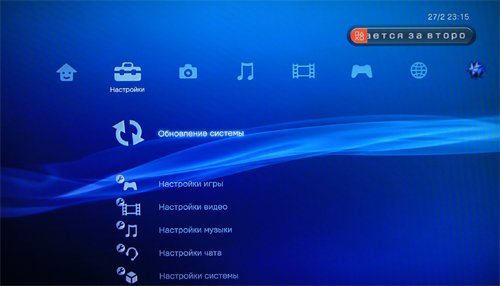
- Go to the menu " Settings -> Update the system " *
- Select " Update from media " *
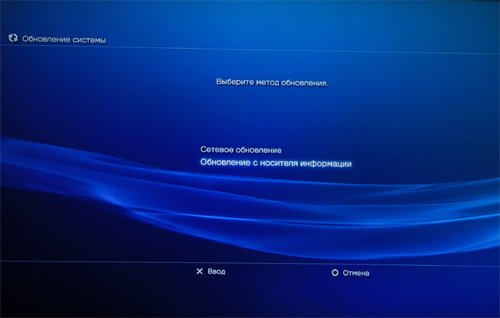
- PlayStation 3 will check the current firmware version and in the event that the media has a newer firmware version, it will offer to update the firmware from the media.
- Make sure that the screen actually shows an update to 3.41 and you accidentally did not win anything, agree to the installation, accept the license agreement and run the firmware installation.
- During the upgrade, do not turn off or restart the PS3, as this may damage the system.
- After the installation of the firmware update is completed, the PS3 will reboot. You can now remove the firmware update folder from the media.
Step # 3 - Installing the "Backup Manager" program on the PS3
- Download and unzip Archive with the Backup Manager installer [ ] [ ].
- Copy the file manager.pkg directly to the root of your USB drive .
- All. The program is prepared for installation. Now, to install this program, you need to translate the PS3 into developer mode using the magic USB dongle "PS Jailbreak".
- Especially important! There should be no disk in the PS3 drive. And before connecting "PS Jailbreak", we always start the console from scratch, resetting the power and clearing the memory.
That is, depending on the version of the console, before you enable it, you must:- PlayStation 3 FAT - Simply turn off the rear console switch and turn it back on.
- PlayStation 3 SLIM - It is important to disconnect the power cable from the back of the console and then reconnect.
- Connect the magic USB dongle " PS Jailbreak " to any USB port on the console. No more USB devices should be currently connected.
- Press the button to turn on the console and then press the "EJECT" button.
- Now connect your USB-drive with the previously prepared program "Backup Manager".
- You should see the " Install Package Files " submenu in the "Game" menu, in which you should see your manager.pkg file.
- If the magic did not happen, then "PS Jailbreak" was not activated, i.e. The "EJECT" button was not pressed in a timely manner. Then it is necessary to turn off the console again and perform all operations with "PS Jailbreak" again.
- So. After seeing the "Install Package Files" item and running the "manager.pkg" installation, in the end of the installation you will see the " Backup Manager " program in the "Game" category.
- All! "Backup Manager" is installed in the system and we can delete the "manager.pkg" file of the installer from the USB drive. Next time, after activating the USB-dongle "PS Jailbreak", you only need to start the previously installed "Backup Manager" program from the "Game" menu.
Step # 4 - Using the Backup Manager
- Run the "Backup Manager".
- Let's say we want to take an image of the disc with the game. Insert the disc.
- In the previously empty manager window, you should have a preview image with the name of the game.
- Here you will have 2 choices:
-
 - Run the game. Here everything seems to be clear.
 -
 - Make a backup. Here we are given the opportunity to save a backup on any information keeper, whether it's an external USB drive or an internal hard disk of the console.
-
- Next, you can also download the game from the backup. But for this you must have any drive in the drive to simulate the startup supposedly from the disk.
- When starting from backup, you will also have 2 choices available:
-
 - delete the selected image.
 -
- Start the selected game. In this case, you will automatically go to the regular XMB console menu and see this game in the "Game" category, where you can now start it, as usual.
-
- The image of the game is not one big file in the usual sense. And this is the extracted structure of individual folders and files, arranged in the same logical order as they are in the BRD-ROM itself. That is, at the root of the internal or external drive creates a folder GAMEZ (concerns all, any games), inside which lies the folder with the name of the game ID, for example BLES00680 , which contains the folder PS3_DIR , which contains USRDIR .
- Thus, the limitation of the FAT32 file system to 4GB on the file is bypassed. Image is not collected in one large file-image, but in separate files in folders.
* In the Internal column - will it work from the internal hard disk.
* In the External column - will it work with an external USB drive.

Comments
When commenting on, remember that the content and tone of your message can hurt the feelings of real people, show respect and tolerance to your interlocutors even if you do not share their opinion, your behavior in the conditions of freedom of expression and anonymity provided by the Internet, changes Not only virtual, but also the real world. All comments are hidden from the index, spam is controlled.