
Frame around image
The image to be added to the web page can be placed in a frame of different widths. To do this, use the border parameter of the <IMG> tag. By default, the frame around the image is not displayed except when the picture is a link. The border color in this case is the same as the text color specified by the style or text parameter of the <BODY> tag (example 1).
Example 1. Adding a frame around an image
<Html>
<Head>
<Meta http-equiv = "Content-Type" content = "text / html; charset = windows-1251">
<Title> Frame and drawing </ title>
</ Head>
<Body text = "# 00ff00">
<P> <img src = "sample.gif" width = "200" height = "222" border = "2" alt = "A 2-pixel-wide green box"> </ p>
</ Body>
</ Html>
Browsers do not display this example in the same way. So, Firefox and Opera will show a green frame, and Internet Explorer - a black one (Figure 1).
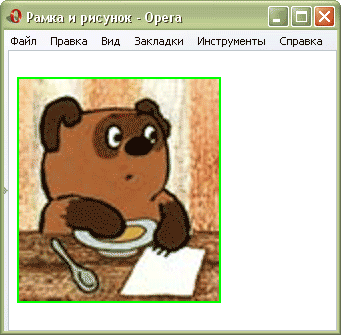
Fig. 1. The border around the picture in the Opera browser
If the image is a link, the border is added automatically, its thickness is one pixel, and the border color is the same as the color of the links.
To remove the border, set the border = "0" parameter for the <IMG> tag (example 2).
Example 2. Deleting a frame around an image
<Html>
<Head>
<Meta http-equiv = "Content-Type" content = "text / html; charset = windows-1251">
<Title> Frame and drawing </ title>
</ Head>
<Body>
<P> <a href="sample.html"> <img src = "sample.gif" width = "50" height = "50" border = "0" alt = ""> </a> </ p>
</ Body>
</ Html>
You can also use CSS to remove the frame for all images that are links. For this, the border style parameter is used with the value none (example 3).
Example 3. Using CSS
<Html>
<Head>
<Meta http-equiv = "Content-Type" content = "text / html; charset = windows-1251">
<Title> Frame and drawing </ title>
<Style type = "text / css">
A IMG {
Border: none; / * Remove the frame around image-links * /
}
</ Style>
</ Head>
<Body>
<P> <a href="sample.html"> <img src = "sample.gif" width = "50" height = "50" alt = ""> </a> </ p>
</ Body>
</ Html>
The A IMG construct defines the context for applying styles - only for the <IMG> tag that is inside the <A> container and is therefore a reference.
Similarly, using styles, you can also set the border color around the picture. The border attribute is also used for this, but its thickness is the border thickness, its style and color (example 4).
Example 4. Changing the color of the frame using styles
<Html>
<Head>
<Meta http-equiv = "Content-Type" content = "text / html; charset = windows-1251">
<Title> Frame and drawing </ title>
<Style type = "text / css">
A IMG {
Border: 1px / * Frame Thickness * /
Solid / * Solid frame * /
Red; / * Frame color * /
}
</ Style>
</ Head>
<Body>
<P> <a href="sample.html"> <img src = "sample.gif" width = "50" height = "50" alt = ""> </a> </ p>
</ Body>
</ Html>
In this example, around the reference image, a red border of one pixel in thickness is added.
Copyright © www.htmlbook.ru

Comments
When commenting on, remember that the content and tone of your message can hurt the feelings of real people, show respect and tolerance to your interlocutors even if you do not share their opinion, your behavior in the conditions of freedom of expression and anonymity provided by the Internet, changes Not only virtual, but also the real world. All comments are hidden from the index, spam is controlled.