
Indents around the image
For any image, you can specify empty indentations horizontally and vertically using the hspace and vspace parameters of the <IMG> tag. This is especially true when the text is flowing around the picture. In this case, if you do not want the text to fit into the image, you need to add empty space around it (example 1).
Example 1. Adding indents around an image
<Html>
<Head>
<Meta http-equiv = "Content-Type" content = "text / html; charset = windows-1251">
<Title> Left alignment </ title>
</ Head>
<Body>
<P> <img src = "sample.gif" width = "50" height = "50" hspace = "10" vspace = "10" align = "left" alt = "Example"> Lorem ipsum dolor sit amet, consectetuer Adipiscing elit, sed diem nonummy nibh euismod tincidunt ut lacreet dolore magna aliguam erat volutpat. Ut wisis enim ad minim veniam, quis nostrud exerci tution ullamcorper suscipit lobortis nisl ut aliquip ex ea commodo consequat. </ P>
</ Body>
</ Html>
The result of this example is shown below (Figure 1). The text is 10 pixels away from the image.
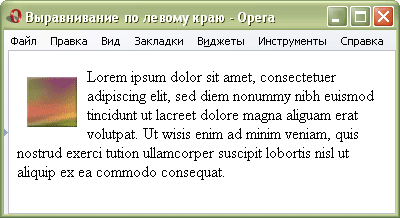
Fig. 1. Indenting the image
The same result can also be obtained using styles, using the style attribute margin , as shown in Example 2.
Example 2: Adding indents with styles
<Html>
<Head>
<Meta http-equiv = "Content-Type" content = "text / html; charset = windows-1251">
<Title> Using Styles </ title>
</ Head>
<Body>
<P> <img src = "images / sample.gif" width = "50" height = "50" style = "float: left; margin: 10px 15px 20px 7px" alt = "Example"> Lorem ipsum dolor sit amet, Consectetuer adipiscing elit, sed diem nonummy nibh euismod tincidunt ut lacreet dolore magna aliguam erat volutpat. Ut wisis enim ad minim veniam, quis nostrud exerci tution ullamcorper suscipit lobortis nisl ut aliquip ex ea commodo consequat. </ P>
</ Body>
</ Html>
The convenience of applying styles is that you can specify different indents for each side of the image. To do this, you must list the space indentation values, starting with the upper. In Example 2, the top indent is set to 10 pixels, the right margin is set to 15, the bottom is set to 20, and the left one is 7 pixels. If all indents should be the same, put only one value.
Copyright © www.htmlbook.ru

Comments
When commenting on, remember that the content and tone of your message can hurt the feelings of real people, show respect and tolerance to your interlocutors even if you do not share their opinion, your behavior in the conditions of freedom of expression and anonymity provided by the Internet, changes Not only virtual, but also the real world. All comments are hidden from the index, spam is controlled.