| section Home
Production, Amateur Radio amateur Model aircraft, rocket- Useful, entertaining |
Stealth master
Electronics Physics Technologies invention |
space Mystery
Earth Mysteries Secrets of the Ocean Stealth section Map |
  |
| Use of material is permitted for reference (for websites - hyperlinks) | |||
ENGINE MANUFACTURING TECHNOLOGY FOR MODELS OF ROCKETS
E-35 Class
![]()
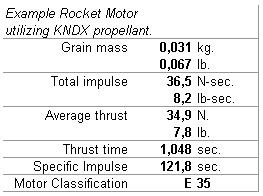
General characteristics of the engine (Calculations were carried out using
SRM software, author Richard Nakka)
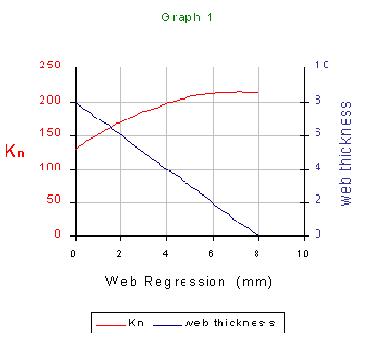
Schedule engine Kn (Calculations were performed using the SRM software
author Richard Nakka)
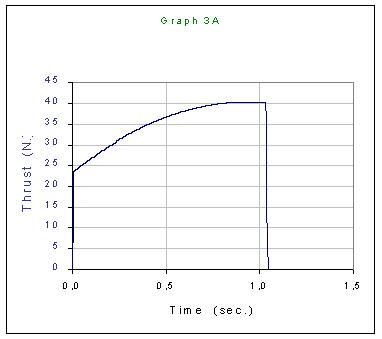
Schedule engine thrust (Calculations were performed using the SRM software
author Richard Nakka)
Production of motor housing
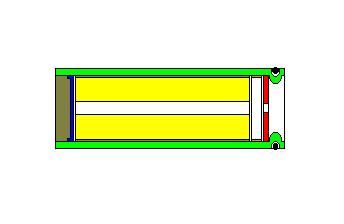
The figure shows a schematic longitudinal section of the engine. the right colors are designated Left:
epoxy plug;
cardboard wad;
fuel block;
ring constituting dozhigatelnuyu motor chamber;
nozzle;
denotes the motor housing.
As you can see, the engine system is quite simple, its manufacture does not require a lot of pores.
We now proceed directly to the manufacture of the engine. To source a good idea to manufactured housing, which take Whatman sheet and cut out a strip length of it in half Whatman sheet width of 75mm. For the winding sleeve, we need more glue (silicate, PVA or epoxy) and a mandrel diameter of 22mm.
Drum sleeve should be so that the layers of the paper as close as possible to the buddy buddy between them can not be left outside layers. The adhesive should be applied evenly, sufficiently thick layer over the entire surface of the wound paper strips.
After winding the liner, we need to make a constriction at one of its ends. For this we need to take a fairly long and not thick rope (preferably nylon). Stepping back from the end of the sleeve 5-7 millimeters venturing pull the sleeve in order to facilitate this task, we tied one end of the fiber to some fairly heavy object. Make a loop with the help of ropes and carefully pinch the sleeve, rolling it into a loop of the rope. You must first put a little effort, gradually increasing to the measure of deepening the channel constriction. At what time of the diameter at the waist indoors is reduced by 6-8mm, then mozhnouspokoitsya, relax a bit (more on procedure waist mozhnoposmotret http://oonoh.narod.ru/ ). Then take a thick thread is also zamatyvaem constriction channel space, where it is desirable to lubricate the threads swung glue, thread after winding the top cover looks like glue.
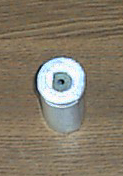
Now we need to make the nozzle (see. Below). To do this, take an ordinary Russian ruble sample 1997 and later. Drill a hole in the center of the ruble diameter 3,8mm. Actually everything is ready nozzle. The ruble sinks to the bottom of the sleeve (he is forced to rest against the constriction). Now clothed sleeve (with the nozzle inside) on the mandrel are bent a little butt edge (which did constriction) in the direction of the center also repeatedly hit the end of this flat hard surface. I get something resembling this:
Now the motor sleeve mozhnoubrat somewhere, because she before us is not necessary as it needs 1-3 days to fill the glue dries. Now zaymёmsya most entertaining, in my opinion, the manufacture of the fuel cell for our engine, but in parallel ignitor for him (the igniter will be described in a single chapter).
For making bookings Checkers cut out from office paper strip 53 * 230mm. More, we need a paper ring dozhigatelnoy engine chamber, cut a strip of office paper 3 * 297mm for him. Drum now bronirovochnuyu strip, strip for the paper ring on the mandrel diameter of 21mm. Winding sleeve bookings similar liner motor winding, but, in contrast to the motor housing, it does not need to make it thicker. After winding bookings and rings allow adhesive to dry (with bookings and ring from the mandrel does not break!), Try inserting the ring as bronirovochny cylinder in the engine housing. They have quite willingly to join, without extreme effort.
Reservation fuel checkers, paper ring dozhigatelnoy camera also ignitor (without caramel charge).
Making fuel Checkers
Now we proceed to the manufacture of fuel checkers. To do this, take 26g of potassium nitrate and 14g of sorbitol, both components must be sufficiently dry (moisture content <1%). The components mix well grind. Sufficiently finely milled potassium nitrate is necessary only because sorbitol we'll still afloat.
Fall asleep after grinding the mixture in an enameled metal bowl (or something similar), heated on a hot plate. The mixture begins to melt at 100 degrees, and later she will start to soften, a hodgepodge need to stir, gradually bringing it up to a liquid state. After sorbitol is completely melted, pour the fuel into the cylinder bronirovochny. The remains will be used to fuel igniter. After the fuel if a little hardened, cool down, a nail or any other metal rod diameter 5mm checkers do, exactly in the center, through the channel.
For full curing fuel must be 2-3 days, this is time he is forced to be tightly packed in the package.
final assembly
Solidified sword inserted into the motor housing. From cardboard cut out a circle, which we use as a wad.
Tightly close the wad outdoor motor end are bent slightly the remaining margin of the body inside and fill the remaining space on the wad epoxy glue.
It remains to wait filled with curing epoxy adhesive as the engine ready for testing!
Go to the test!
![]()

Comments
Commenting, keep in mind that the content and the tone of your messages can hurt the feelings of real people, show respect and tolerance to his interlocutors, even if you do not share their opinion, your behavior in terms of freedom of speech and anonymity offered by the Internet, is changing not only virtual, but real world. All comments are hidden from the index, spam control.