
| Start of section
Production, amateur Radio amateurs Aircraft model, rocket-model Useful, entertaining |
Stealth Master
Electronics Physics Technologies Inventions |
Secrets of the cosmos
Secrets of the Earth Secrets of the Ocean Tricks Map of section |
  |
| Use of the site materials is allowed subject to the link (for websites - hyperlinks) | |||
METHOD OF MANUFACTURING STEREOPS
Sergey Velichkin
![]()
For the manufacture of prismatic stereo glasses, you will need a case from the CD- disc ( figure 1 ), polystyrene glue (for example dichloroethane, or glue attached to children's sets for assembling models). From tools - a cutter for cutting plastic also a file or a skin.
|
Fig.1 The scarlet color shows which parts are cut from different elements of the case |
From the bottom cover of the case from the CD- disk, cut out part B (the length in length you will have to get automatically - from the wall to the wall) so as not to scratch the plastic through the side edges of the lid - the half-cut plastic is easily broken evenly. After all the details are cut out, straighten the strips B , B , D also on the height on the file or on the skin (put the skin on a flat surface). |
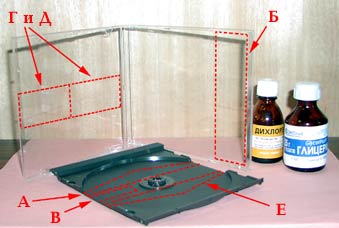
At what time all the parts are ready ( Figure 2 ) - you can proceed to assembly: to the middle of the strip B is glued the partition B - to wet with glue you need both parts, if the glue is very liquid, you need to add the shavings left by labor. So far, the glue has not completely dried up (there is a possibility to slightly move the parts), we glue the walls of Г as well, Д , align the resulting system, and also glue the part Е to the bottom.
|
Fig.2 Blanks for a prism |
Sequence of operations for gluing the prism
1. The baffle B is adhered to the center of the strip B.
2. The side faces of G and D are glued.
|

|
After this, you need to let the glue dry, if there are cracks - seal up (kneading the glue with the chips more thickly), plus, after the glue dries, carry out tests - to sample pour boiled standing water into the prism. If the prism is glued carefully, it does not flow in any way, then it is possible to verify its optical properties - to consider through it a stereopicture for the inverse (cross) method, for example, from the journal Science and Life ( No. 4, 1998, No. 5, 2000 ). |
|
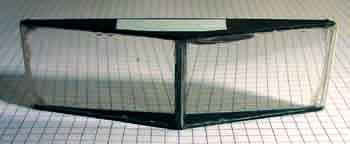
If you notice a leak, grease the seams again with glue. If there is no leakage, you can continue to work, dry and also wipe the inner surfaces of the prism and also glue the top cover (matte side down). After the glue dries, it will only be necessary to fill the prism with liquid. Fill the glycerin in the prism (the refractive index of glycerin is greater than that of water, plus, therefore, the prism will become stronger to shift the images - it will be possible to closer look at the stereo picture). You can also fill the prism with distilled water. Just so fill the liquid does not succeed - the liquid will be in your hands, on the table - everywhere, in addition to the organs of the prism. It is most convenient to use a syringe, you can use a pipette (if you have the patience), but you can use a double piece of plastic tube: one tube is immersed in a bottle of glycerin, the other end is pressed against the filling hole, but the second tube is pressed to another hole - the atmosphere is aspirated. After filling the filling holes need to be wiped and sealed with pieces of self-adhesive film.
Author of the article: Sergey Velichkin

Comments
When commenting on, remember that the content and tone of your message can hurt the feelings of real people, show respect and tolerance to your interlocutors even if you do not share their opinion, your behavior in the conditions of freedom of expression and anonymity provided by the Internet, changes Not only virtual, but also the real world. All comments are hidden from the index, spam is controlled.