|
Anyone who wants to make their own aquarium, should have no weak craft navykami.Umeltsy accustomed to the fact that all they held on the two studs (usually about such talk: "on the snot"), should think about the consequences, as well as possible claims of third parties, if a homemade aquarium debonding. And so: if to do it at home, you need to approach the matter thoroughly.
We consider in detail here only one of the possibilities aquarist: the production of frameless glass aquarium. Just say the main thing: to take on this work at home only makes sense if you need a non-standard size aquarium, and the production of its custom-made will be very costly. In all other cases it is better to explore the range of specialty shops. Produce an aquarium is not as easy as many think. First, we should pay attention to a lot of little things that will be mentioned below.
The most important question: what should be the thickness of the glass and for what capacity? The calculation is made for the longitudinal walls and the bottom of the aquarium glass with the indispensable use of the above-mentioned strips to reinforce the tank in the upper part of the longitudinal glasses (they not only serve to protect the glass from sagging, but also a support for the cover glass).
Many people try to always and everywhere to find the cheapest option, but we would like to warn them: in the aquarium can not save! Sometimes, as bottom for most primitive tanks used glass reinforced with wire or shaped glass, but it is more than lightly. You confirm any specialist: the strength of these types of glass is very limited due to their characteristics.
|
|
|
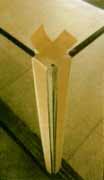
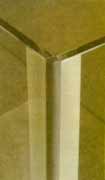
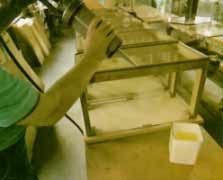
Since professional aquarium made four more glued glass paste inside the outside and connected via silicone rubber so that the adhesive fills the entire angular groove. In the last photo: using a wooden template impose size bed and is sized the same composition.
|
Referring to the illustrations related to the topic, you will see that with the increase in thickness of the glass and increases the thickness of the adhesive joint. If the aquarium is longer than 220 cm, the bottom should consist of two parts: two pieces of glass, connected by a thick silicone seam, reduce stress! Below you will see two small tables, which contains the required thickness of the glass panes for the longitudinal and bottom. And if you increase the thickness of a further measure, the reliability of the aquarium also grow along with it. (All calculations are valid if the sidewalls do not differ some special wide - because then the water pressure is greatly increased.
For the manufacture of the tank of 100 cm long, 50 cm wide, and 60 cm in height, according to the chart, it is necessary to take a 10 mm thick glass.
Glass thickness in mm of the longitudinal (in the presence glued along the length direction of the same strip of glass thickness)
|
Height
cm
|
Length in cm |
| thirty |
40 |
50 |
60 |
80 |
100 |
120 |
150 |
200 |
250 |
300 |
350 |
| thirty |
3.5 |
3.5 |
4 |
4 |
4.5 |
4.5 |
4.5 |
4.5 |
4.5 |
4.5 |
4.5 |
4.5 |
| 40 |
- |
4.5 |
5 |
5 |
5.5 |
6 |
6 |
6 |
6 |
6 |
6 |
6 |
| 50 |
- |
- |
6 |
6 |
7 |
8 |
8.5 |
8.5 |
9 |
9 |
9 |
9 |
| 60 |
- |
- |
- |
7 |
8 |
10 |
eleven |
eleven |
12 |
12 |
12 |
12 |
| 80 |
- |
- |
- |
- |
9 |
10 |
eleven |
eleven |
12 |
12 |
12 |
12 |
| 100 |
- |
- |
- |
- |
- |
12 |
12 |
13 |
14 |
14 |
14 |
15 |
Glass thickness for the bottom of the tank in millimeters
|
Height
cm
|
Width in cm |
| 20 |
thirty |
40 |
50 |
60 |
70 |
80 |
90 |
100 |
| 20 |
4 |
5 |
6.5 |
7.5 |
8.5 |
9 |
10 |
eleven |
12 |
| thirty |
4.5 |
6 |
7.5 |
8.5 |
9.5 |
eleven |
eleven |
12 |
13 |
| 40 |
5 |
6.5 |
8 |
9.5 |
eleven |
12 |
12 |
13 |
14 |
| 50 |
5.5 |
7 |
8.5 |
10 |
eleven |
12 |
13 |
14 |
15 |
| 60 |
6 |
7.5 |
9 |
eleven |
12 |
13 |
14 |
15 |
16 |
| 80 |
6 |
8.5 |
10 |
12 |
13 |
14 |
15 |
16 |
17 |
| 100 |
7 |
9 |
eleven |
12 |
14 |
15 |
16 |
17 |
18 |
The thickness of the glass in the shops usually not denote exactly indicating only approximate figure (for example, 10.12 mm). If in doubt, you should always choose, as already mentioned - higher rates. Now, we will build a solid aquarium with so-called open end, and which is at the ready high-quality products. To correctly cut out glass, we must subtract from each side (the edge) on the glass thickness for two silicone joint, that is 2 x 10 = 20 mm. Thus, the longitudinal length of the glass is actually not 100 but only 98 cm and a lateral length - not 50, but only 48 cm.
To the bottom of which is only at the end (after cured silicone) is placed between the panes standing upright, it is necessary in both directions on both sides of sizing to take seams 3 mm (for a total of 6 mm). Thus, a solid bottom to the glass size would be 97.4 x 47.4 cm.
As can be seen in the illustrations, to the edge of the glass processing it is necessary to paste over the protective tape. Silicone rubber is available in cylinders. To squeeze it, using a syringe mechanism: on the hand press cylinder, and the silicone is pushed into the front part to the nozzle. To perform this work professionals use special pneumatic device. Smooth out the silicone rubber on the corresponding slot can spatula or just a finger. But in all cases, this instrument - whether it is a spatula or a finger! - It is necessary to dip into the water, adding a drop of pre-detergent, then silicone will not stick! Smooth out the glue, must immediately (!) Remove the protective tape, because the silicon film is formed immediately (hardening process begins).
It goes without saying that the skilled person is particularly attentive to the accuracy of the calculations and execution, I must especially see to it that the side windows are glued at an angle of exactly 90 °. The easiest way for this cut two wooden plates of appropriate size (in our case, 978 x 478 mm) and use them as the upper and lower supports. When properly fixed, the glass plates can even be attached with adhesive tape to wooden plates and leave until completely hardened silicone.
To glue the strips on top of the glass, first you need to just paste over the future longitudinal side seam, and before (!) Of how silicone is inflicted and razrovnen. After the gluing process, should be given the opportunity to silicone how to harden. This contributes to relative humidity (rather than heat), and it takes about 24 hours for the material 5-6mm thick.
That is especially important for the bonding process: to prevent the glass from scratches and indentations, it is often paste over with a thin film, missed oil or fat, and fat - is the enemy of adhesion (sticking surfaces of two solid or liquid bodies). All areas of glass, which later come into contact with the silicone rubber must be completely free of grease! It really needs to be done on the conscience - for example, by means of pure acetone. (Note that nail polish remover with acetone is not clear and it does not fit!)
These figures show how it is possible to produce frameless aquarium at home.
In Figure 9, you can see both ways of gluing glass in the corners. Safer always open angle, but it takes more sizing silicone rubber.
|
The same - BUT MORE DETAILS
Let's start from the beginning, that is, with cutting glass jars for the future. If you do it yourself, you just tip: do not buy a cheap glass cutters - because when you mess up cutting not only glass but also your nerves. What does a good glass cutter? For example, a good glass cutter is not less than 200 rubles. However, not necessarily to buy a glass cutter to cost about $ 50 professionals, etc. Just choose something in between the first and second option. And besides the glass cutter is such a thing in the household can still come in handy more than once. In our opinion, and many professionals are engaged in cutting glass for aquariums most appropriate - a roller glass cutter, which is smooth and soft, coming on the glass, no different vibrations, jerks, jumps and do not go crazy.
Another not unimportant detail for work - the glass should always be clean and dry, on it should be absent (especially on the intended cut line) any defects, ie, should be different bubbles, bubbles, deep scratches and other foreign inclusions. There should not be these flaws even more so - in the middle of the front wall or the floor. When marking the glass do not forget to take into account the thickness of the glass cutter from the edge to the middle of the roller (as a rule, the thickness is usually in the region of 2.5-3 mm).
Of course, with all the dope on the handle stekloreza pressure should not be only negative, namely, on the glass will remain a very deep cut line around the edges of which bounces chips, resulting in a consequence the glass may break off badly. And of course the cut glass, as if you cut a piece of paper, and should not be. It is necessary to find the middle ground in which everything will be perfect. In short, before you begin to frantically chop up his new glass cutter glass, must be properly trained.
It is not superfluous to the glass before cutting head to moisten stekloreza in liquid oil or turpentine. Once you must cut through the glass immediately break it, due to the fact that the glass tends to cool as it after cutting and break if it later, for example after cutting after drinking cup of coffee, it may break down much worse. It is not necessary to do so, as you have seen many do uncle from ZhEKov, when inserted into the flats glass, ie, rattling the cut line. In this window will end rough, and also there is a possibility that the glass may crack is not where you should be. How, then break the glass correctly? It's very simple. Put cut through a sheet of glass on the table (bench) so that the cutting line accounted for exactly along the edge of the table, and a pressure break off the cut piece. Do it with confidence, no fuss, you are sure to get. If the glass sheet is very large, then resort to the help of a friend or neighbor, because alone with a glass length of over 1 meter is not easy to handle and can break not quite as it should. When breaking the narrower slotted strips can be used an ordinary pencil or similar object (not metallic origin). Place the tip of a pencil, or any other small (not metal) object at the end of the slot, where it ends, and push at the same time on both the edge of the glass close to the place. The crack will creep forward on the slit lines.
If you have all turned out well, it is time to process the glass cut you. Treat them like you can your heart's content and how much you have enough imagination, there is just one - but not processed (not grind) bonding locations, ie those locations to be bonded to each other, as then they just do not stick together. The fact that silicone sealants do not adhere to the porous and polished surfaces. Usually these edge (glued together) of glass treated with quite a bit, only to itself in the process of gluing is not circumcised. Edit windows can be abrasive paper (sandpaper) or ordinary stone (bar) for sharpening knives - in almost all homes have a bar, etc. Most importantly, you must not forget the constantly wet bar in the water... What is it for? And to ensure that the treatment was faster, as well as the glass does not heat up itself on your effort (this should not be allowed - meaning, heating the glass), and of the latter, not least for the kind of work that he bar will not clog steklopylyu.
When the glass processing is complete, they should pick up in pairs, visually compare with each other, so you do not have something horrible and crooked, not what you want to create.
Finally it's time to select a sealant. After all, our cut and polished glass is now necessary to glue, to result in the - what we actually wanted to. Before many aquarists who have decided on their own glue tank gets the same question - what is still to glue their offspring? Of course, silicone adhesive sealant. Call them by the people in different ways and silicone sealant and adhesive-sealant. However, both the name refers to the same mean: 100% solution-component silicone adhesive sealant acetate groups based on acetic acid. When you select a sealant, make sure that it is really a 100%, and not less important is the fact that it is not harmful to living organisms. The most common and suitable for gluing aquariums: Dow Corning 788 (one of the best, but the infection is very expensive), it is not wrong in using: Teosil A akvariolaatu, Chemlux 9011, Dow Corning 911, Kleiberit Suprasil 590E. All of these sealants are suitable for gluing aquariums, only differences in several parameters and prices. Be sure to read before using the instructions on the bottle and with guidance for use.
Well, you cut glass, processed, adhesive sealant you stocked (I hope to work with the gun sealant, you also have). You can proceed to the most long-awaited and interesting - gluing of all this ugliness. First of all, make sure that the surface of the table (bench, etc.), which is supposed to carry out works - smooth. Before gluing all surfaces must be degreased using conventional acetone (sometimes more white spirit) or gasoline, and then wiped to dryness to not stains remained turbid and traces of acetone, benzene, etc. degreasing. All these spots are easy to remove the usual rag, wiped dry. Next Cover the table (workbench, etc.) paper or ordinary paper (still do not read them), to the gluing, your aquarium is not stuck to the table and did not stay there forever.
Now, take the gun for sealant in hand and begin to spread the front wall of the first (I hope it is clear what it is). The most convenient way to do it on the line (rail), placing it under the advance anything to not touch the sealant itself line (rail) can be accurately carried out spout gun along the edge of the glass, thus necessarily resting on the very edge of this finger. In general, it is not necessary to be perverted - to do so, as it seems, the most convenient, the main thing that was smoothly and accurately. Sausage sealant squeeze out a gun should be about the same thickness as the thickness of the glass. Apply sealant along the vertical edges and along the bottom (at the bottom you can even make the seam thicker). Then laid seam along the lower edge of one end of the glass.
Now very carefully take both handles have smeared our front wall and puts it to the back of the bottom, presses its entire length and see to it that on the edges of this wall is performed from the bottom about the same distance. Then, with one hand holding the same wall with the other hand we put a prepared end to the bottom, a little bit at the same time rejecting the rear wall, so that it does not smudge on the vertical seam. Only after you have pressed to the bottom end, you may be accustomed and get end of the "end" (oil oily but otherwise not tell) in the vertical seam on the back. Only after this has put a second end.
After such training, sticking latest front wall you will not be difficult. Once all this mess collected and planted in the sealant, press all the parts glued at the joints so that between the United glasses had the least amount of sealant. And if you simply say, just do not leave a very thick seams. Their thickness should be approximately in the range of 0.5 - 1.5 mm. Do not resort to any technical or zamorochki when pressed against the glued parts, everything is done only handles.
We now explain why we can neglect the quality (only in the sense of beauty) at promazyvanii lower seams. Well, start with the fact that this is the bottom edge of the aquarium still something usually glued (decode) - so it is more beautiful. It is equally unimportant aspect is the fact that you need to avoid leaks of water (when water enters the air bubbles in the sealant), this all lower joints must be spread around the perimeter of a trowel or your finger. This your neighbors from the lower floors will be able to sleep better, knowing about your aquarium economy.
At the end of our work remains the only glue reinforcement ribs. This operation can be carried out later, when the dry tank. The fact is that in this case the bank will be put on the side and from the inside (by the way, so much more convenient), to the inside of the front wall perpendicular to stick the edges.
Dries sealant for long. Most sealants allow further work the very next day. The water in the aquarium should be ready to fill in only 7 - 10 days, after cutting off the outside of the hermetic surpluses inside we hope you got carefully.
A little about the edges of rigidity and what they need. In order to not burst tank. As a rule, the aquarium is exposed to stress. If the bottom of it is held by bending the adhesive seam, fasten it to the bottom, the top necessarily needed reinforcement ribs.
What is the tie and with what, as they say they are eaten. Sometimes the glass thickness is insufficient to keep the aquarium wall by bending and subsequent destruction as soon as stiffeners. Upon reaching certain proportion to the size on the glass thickness and the edges can not withstand loads and unfortunately cracked. To remove this tension in the transverse ribs placed screed. The screed can be one or more. The most important tie - this is an average, because it is just in the center of the aquarium wall it undergoes the greatest load.
And another no less important detail. Sometimes when gluing aquarium seams appear air bubbles. They are especially evident if you are used to bond a transparent sealant.
Why they are formed, where do and how to cope with this disaster? This usually occurs during or after gluing it - here's the problem in the uneven surface of the table (bench), which made the aquarium gluing, we talked about above or uneven glasses, which are glued together. Simply put, after you pressed glass, thus crushing the glue they stood in a not very usual for them the situation, and then come back to a more suitable position for them, bringing fresh stitches are stretched and they pop the bubbles.
It is best when you notice it right away, because it is possible to remove these bubbles. To push this back glass tank in areas where you have identified these bubbles to be replaced outside the sealing joints and then pressed glass must be secured in such position. In this case, use a rope, elastic, adhesive tape, etc. until such time until all is not well sealant dries.
If you notice bubbles in the seams in the dried-up and finished the aquarium, you will not be able to get rid of the bubbles. It is necessary to start all over again. Or exchange (for purchase) to another aquarium. Otherwise, the load on the joints will be over, and you risk to make repairs to their neighbors from the bottom and naturally pull the nerves themselves.
NOW ABOUT Fixtures for AQUARIUM:
We believe that the lighting for the aquarium is best done from plastic, but it is a purely private matter. Plastic has a number of advantages over wood and metal:
- Do not swell from moisture and does not rot like for example - wood.
- It does not rust like iron.
- About Security in an electric concept - generally can not speak.
- Finally easy to process during manufacturing, again, not in favor of iron and wood.
Now that some of the plastic cover to make a lamp? The most suitable is <polystyrene impact-lasting>, due to the fact that he is very easily processed, and then not very difficult to stick together. And also this plastic there are still a number of advantages - it does not shine, and that is not unimportant for a very very inexpensive price. Producing the plastic in sheet form is usually different thicknesses. He glued together by means of organic solvents, adhesives, such as for example, chloromethane, chloroform, dichloroethane. All these so-called adhesives can be completely found in shops or on the bird. Usually a way of working with these adhesives is quite simple - they are loaded into disposable syringes with needles (sold in the pharmacy).
Warning: You must be very careful in handling these types of glue. Since they are extremely toxic. Let's just say - it poisons. In this regard, the work of gluing polystyrene room should be well ventilated, as well as to eliminate contact adhesives on the skin of hands, face, eyes, etc. - It can even lead to death.
The design of the lamp, you can invent yourself as you have enough imagination or copy your favorite you previously seen in shops, exhibitions, etc.
All electrical parts lamp, better endure beyond the lamp, for example upward, to the lamps of course is not the case, it is to avoid the closure of the electrical circuits, as well as the electric shock of the owner. If for some reason this is not possible, then you can place the entire electrical stuffing inside, but it is necessary to consider a reliable insulation against water and condensation.
About the decoration is almost nothing to say - it can be a decorative film under the tree, and the like, which can be pasted cover and a variety of other materials. In general, this decision should be made by the user. Unambiguous advice here can not be. Everyone has their own tastes and preferences.
|
|


Comments
Commenting, keep in mind that the content and the tone of your messages can hurt the feelings of real people, show respect and tolerance to his interlocutors, even if you do not share their opinion, your behavior in terms of freedom of speech and anonymity offered by the Internet, is changing not only virtual, but real world. All comments are hidden from the index, spam control.