
Collect Rubik's Cube? It is not difficult

The puzzle "Rubik's Cube" ("Magic Cube", "Hungarian Cube" and even just "Rubik") attracted the attention, as they say, of "all groups of the population" and got the widest distribution. The merits of this wonderful puzzle, in which both schoolchildren and academics began to play with pleasure, finding dignity in it, consistent with the level of learning, education and propensity for research, we already wrote ( see Science and Life, No. 3, 1981, and No. 2, 1982 ) and even cited the methods of solution.
We will not touch on either the mathematical theory of groups or quantum physics, for certain sections of which the Rubik's cube serves as an original visual aid. Let's try to tell how to put in order the confused cube, and to those readers and readers who are very, very far from mathematics and from physics in general. Perhaps, there will be some usefulness in self-education, in broadening the horizon: after all, you will have to get acquainted with mathematical symbols and with drawings, although very simple. We hope that the desire to collect a cube will overcome their dislike for the exact sciences.
Therefore, we apologize in advance for the more prepared readers for the "excessive" details in the description: there have been a lot of letters asking "to tell so that it is clear to everyone, everyone ...".
Detailed instruction with explanations # 1
In square brackets [...] our explanations and tips are indicated.
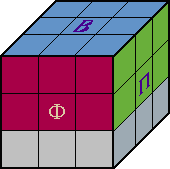
First of all, let us recall the system of notations adopted in the journal. The faces of the cube are denoted by the letters F, T, P, A, B, H - the initial letters of the words Facade, Rear, Right, Left, Top, Bottom . Which side of the cube to consider the front - blue, green, etc. - depends on you and the resulting situation.
In the process of assembly, you will have to take several times for the facade one or another side, convenient for this case. The central cubes determine the color of the face, that is, we can say that even in a completely confused cube the central cubes are already selected and each of them has to attach 8 cubes of the same color.
The central cubes are denoted by a single letter: ф, п, л, в, т, н.
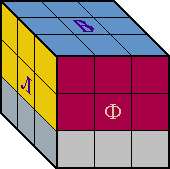
The edge cubes ( there are 12 of them ) belong to two faces and are denoted by two letters, for example, pn, pv, fn , and so on.
Angular cubes - in three letters by the name of faces, for example, fvv, fln ...
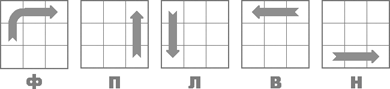
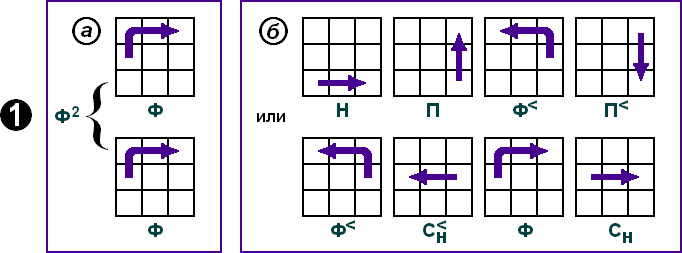
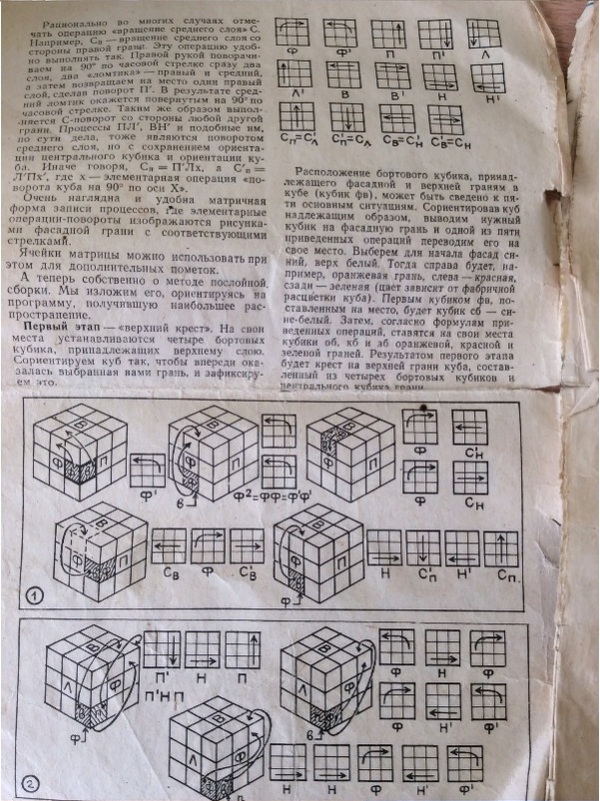
Capital letters Φ, Τ, Π, Λ ,,, Η denote elementary operations of rotation of the corresponding face (layer, slice) of the cube by 90 ° clockwise.
The notations Φ < , Τ < , Π < , Λ < , << , Η < correspond to the rotation of the faces by 90 ° counterclockwise.
The notations Φ 2 , Π 2 , etc., indicate a double rotation of the corresponding face ( Φ2 = ΦΦ ).
The letter C denotes the rotation of the middle layer .
The subscript indicates which side to make this turn from. For example, C n is on the right side side, C n is on the lower side. C <A - from the left, counterclockwise, and so on.
Recording the process (Φ < Π < ) H 2 (PF) means: turn the facade face counterclockwise by 90 °, the same - the right face, rotate the lower face twice (i.e., 180 °), turn the right side 90 ° Clockwise), turn the facade face.
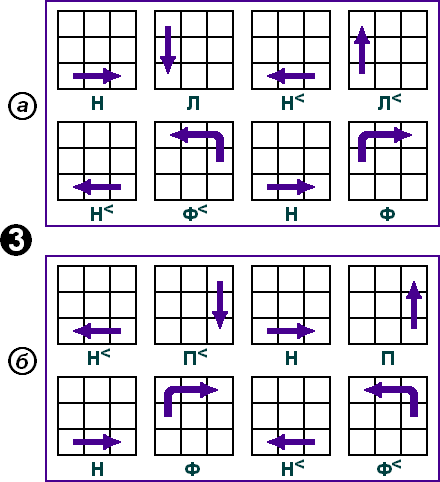
Along with the lettering of processes, a matrix form of recording is also used, where elementary operations are depicted by a drawing of the facade face with the corresponding arrows indicating the direction of rotation of the corresponding face:
Fig. 1
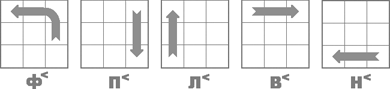
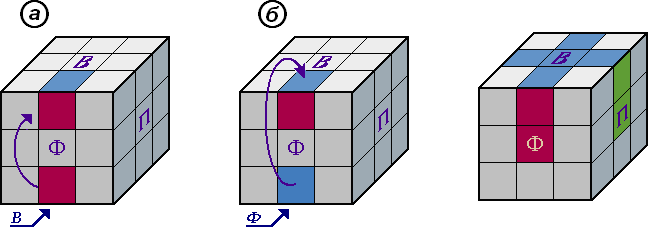
As a result of some operations, the central cubes leave their place - the cube changes its orientation. But, as you know, the color of the face is determined by the color of the central cube. To ensure that at the end of the task the orientation of the entire cube is the same as in the beginning, the operations of turning the entire cube, denoted by the letter O , are introduced:
- О П - from the right side side clockwise;
- About F - from the side of the front face clockwise;
- O B - from the side of the top face clockwise;
- O <n - from the right-hand side in a counter-clockwise direction;
- О <Ф - from the side of the front face in a counter-clockwise direction;
- O <B - from the side of the upper face in a counter-clockwise direction;
Fig. 2

Now let's move on to the actual assembly of the cube. There are several different systems, but we like the layered assembly most of all, when we first collect one layer, then the second, and finally the third. In total, seven stages are obtained.
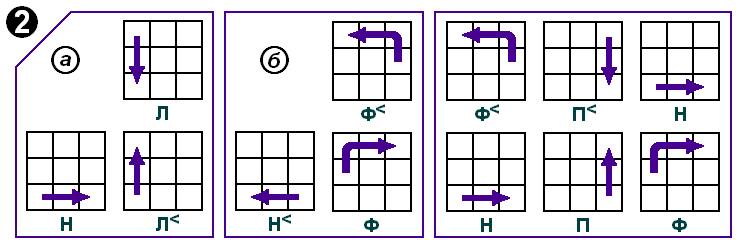
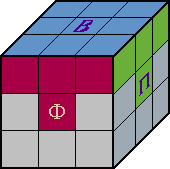
First step
Cross the top face
The required cube is lowered down by turning the corresponding side face ( P, T, A ) and is output to the facade face by the operation H, H < or H 2
Ends with a mirror-turn operation ( inverse ) of the same side face, restoring the original position of the affected edge cube of the upper layer.
After this, operation a) or b) of the first stage is performed.
In case a), the cube went to the facade face so that the color of its front face coincides with the color of the facade.
In case b) the cube should not only be moved upward, but it must also be deployed so that it is correctly oriented, becoming in its place.
On [color] drawings, points are marked with [arrows indicated] the place on which the desired cube should appear, which was previously drawn to the facade of the lower face.
Fig. 3
Result: the cross of the top face is collected .
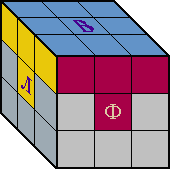
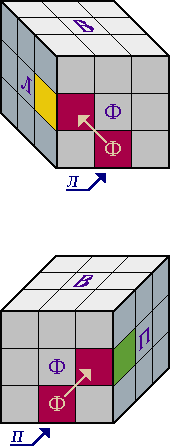
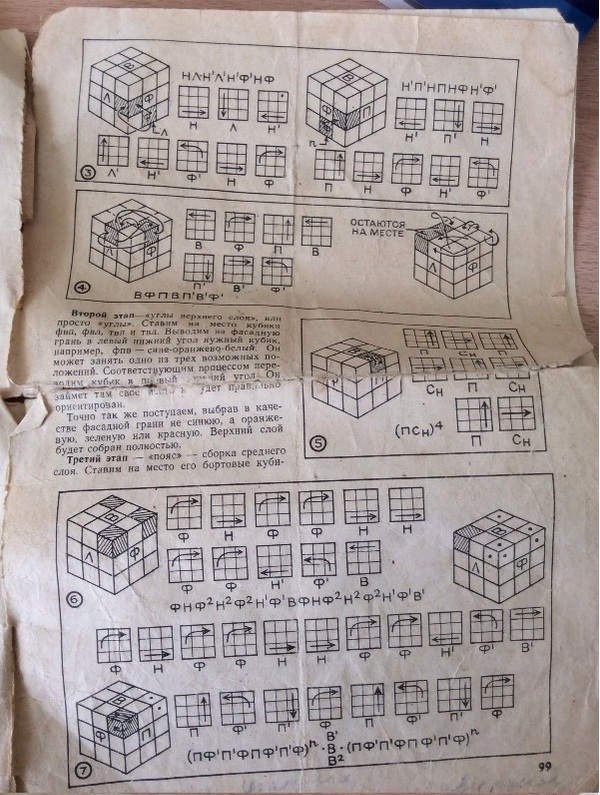
Second phase
The required corner cube ( having the colors of the faces Ф, В, Л ) and the same method as described for the first stage is found, is displayed in the left corner of the facade you have chosen.
There can be three cases of orientation of this cube. Compare your case to the picture and apply one of the operations of the second stage a) , b) or c) . The points are marked with [arrows indicated] the place [on the top face] , on which the cube you need should stand.
Look for the remaining three corner cubes on the cube and repeat the described technique to move them to their places of the upper face [taking the right, left, and back faces alternately in front of the facade] .
Fig. 4
Result: the top layer is selected.
The first two stages almost no one causes difficulties: it's quite easy to follow your actions, since all attention is drawn to one layer, and what is done in the two remaining ones is completely unimportant.
The third stage
Belt
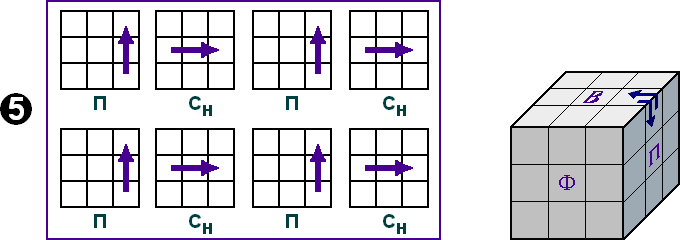
The processes shown in the figures are easily remembered if a mnemonic rule is applied. To move the cube drawn to the facade face to the left, the beginning of the process coincides with the initial letters NL - NALVO , and to the right - with the initial letters on the right .
And here, as you can see, the desired cube is found and first displayed down to the facade edge. If it is below - by simply turning the lower face to match the color of the facade, and if it is in the middle belt, then you must first lower any of operations a) or b) , and then combine in color with the color of the front face and perform the operation of the third stage A) or b) .
Fig. 5
Result: two layers are collected .
Fourth stage
Belt
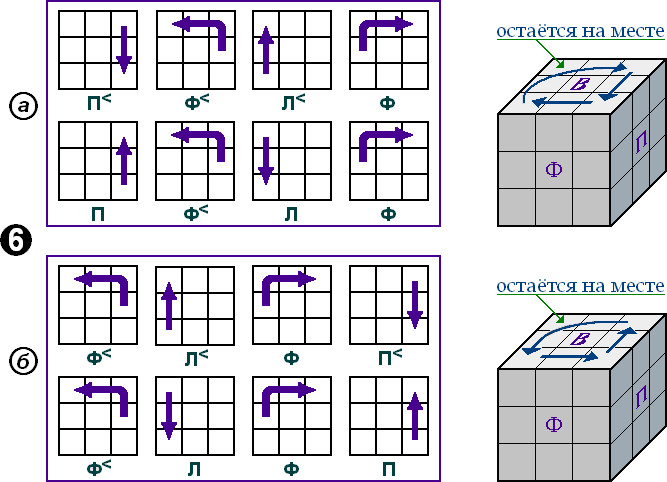
Cross of the lower face [initial designations of faces - Ф, В, П in Fig. 6 are given for the current task, but it is implied that the cube is inverted and its two upper layers, which are now below, are already collected] .
The goal is given by operations that move the side cubes of one face that do not ultimately destroy order in the assembled layers. One of the processes that allows you to select all the side cubes of the face is given in the figure. It also shows what happens to other cubes of the face.
Repeating the process by selecting another facade face, you can put all four cubes in place.
Fig. 6th

Result: the edge cubes stand in their places, but, as a rule, two of them are misoriented.
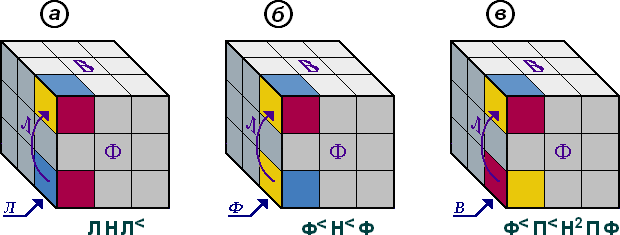
Fifth stage
Orientation of two side cubes according to D. Conway.
A very simple, easy-to-remember process, but it was here that some readers had difficulties. Here it is necessary to take into account: the unfolding cube should be on the right side, in figure [7] it is marked by arrows.
In Figures a) , b) , and c) the possible cases of disposition of wrongly oriented cubes (marked by dots) are presented. Using the general formula, in case a), it is required to perform an intermediate rotation B in order to bring the second cube to the right face, and in cases b) and c) respectively, B < and B 2 .
Fig. 7th
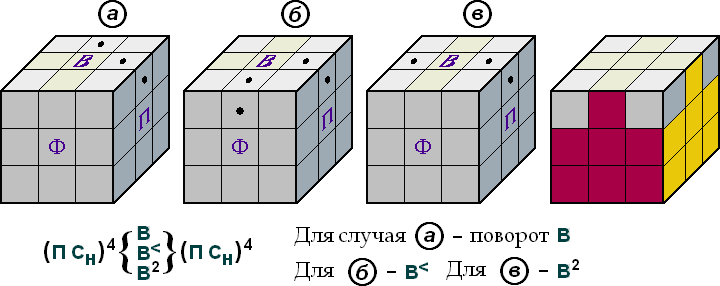
Many were confused by the fact that after the first part of the process (PS n ) 4 cubes unfolded as it should, but the order in the assembled layers was broken. It was confusing and forced to throw halfway up the almost assembled cube.
After completing the intermediate turn, - not paying attention to the breakdown of the lower layers, - perform the operations (PS n ) 4 of the second part of the process, and everything will fall into place.
Result: the cross of the last layer is collected.
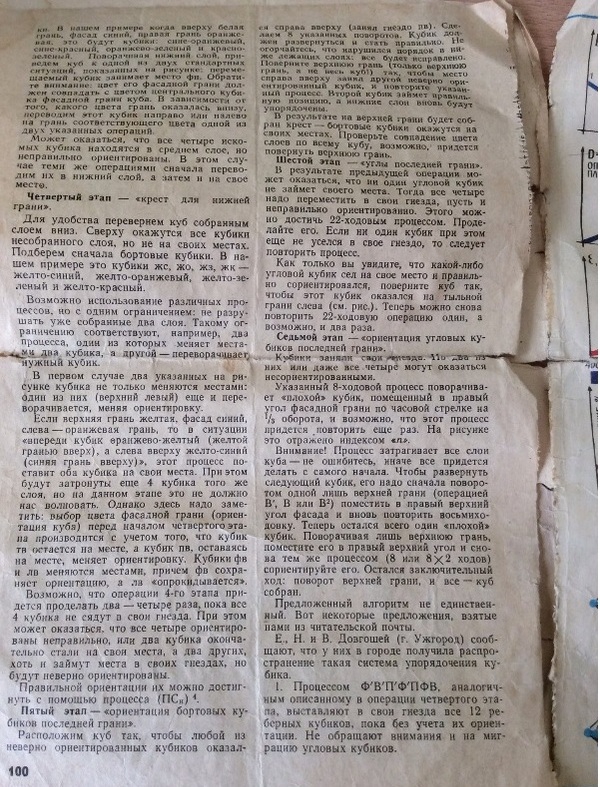
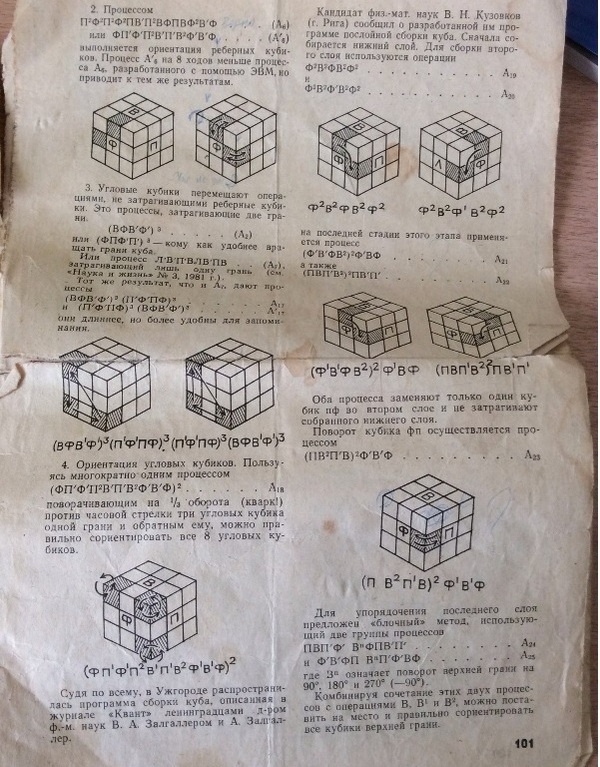
Sixth stage
The angles of the last face can be put into place using (...) the 8-way [ easy to memorize process] , a straight line that moves three corner cubes in the clockwise direction, and the reverse moves three cubes in the counterclockwise direction .
Fig. 8
After the fifth stage, as a rule, at least one [corner] cube sits in its place, albeit incorrectly oriented.
Turn the cube so that this cube is in the far left corner, and repeat the process once or twice until all the cubes are in their proper place.
Result: all corner cubes took their places, but two of them ( or maybe four ) are oriented incorrectly.
Seventh stage
Orientation of the corner cubes of the last face
The process is very easy to remember - it is a repeatedly repeated sequence of rotations of the PF < П < Ф .
Rotate the cube so that the cube that you want to unfold is in the upper right corner of the facade. The 8-way process ( 2 × 4 stroke ) turns it 1/3 turn clockwise . If the cube is not yet oriented, repeat the 8-move again ( in the formula this is indicated by the "n" index ).
Do not pay attention to the fact that the lower layers will become confused: the situation is similar to that done in the fifth stage, it is also a pair, split into two identical halves with an intermediate operation of turning the top face. The execution of the right side of the process automatically corrects the broken harmony.
Fig. 9
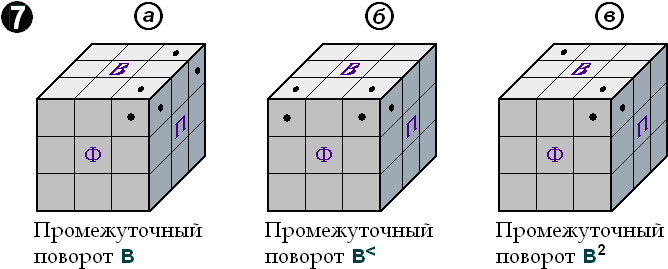
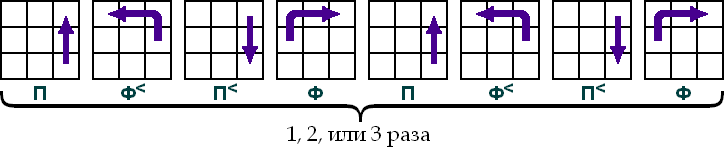
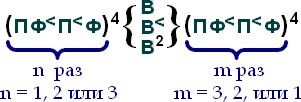
Figure [9] shows three cases of arrangement of "bad" cubes (they are marked with dots).
When:
- An intermediate turn B is required
- Turn B <
- Turn B 2
Result: the last face is collected.
Now it remains only to turn it and everything - the cube is collected, clap your hands!
Scans of the journal "Science and Life" from 1982 # 2
Here is the time-tested, old Soviet instruction. Then did not make a mistake and did not fool - this is an article from the journal "Science and Life" from 1982.
 Download instruction - How to assemble Rubik's Cube from Science and Life from 1982 # 2
 Virus Free by KAV
Another instruction "Collect Rubik's Cube" "# 3
 Download instruction - How to assemble Rubik's Cube # 3
Virus Free by KAV
Download instruction - How to assemble Rubik's Cube # 3
Virus Free by KAV

Comments
When commenting on, remember that the content and tone of your message can hurt the feelings of real people, show respect and tolerance to your interlocutors even if you do not share their opinion, your behavior in the conditions of freedom of expression and anonymity provided by the Internet, changes Not only virtual, but also the real world. All comments are hidden from the index, spam is controlled.