Guide MIT on the opening of locks picklock
Chapter 6 - Basic principles of "combing"
To train the opening of the lock at home, there is no need for haste, but during this autopsy, speed is always extremely important. This chapter describes one of the methods of opening locks, which is called "combing". Thanks to this method, most locks are quickly opened.
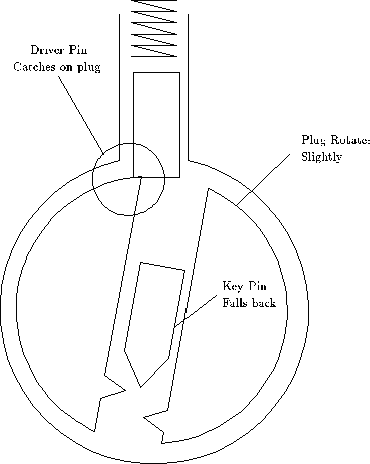
The longest step in opening the locks is usually to find the pin that closest to the wall of the hole. The force diagram ( Figure 5.5 ), considered in Ch. 5 , prompts a quick way of finding the right pin for lifting. Suppose that all pins can be characterized by the same force diagram. That is, suppose that they all fit tightly to the walls of the holes and they are the same friction. Now let's see what happens if we apply a master key to all the pins with a force that is large enough to overcome the forces of the spring and friction, but not large enough to overcome the force of the collision between the key pin and the body. Any pressure that is on the power chart above the horizontal line and below its top will work. When the pick passes through the pin, the pin goes up and touches the case, but it does not enter the case. See Fig. 5.3 . The pressure of the master key is counteracted by the collision force on the rotation line, and therefore the master key does not press the pin into the housing. When applied to the cylinder of the right amount of torque, it slightly shifts. When the key does not act on the pin, the key pin returns to its original position, and the guide pin is held at the top of the cylinder above the rotation line. See Fig. 6.1 . Theoretically, one effect of the master key on the pins is sufficient to open the lock.
In practice, one effect of the master key pushes only one or two pins, so several impacts are necessary. That is, you sort of "comb" the pins with a master key in both directions, simultaneously giving the cylinder a rotational moment. Exercises in Ch. 8 will teach you to choose the right torque given to the cylinder, and the correct amount of pressure on the pins.
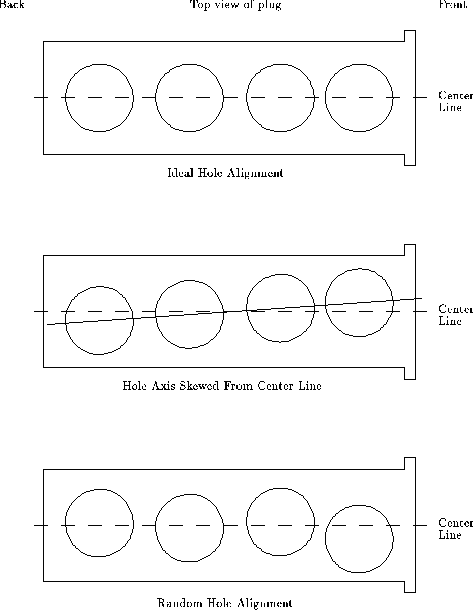
You may find that the lock pins tend to be pushed in a certain order. This order is determined by many factors (see Chapter 9 ), but the primary reason is the discrepancy between the central axis of the cylinder and the axis along which the holes are drilled. See Fig. 6.2 . If the axis of the pin holes deviates from the center line of the cylinder, the pins will be pushed one after the other when the cylinder is turned in one direction and also one after the other, but in the opposite direction, when the cylinder is turned to the other side. This defect occurs in many castles.
Carding is a quick method, since you do not need to spend time on each pin individually. It is only necessary to find the correct rotational moment of the cylinder and the pressure on the picklock. Fig. 6.1 illustrates all the steps of the process of opening the lock by carding. Exercises will teach you how to learn that you pushed the pin and how to properly use the force. If the lock does not open quickly, then, probably, it has one of the features described in Ch. 9 , and you will have to pay special attention to individual pins.

Fig. 6.1 . The guide pin clings to the cylinder

Fig. 6.2 . Arrangement of holes in the cylinder
- Insert the picklock and the lever. Without giving the cylinder a torque, remove the pick to feel the spring stiffness in the lock.
- Give the cylinder a small torque. Insert the picklock without touching the pins. When removing the picklocks, push the pins. The pressure should be slightly higher than the minimum pressure required to overcome the spring resistance.
- With each influence of the master key, gradually increase the rotational moment until the pins begin to be pushed.
- Keeping the rotational moment constant, comb in both directions the pins, which are not pushed. If the remaining pins do not push, loosen the torque and start again with the torque that was applied to the cylinder during the previous step.
- Once you push through most of the pins, give the cylinder more torque and comb the pins with slightly higher pressure. Due to this you push the pins that you pushed not high enough, for example, because of the beveled edges.


Comments
Commenting on, remember that the content and tone of your message can hurt the feelings of real people, show respect and tolerance to your interlocutors even if you do not share their opinion, your behavior in the conditions of freedom of expression and anonymity provided by the Internet, changes Not only virtual, but also the real world. All comments are hidden from the index, spam is controlled.