
Saving electricity at home and in the country.
Author: V. KUKLIN Zaporozhye
I want to offer readers an interesting in my opinion and useful device - a portable wind power plant. In the summer, I often rest on the beach with my family. Everyone understands that rest becomes much more comfortable, if there is a source of electricity. After the manufacture of the windmill, there was no need to save the on-board network of the car, it became possible to constantly use the radio tape recorder, lighting, TV, and during even a small wind - an automobile refrigerator.
I have made several variants of wind power plants. The proposed now is the most simple and accessible.
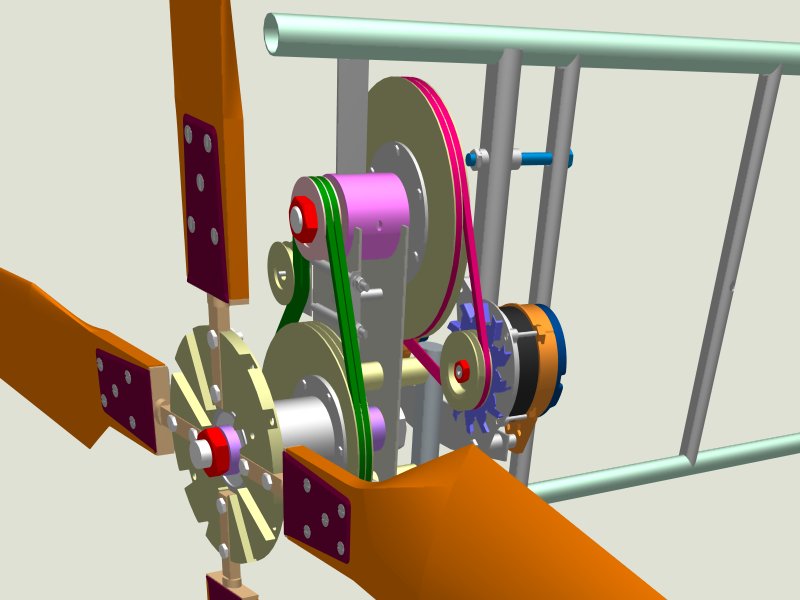
As a generator, the main unit of any power plant, a DC electric motor (U = 48 V, 1 = 15 A, n = 1200 rpm) is used. Rotor rotates with a frequency of less than 500 rpm, and as the wind increases, the revolutions do not increase, but the charge current increases. On the generator shaft there is a chain sprocket (Z = 10) from the D-6 bicycle engine. The driven sprocket (Z = 48) and the entire carriage block are taken from an adult bicycle. Ram had to saw and give it the right shape, and then brew. The generator is attached to the frame using M8 bolts.
The roller chain with a step of 1, 2.7 mm before installation, it is necessary to boil a few minutes in the engine oil, and then wipe with a rag. It is better to use a chain from a motorcycle: its service life is much longer.

I carved the new, longer arm shaft. When assembling the carriage unit, grease the bearings with Litol-24 lubricant or CIATIM. Then the nut M16 is screwed onto the shaft until it stops, the flange is put on (Fig. 3) and clamped with the other nut. To the flange, a disk is attached to the flange with eight bolts MB (Fig. 4) so that the projection of the flange 0 40 mm is inserted into the hole of the disk. The flange is manufactured as follows: on a lathe made of steel, the disc is turned out (Fig.3, pos.1), then the head of the socket wrench on 24 is cut off from the holder side in height to 20 mm, both these parts are coaxially and welded together. In this case, if only two blades are used, the disc and flange can be replaced with a steel plate (Fig. 1, pos. 3).
The blades are made of duralumin with a thickness of 2 mm. After manufacturing, they need to give an arc-shaped shape. To do this, the blade should be put on something round (for example, a tube with a diameter of 800 mm and a length not less than 800 mm) and bend along the line shown in the drawing. Then the blade is fastened with six screws to a wooden spoke, which is made of a scraped wooden block 36x55x500 mm. The spokes, in turn (using two M8 bolts each) are attached to the disc or plate.
To use a weak wind, 5-8 m / s, I made six identical blades. With a strong wind, I advise you to use only two. But even with a small wind with two blades, the windmill gives a current of 4-6 A at a voltage of 14 V. In principle, it is possible to reduce the length of the blades to 80 cm.
A pin (a piece of pipe 120-150 mm long) welded to the bottom of the frame is inserted into the pipe-mast with a small clearance. Before installation, it must be lubricated and a brass washer is laid on which the whole assembly will easily rotate in a horizontal plane and with the help of a removable stabilizer stand against the wind.
The mast 3-3.5 m long is made of a water pipe d 34 mm (not less). To the lower part of the mast, from the end of the pipe, the support pad (S 2-3 dm?) Is welded, to which, in turn, a 150 mm long pin and d 12-15 mm is welded. When installing the mast the pin simply sticks into the ground. At a distance of 1 m from the upper end of the mast pipe, along its circumference, I welded four M1O nuts to secure the stretch marks. It is better to make a mast from two parts - for convenience of transportation on a luggage carrier of the car. Under stationary conditions, it can be made from a different material, and a longer one.
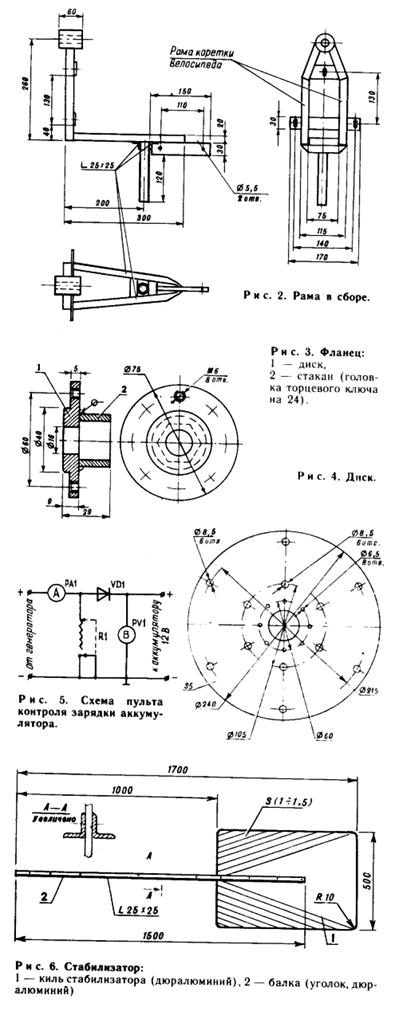
A few words about the control panel and charging the battery. It includes an ammeter and a DC voltmeter of any type, but better than small ones. Ammeter for maximum current 20-30 A, voltmeter for 15-30 V (from the calculation that the vehicle's on-board network is 12 V). The decoupling diode is of any type with a current of 20 A. As a rheostat, a wire resistance of the PPB-50G type can be used at 5-10 0 m, 50 W with modification: several turns of the wire need to be removed from the left edge so that the circuit breaks in the operating position. You can use any other resistor that can withstand a current of 20 A for a few seconds. And you need this for this: if the battery is fully charged and the voltage reaches 14-14.5 V, then short-circuit the generator for three seconds and stop it, the current is 3-4 times less than the working current. You can then attach one of the blades to the mast. The generator can not be shortened sharply, as the mechanism may break down. Manually, even with an average wind, it is very dangerous to stop the blade. Reduce this resistor charge current is also impossible, since it will burn out in a few tens of seconds. The charge current can be reduced by adding the number of lamps included in the socket. A live wire is any soft cable (better rubberized) with a cross section of 3-4 mm ?, which is passed inside the mast pipe.
Operation of wind farms for 10 days, even with two blades, showed that this energy is enough: after all, the wind on the sea almost every day.
Comment: In my opinion, the control electronics really make it more perfect. The proposed electrical circuit obviously needs further development. Instead of a diode, a diode bridge. You can add a voltage regulator, any simple (emitter follower) or a more complex and economical pulse stabilizer and the problem of recharging the battery will fall off of itself. And stable voltage is more versatile in application. Well, what is a voltage converter that would have access to 220 volts.
As an electric generator, various automobile and tractor generators are also perfectly suited. Excellent blades are produced using aviamodelnoy technology with twist (to maintain a constant step) - Longeron and foam filler, all glazed with fiberglass on epoxy. But this is already a complication, although the efficiency will increase by 20%.
Below is a construction of a wind generator with two generators.
Watch the same topic:
A homemade windmill with blades made of aluminum pipe with a homemade generator.
A homemade wind generator from a bicycle wheel.
Windmill 1.6m with your hands.

Comments
Commenting on, remember that the content and tone of your message can hurt the feelings of real people, show respect and tolerance to your interlocutors even if you do not share their opinion, your behavior in the conditions of freedom of expression and anonymity provided by the Internet, changes Not only virtual, but also the real world. All comments are hidden from the index, spam is controlled.