MIT Guide to picking locks opening
Chapter 4 - The main defect pins
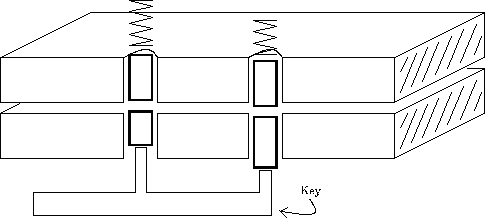
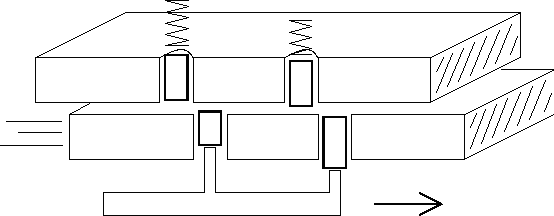
The horizontal model shows a major defect pick locks. This defect allows you to open the lock, picking up one pin at a time, and so you do not need a key to pick up all pins simultaneously. Fig. 4.1-4.3 shows how it is possible to push the lock pins one at a time. The first step of the procedure - subjected to the action of the bottom plate of the mechanical force directed along it. Because of this one or more pin are closely fitted to the walls of the holes of the upper and lower plates. The most common defect lock is that only one pin abuts up against the hole wall. In Fig. 4.1 close to the hole wall is making a left pin. It can push up the pick, see. Fig. 4.2 . When the top of the key pin reaches the sheer line, the bottom plate is slightly shifted. After the cessation of exposure to the key pin picking guide pin is held at the top of the bottom plate, and the key pin will return to the original position, see. Fig. 4.3 . As a result, a small displacement of the bottom plate new pin is closely adjacent to the wall hole. To push this new pin using the same procedure.
Thus, the method of opening the lock on the basis of one pin at a time is that the lower panel vozdeytsvovat mechanical force directed along it, find pin which is denser than the rest adjacent to the wall of the hole and push it upwards. When the top of the key pin reaches the line rotation, the movable part of the lock is slightly shifted, and the guide pin is hold above the sheer line. This procedure is called pushing the pin.
In Sec. 9 discusses various defects because of which only one pin is flush with the wall adjacent to the hole.
- 1. Apply a mechanical action.
- 2. Locate the pin more than all the other adjacent to the wall of the hole.
- 3. Push the pin upwards until it is established on the sheer line.
- 4. See para. 2.

Fig. 4.1 (a). Pin contact with the wall of the hole

Fig. 4.2 (b). Passepartout raises the pin, which is in contact with the wall of the hole

Fig. 4.3 (c). Left guide pulled across, pravyysoprikasaetsya wall with holes


Comments
Commenting, keep in mind that the content and the tone of your messages can hurt the feelings of real people, show respect and tolerance to his interlocutors, even if you do not share their opinion, your behavior in terms of freedom of speech and anonymity offered by the Internet, is changing not only virtual, but real world. All comments are hidden from the index, spam control.